If your computer doesn’t fully meet the system requirements of Windows 11 you may see a watermark “System Requirements Not Met” on your PC. This can get in your way and be quite distracting. However, there is a way to remove this watermark. It’s pretty easy and quick to do.
What you need to do to remove the ‘System Requirements Not Met’ in Windows 11
When it comes to operating systems for your computer, there isn’t much choice. In today’s computers, there are three main operating systems: macOS, Windows, and Linux. And if Linux is suitable for professionals in a very narrow direction. This system is put on the computers of different programmers or workers who need full and easy control over your computer.
MacOS and Windows are the most popular user systems. macOS is used on computers manufactured by Apple: Macs and MacBooks. The vast majority of all other computers use Windows.
Recently a new version of Windows has been released – Windows 11. It’s the successor of Windows 10. Many users are already actively migrating to the new operating system. It has a lot of advantages. Starting from a redesigned and more modern design to different software improvements that weren’t previously available in Windows 10.
It’s a really good and powerful system for your PC. And with the new features you get, Windows 11 is still fully compatible with the software you get with Windows 10 which means that you can upgrade to a new system and keep all your programs and data.
However, there is one major disadvantage to this upgrade. At the moment the build of Windows 11 is still quite raw and can cause a lot of bugs. In addition, Windows 11 is quite demanding and you need quite powerful hardware to run it on your PC.
Not all users have powerful enough computers to run Windows 11 stable. However, if users want to upgrade anyway, there are several ways to do it. In such a case, Microsoft has added a special watermark ‘System Requirements Not Met’. Which appears on your system if your PC doesn’t meet the system requirements.
Many users are wondering if there is a way to remove this watermark so it doesn’t get in the way. There is a way to do this rather quickly and easily.
How to remove the watermark with a special command
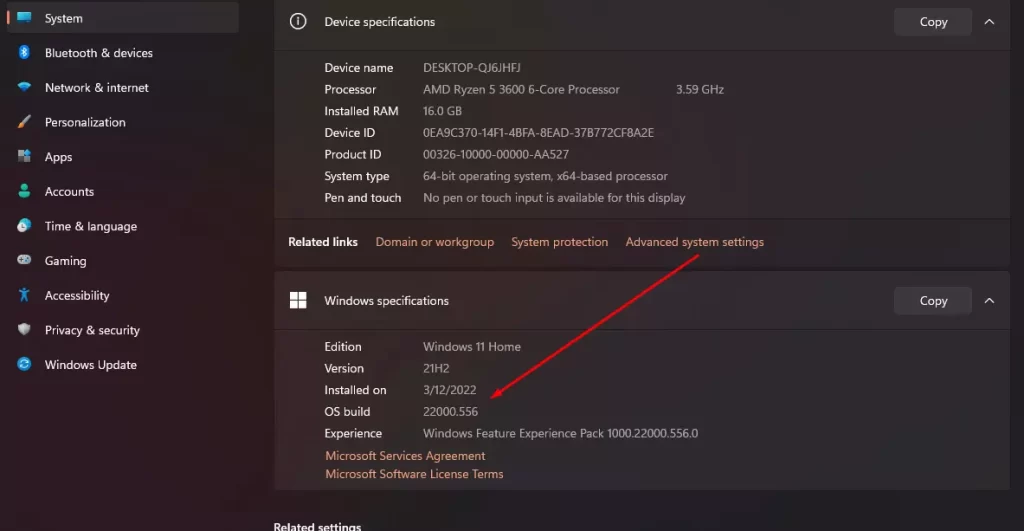
There is a fairly simple and fast way to remove the watermark with a simple special command. However, before you do that, you need to know what build of Windows 11 is installed on your PC. To do this you need to:
- To start, click on the Start button.
- Then go to Settings.
- After that, you need to click on the System tab, and then at the end of the list click the About button.

- Here you can find the item OS build this is the version of your build.

Next, you need to press Win + R to open the Run dialog. Here you need to enter
- reg add “HKEY_CURRENT_USER\Control Panel\UnsupportedHardwareNotificationCache” /v SV2 /t REG_DWORD /d 0 /f (If you have build 22557 or higher)
- reg add “HKEY_CURRENT_USER\Control Panel\UnsupportedHardwareNotificationCache” /v SV1 /t REG_DWORD /d 0 /f (If you have build 22500.88 and higher)
Alternatively, you can do this manually from the registry.
How to manually remove a watermark using the registry
There is another way you can remove this message manually. To do this, you will need to use the registry on your PC. To do this, you will need to:
- Press the Win + R key combination and type regedit.
- Then you will have a registry editor window open, here on the left side you will need to go to the HKEY_CURRENT_USER\Control Panel\UnsupportedHardwareNotificationCache folder.
- Then you need to select the SV2 Dword file and change the value from 1 to 0.
- In the end, you have to restart your PC.
These simple steps will help you to deactivate the “System requirements not met” watermark in just a few seconds. It can be done rather quickly and easily.


