

Microsoft Excel is the most popular spreadsheet program on the market. This is especially true for the corporate segment. This is so because Microsoft has added to its service many valuable features and tools that make working with data and spreadsheets as easy as possible. Including modern Excel has online functions that will allow you to work on one table with other users. However, some tables can be password protected because of this. But how can I open and change a spreadsheet without a password?
You can use several ways to make changes to a spreadsheet without a password, but they are not strictly legal, and you will need to use third-party services or applications to use them. It might be easier to ask the table’s creator for the password. However, if that is not an option, below I will describe known ways to break the password of an Excel document.
What is password protection in Microsoft Excel?
Let’s start by breaking down what Excel password protection is and how it works. Everything is very clear from the name. You can set a password for a single sheet or an entire document. As long as your document remains password-protected, no one can change it unless they type in a password that only you know. This is a great way to keep your data safe if other people access the document.
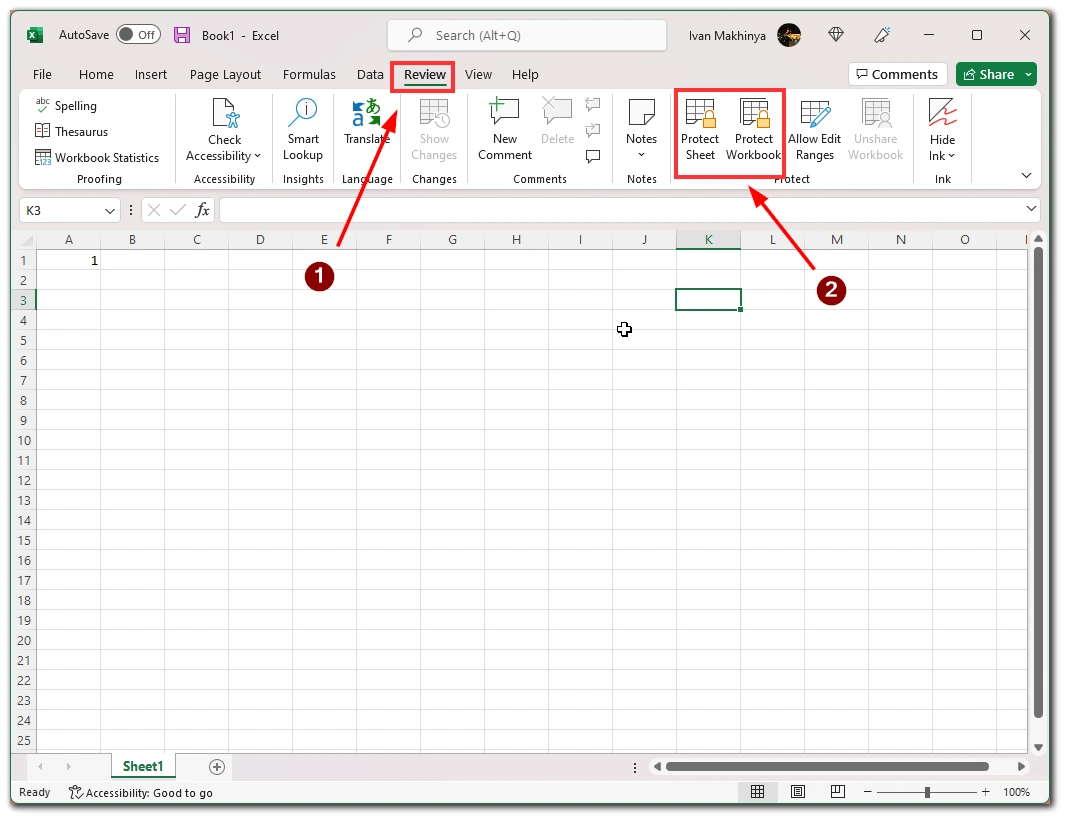
You can lock your document directly from the Review tab above the toolbar. There are particular Protect Sheet and Protect Workbook buttons. Once you click on them, your document will be protected, and no changes can be made. If you need to remove the password, click the Unprotect Sheet or Unprotect Workbook button in the same tab. Then you have to enter the password, and now you can change the document.
Note that this password is not the most robust protection you can give, as there are a few examples of how to break it below. I advise you to make a copy of the document if you have important data and keep the copies in a place where no one else has access. This will help protect your data as much as possible.
How to unprotect Microsoft Excel without a password
In case you have one sheet locked in Excel, I know three ways to unlock editing. You will need the 7zip app, Visual Basic, built into Excel or Google Sheets to do this. All these ways are tested and can help you unlock your document. Let’s take a closer look at how to do this:
Remove password with VBA Code
You don’t need any additional applications or add-ons to do this. All you need is to use the power of the VBA Code. This feature allows users to create different Excel tools using rudimentary programming manually. Let’s see what kind of code can break your password:
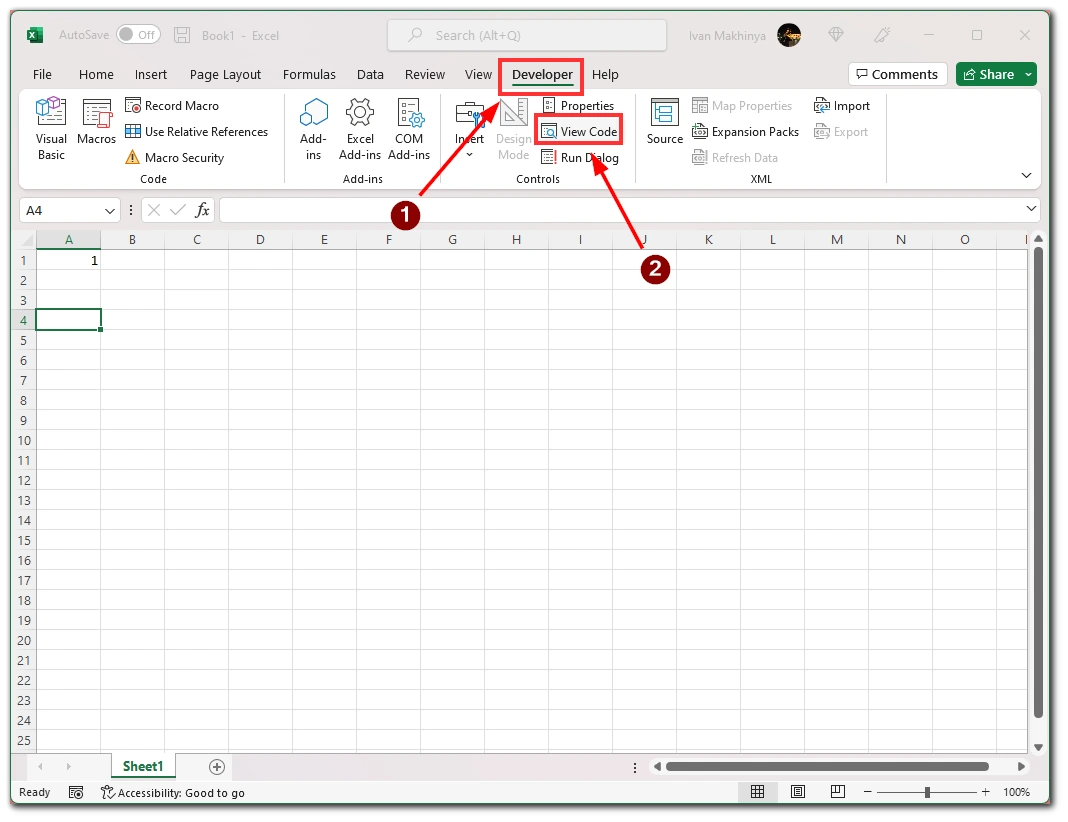
- Open your document and go to the Developer tab above the toolbar.
- This is where you click on View Code.
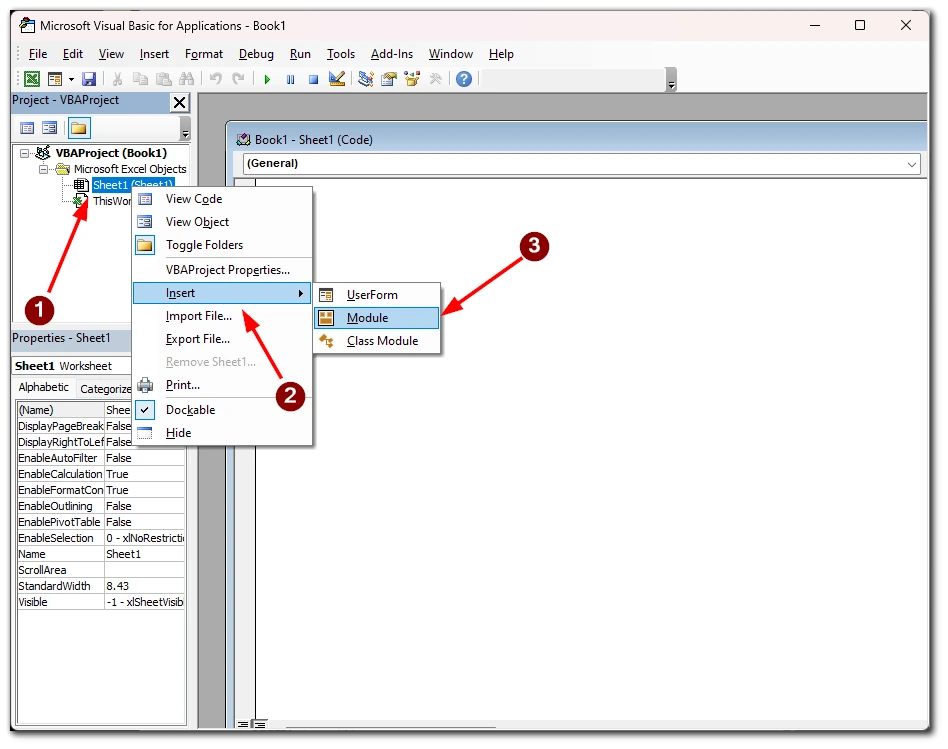
- The Visual Basic menu opens in front of you. On the left side, select your sheet and right-click on it.
- In the drop-down menu, hover over Insert and select Module.
- In the Code window of the protected sheet, enter this code:
Sub PasswordBreaker()
Dim i As Integer, j As Integer, k As Integer
Dim l As Integer, m As Integer, n As Integer
Dim i1 As Integer, i2 As Integer, i3 As Integer
Dim i4 As Integer, i5 As Integer, i6 As Integer
On Error Resume Next
For i = 65 To 66: For j = 65 To 66: For k = 65 To 66
For l = 65 To 66: For m = 65 To 66: For i1 = 65 To 66
For i2 = 65 To 66: For i3 = 65 To 66: For i4 = 65 To 66
For i5 = 65 To 66: For i6 = 65 To 66: For n = 32 To 126
ActiveSheet.Unprotect Chr(i) & Chr(j) & Chr(k) & _
Chr(l) & Chr(m) & Chr(i1) & Chr(i2) & Chr(i3) & _
Chr(i4) & Chr(i5) & Chr(i6) & Chr(n)
If ActiveSheet.ProtectContents = False Then
MsgBox "One usable password is " & Chr(i) & Chr(j) & _
Chr(k) & Chr(l) & Chr(m) & Chr(i1) & Chr(i2) & _
Chr(i3) & Chr(i4) & Chr(i5) & Chr(i6) & Chr(n)
Exit Sub
End If
Next: Next: Next: Next: Next: Next
Next: Next: Next: Next: Next: Next
End Sub
- Then click on Run and choose Run Sub/UserForm from the drop-down menu.
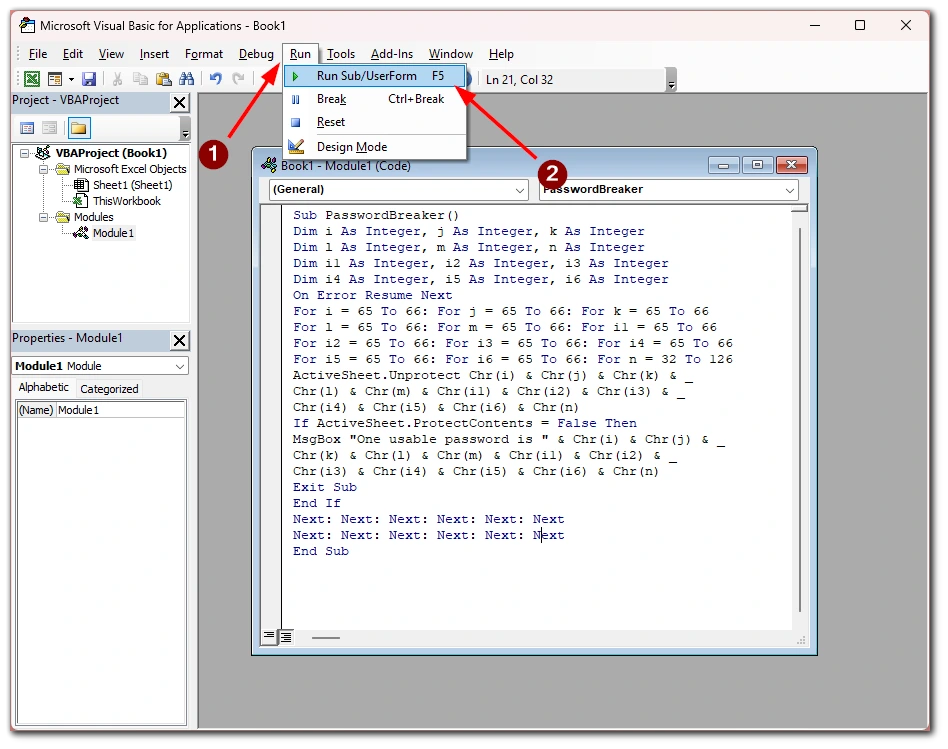
It may take a few minutes for the program to think about it. After that, you will see a popup window showing you the cracked password. It will likely not be the original password, just a bunch of letters, but it should work. Click OK and enter it if Excel asks you for it.
Use Zip
This method is that you need to turn your Excel document into a Zip file and then make changes in the text document responsible for the functionality and content of your Excel document. To do this, you need to:
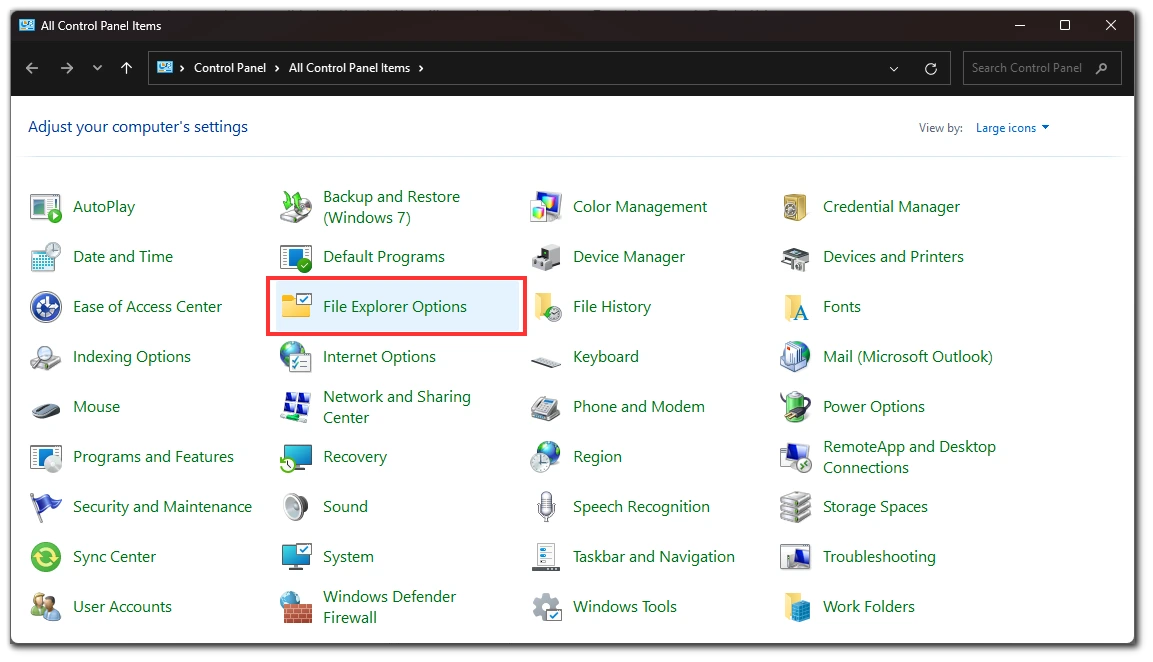
- Open the Control Panel and select File Explorer options.
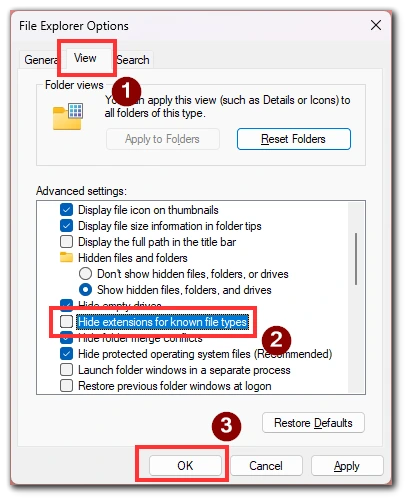
- Click the View tab and check Hide Extensions for known file types. Click OK.
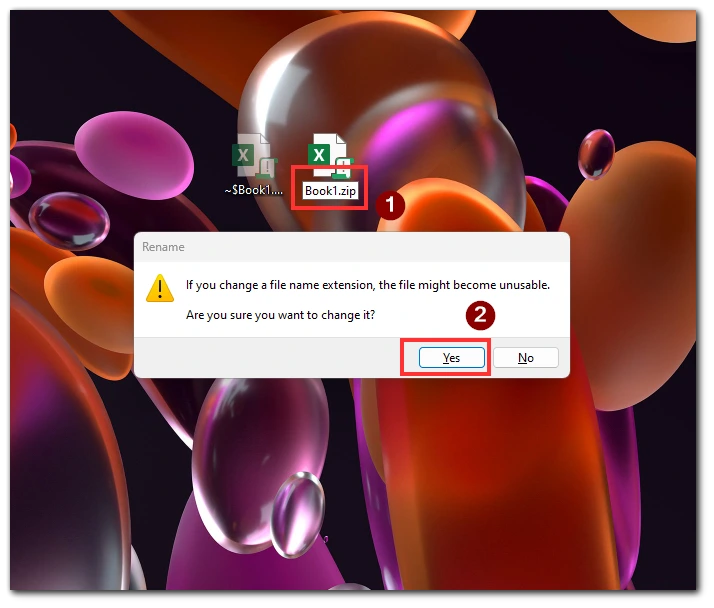
- Then go to your document and change its extension from .xlsx to .zip.
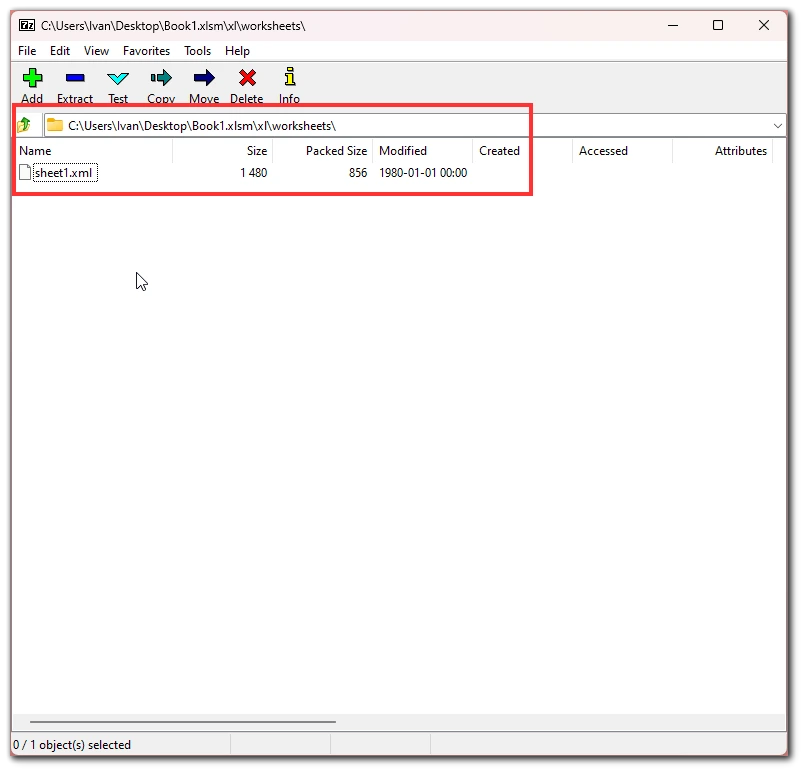
- You will then be able to open the file as an archive with 7zip. Open it and go to the /xl/ folder.
- This is where you need to go to the worksheets folder and open the XML document with the name of your worksheet.
- Find such a line in that document and delete it:
<sheetProtection password=… /> - In case you need to remove the password from an entire workbook, you need to find and do this line
<workbookProtection workbookPassword= …/> - Then save the document, change the extension from .zip to .xlsx. and open your document.
In this case, the password will be just cut out of the document. Also, by looking into the document before deleting the string, you can find the password to unlock the document. If there is too much data in this document, you should use the shortcut “Ctrl + F” to search through the document.
Use Google Sheets
The last method is a little trick. It lies in the fact that you can import data into Google Sheets and create a new document there. This way, you can access the data in your document, but you can not work with the original. If it’s the data that you want and the original isn’t that important, you can resort to this method.
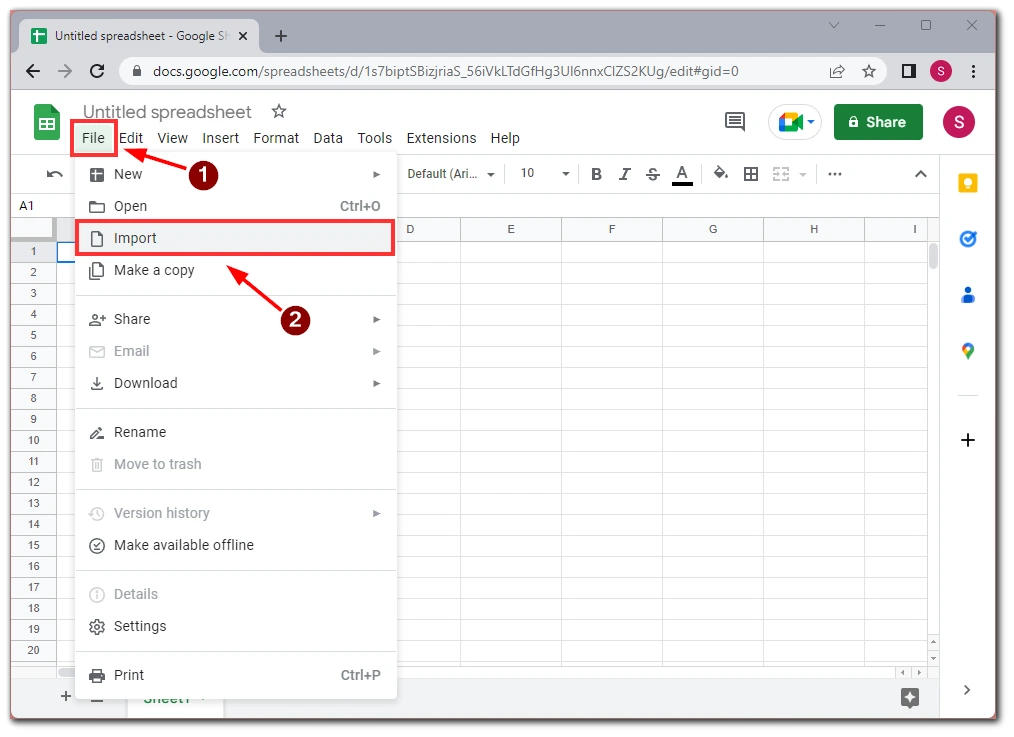
To do this, create a new document and then, using the File button, select Import and load your Excel document; then, all the data will be transferred automatically, and there will be no password.


