

Screen sharing is a standout feature on Discord, allowing you to broadcast your entire screen or a specific application. This is particularly useful when you conceal irrelevant information from the person you’re communicating.
Discord provides two primary screen-sharing methods: through a voice call or within a server channel. The process for both is broadly similar. Click the “Share Your Screen” button, choose the screen or application you wish to share, and then click “Go Live.”
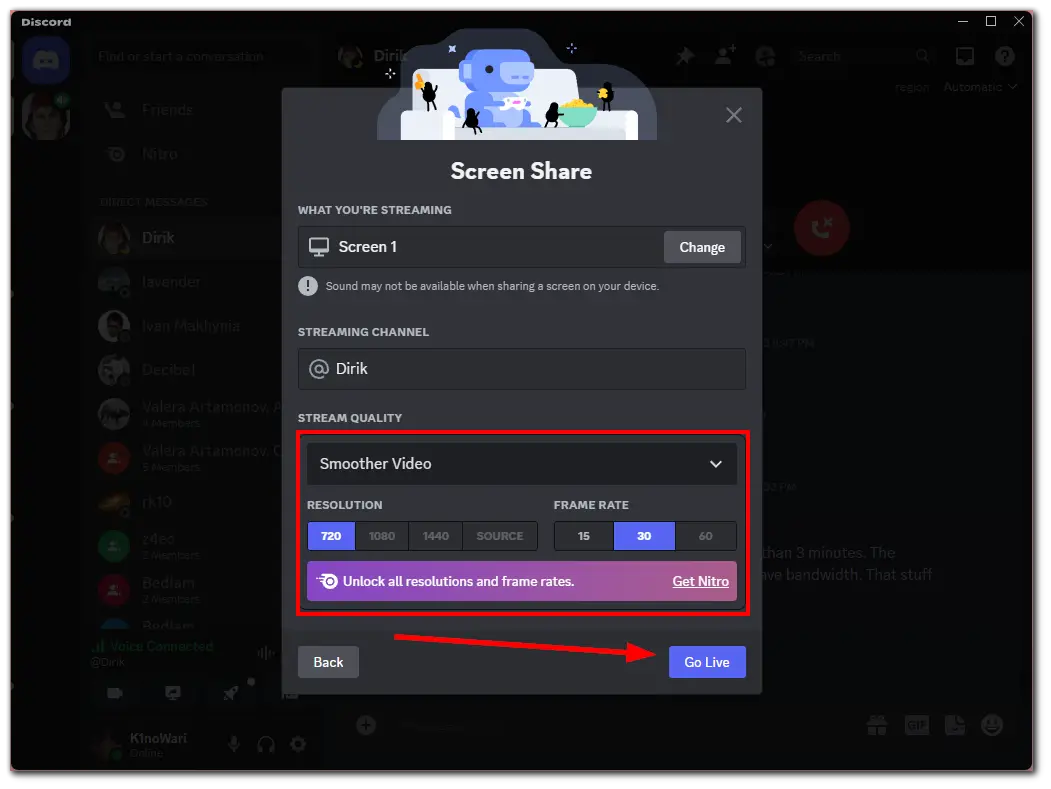
Discord also offers adjustable quality settings for screen sharing, ranging from a resolution of 720p to 1440p and a frame rate from 15 to 60 FPS. However, these enhanced options are exclusive to users with a Nitro subscription. Standard users without this subscription are limited to streaming at 720p and a maximum frame rate of 15/30 FPS.
For most users, these basic settings are sufficient. However, a Nitro subscription can benefit those who frequently stream to larger audiences and require higher streaming quality.
Here is an in-depth guide on how to use the screen-sharing feature on Discord.
How to share your screen in a voice call on Discord
In addition to what I said above, I would also like to add that you can screen share not only through the Discord desktop app but also on your mobile device. So let’s look at how to do it both ways.
To share your screen in a voice call on Discord, follow these concise steps:
- Join a voice call on Discord.
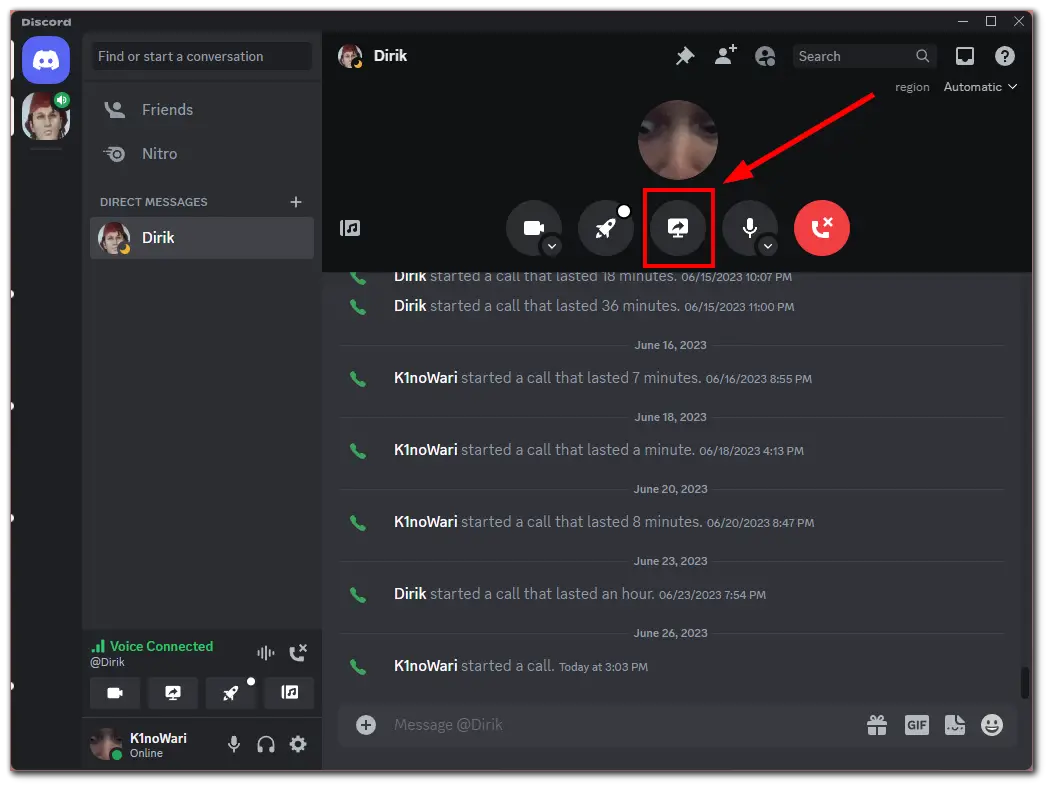
- Look for the “Share Your Screen” icon, typically located at the bottom of the call interface.
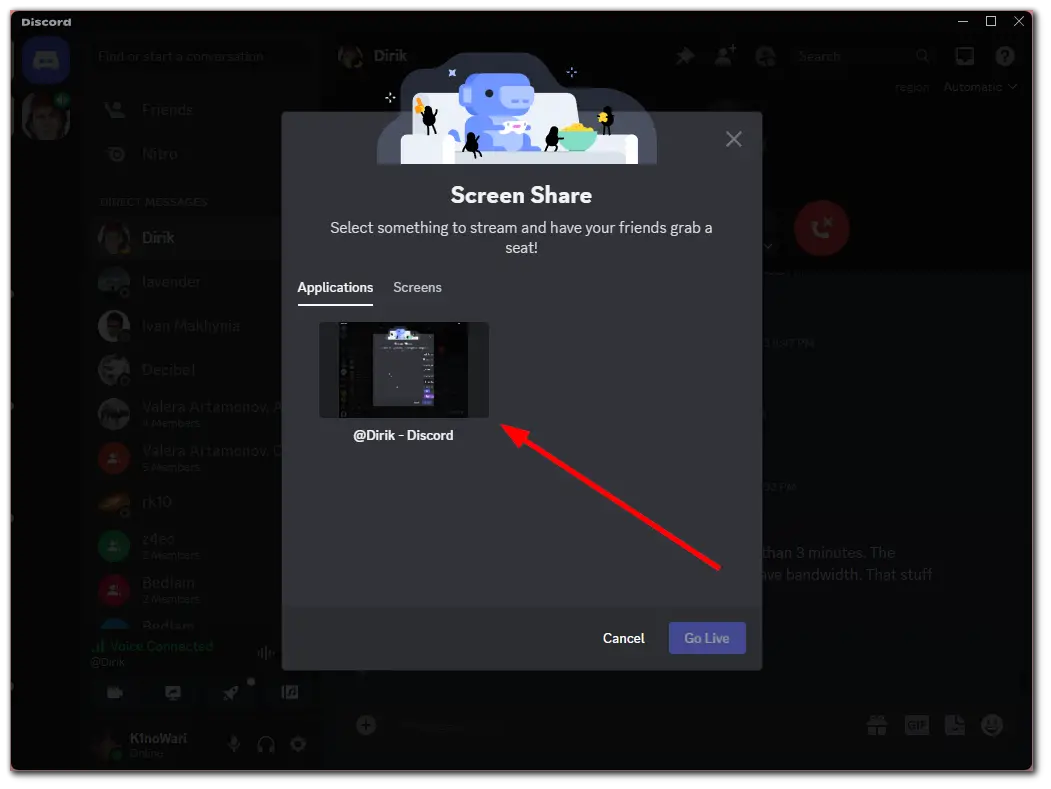
- Click on this icon, which will prompt a window to select either your entire screen or a specific application window for sharing.
- Choose the desired screen or application you wish to share.
- Select the streaming resolution and frame rate. Note that higher settings may require a Discord Nitro subscription.
- Click “Go Live” to start sharing your screen with other call participants.
Now detailing how to do it on different devices with visualization in screenshots.
Screen broadcast: voice call in Discord on PC
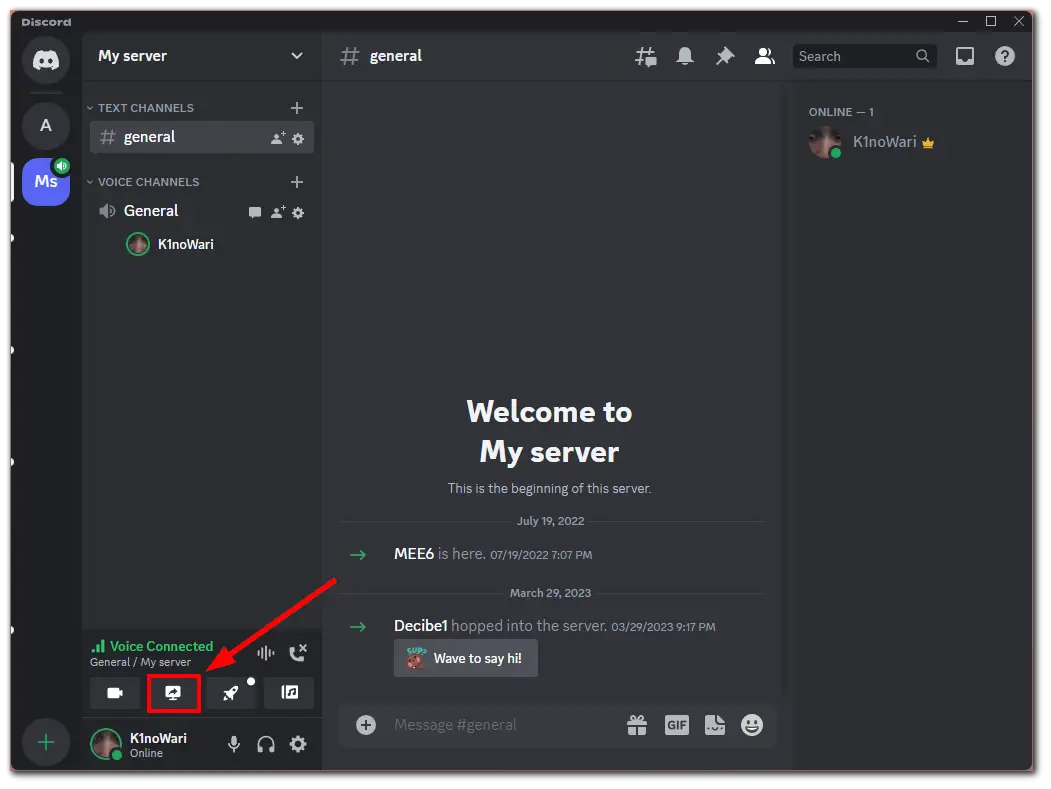
- Once you start a voice call, click the Share Your Screen button.
- Select the screen or application you want to stream.
- Adjust the quality settings and click Go Live.
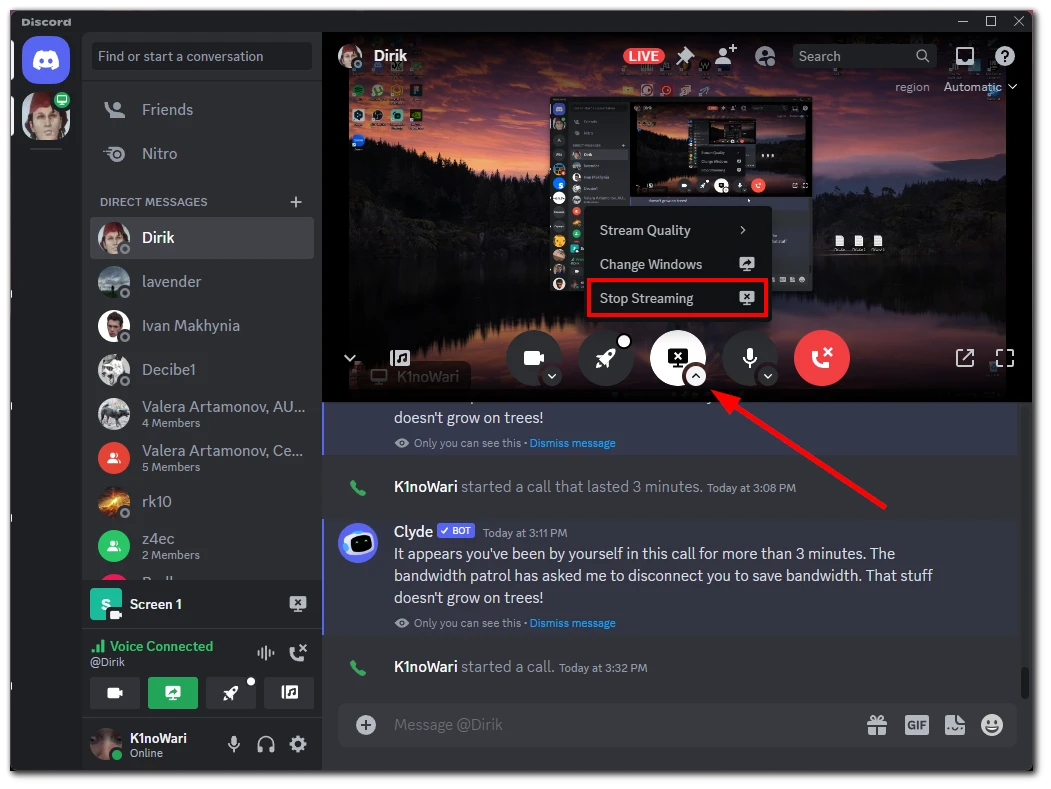
- To stop screen sharing, return to Discord and click the Stop Streaming button.
Screen broadcast: voice call in Discord on mobile
- Once you start a voice call, open additional options from the bottom and tap Share Your Screen.
- After that, tap Start Broadcast.
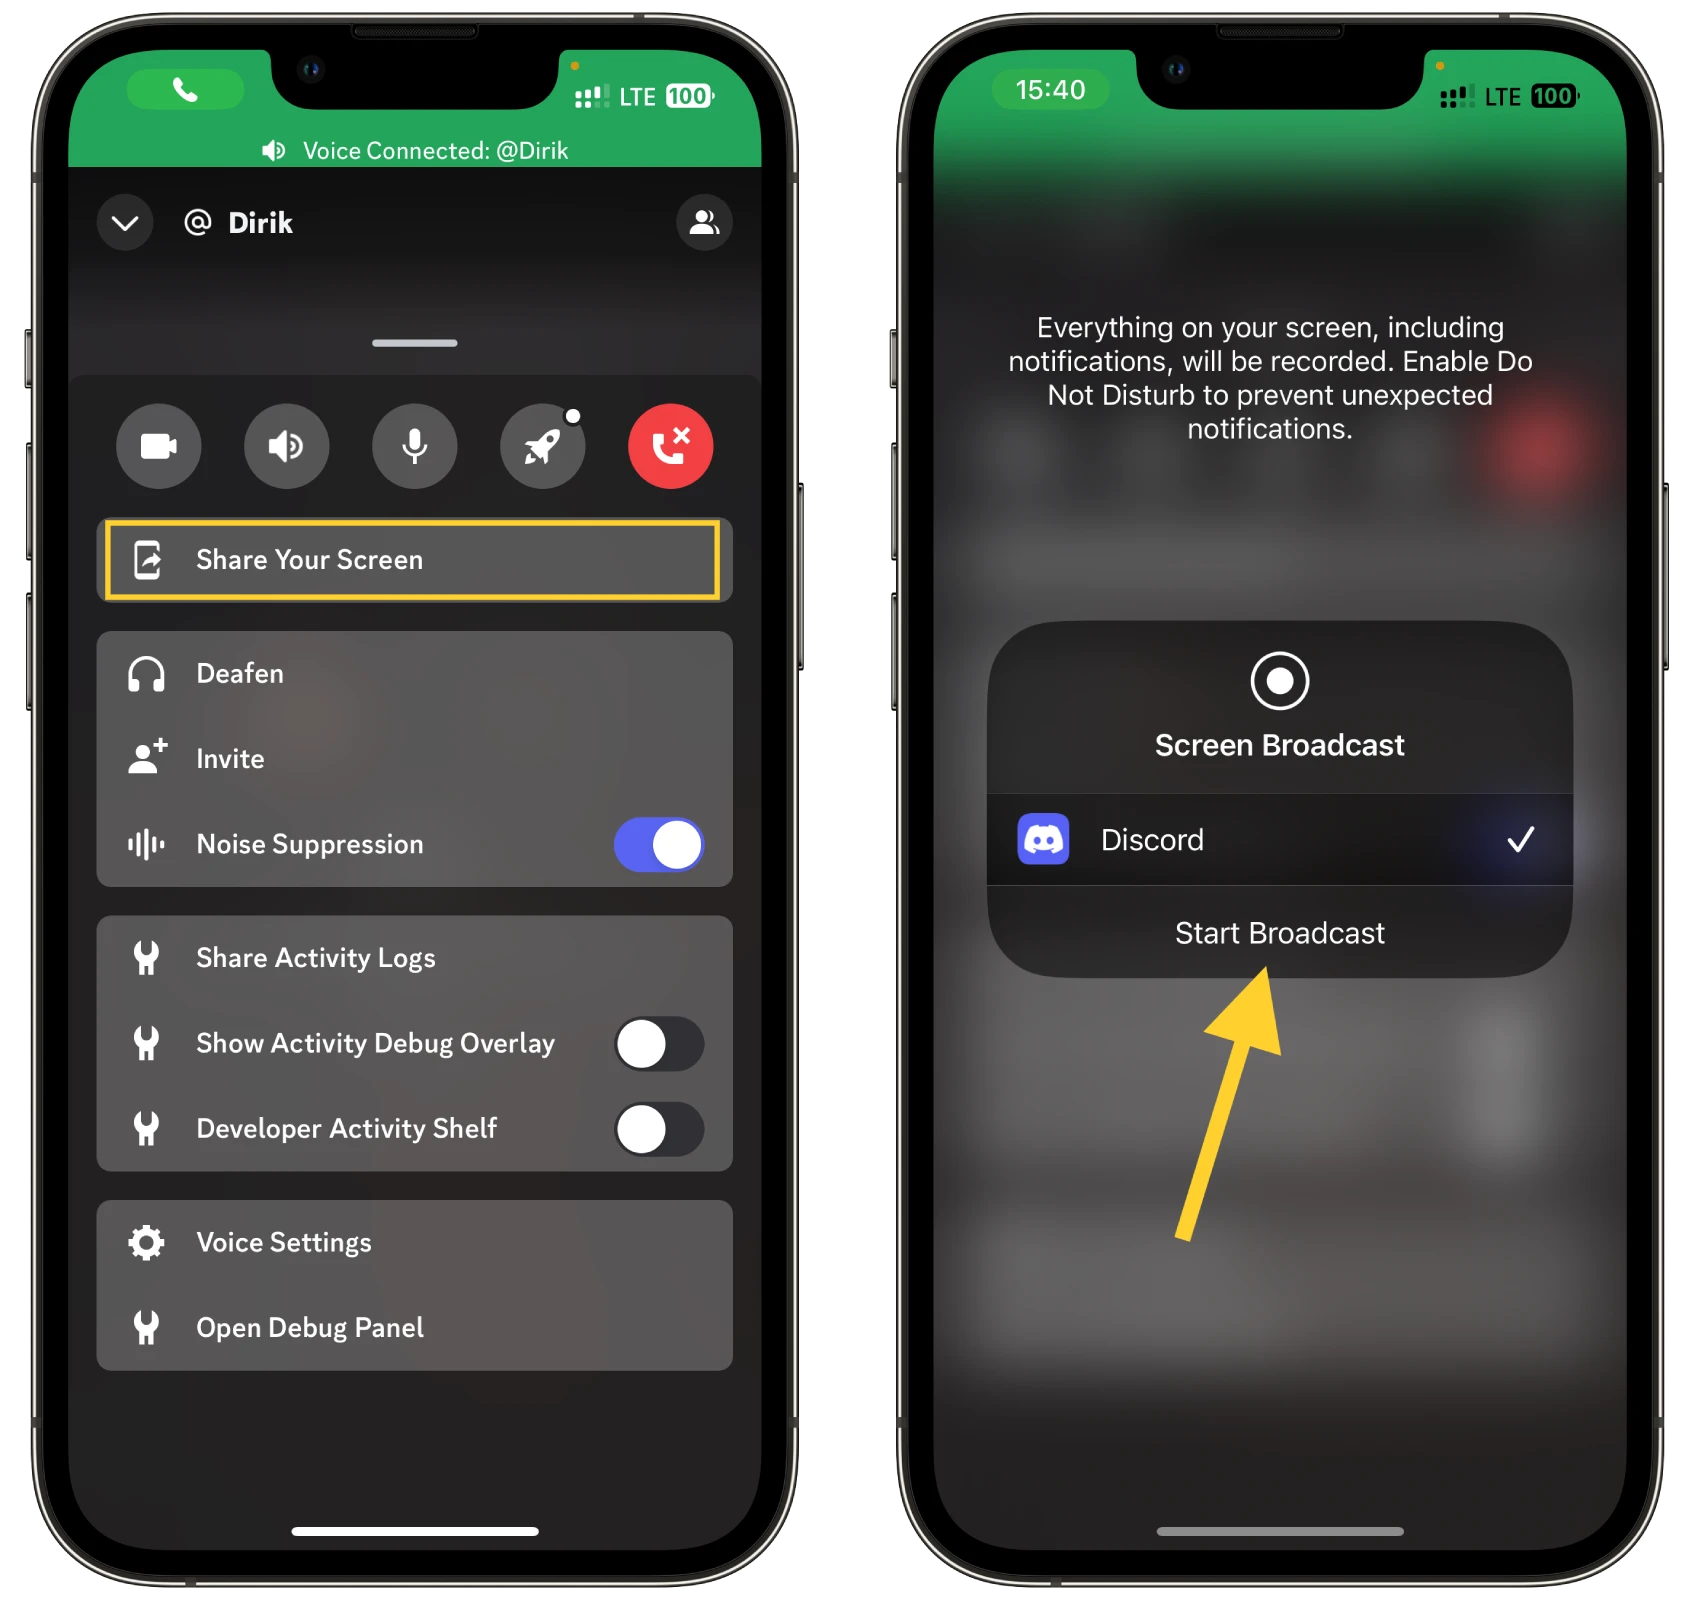
- To stop screen sharing, return to the Discord app and tap Stop sharing.
This will end the screen share session, and your screen will no longer be visible in the voice call.
How to share your screen in a server channel on Discord
Here’s the same situation as above but with a slight difference.
If it’s your server, then you won’t have any problems. But if you enter someone else’s server, you may not have permission to share your screen. So keep that in mind and, in case of doubt, contact the admin before you start streaming.
To share your screen in a server channel on Discord, follow these straightforward steps:
- Navigate to the server where you want to share your screen.
- Join a voice channel within the server.
- Once in the voice channel, locate and click on the “Share Your Screen” icon. This is typically found at the bottom of the Discord interface.
- A window will appear, prompting you to select either your entire screen or a specific application window for sharing.
- Choose the screen or application you wish to stream.
- Select your preferred streaming resolution and frame rate. Keep in mind that higher quality settings might be available exclusively to Discord Nitro subscribers.
- Click “Go Live” to begin broadcasting your screen to others in the channel.
Let’s look at how this works on desktop and mobile.
Discord screen broadcast: in the server channel on PC
- Go to the server and enter the voice channel.
- Then click the Share Your Screen button at the bottom left.
- After that, in the same way as shown above, select the screen or app window you want to stream, choose the frame rate and resolution, and click Go Live.
- To stop screen sharing, click the Stop Streaming button, just like in a voice call.
Discord screen broadcast: in the server channel on mobile
o broadcast your screen on Discord while in a server channel using a mobile device, follow these steps:
- Open Discord App: Launch the Discord app on your mobile device.
- Navigate to Server: Go to the server where you want to share your screen.
- Join a Voice Channel: Enter a voice channel within that server.
- Start Screen Sharing: Once in the voice channel, you’ll find an option to share your screen. This is usually represented by a screen or monitor icon.
- Select Screen Sharing Options: Upon tapping this icon, you might need to select what part of your phone screen you want to share or confirm the screen sharing action. Note that the exact options might vary depending on your device and app version.
- Broadcast Your Screen: After selecting and confirming your options, your mobile screen will start broadcasting to other members in the voice channel.
- Stop Sharing: To end the screen sharing session, simply click the stop button or exit the voice channel.
Remember, the performance and quality of the screen sharing might depend on your device’s capabilities and your internet connection. Additionally, the Discord mobile app interface may vary slightly between iOS and Android devices, so some steps might be slightly different.
How to manage your stream on Discord
During your stream session, you can change different parameters. Let’s take a closer look at what you can do:
- First, click the little arrow icon under the highlighted screen share button. There you will have some options.
- Stream Quality: If you have a Nitro subscription, you can change your stream’s Frame Rate and Resolution.
- Change Windows: If multiple monitors are connected to your computer, you can select the specific screen you want to share. Alternatively, you can choose to share a specific app window instead.
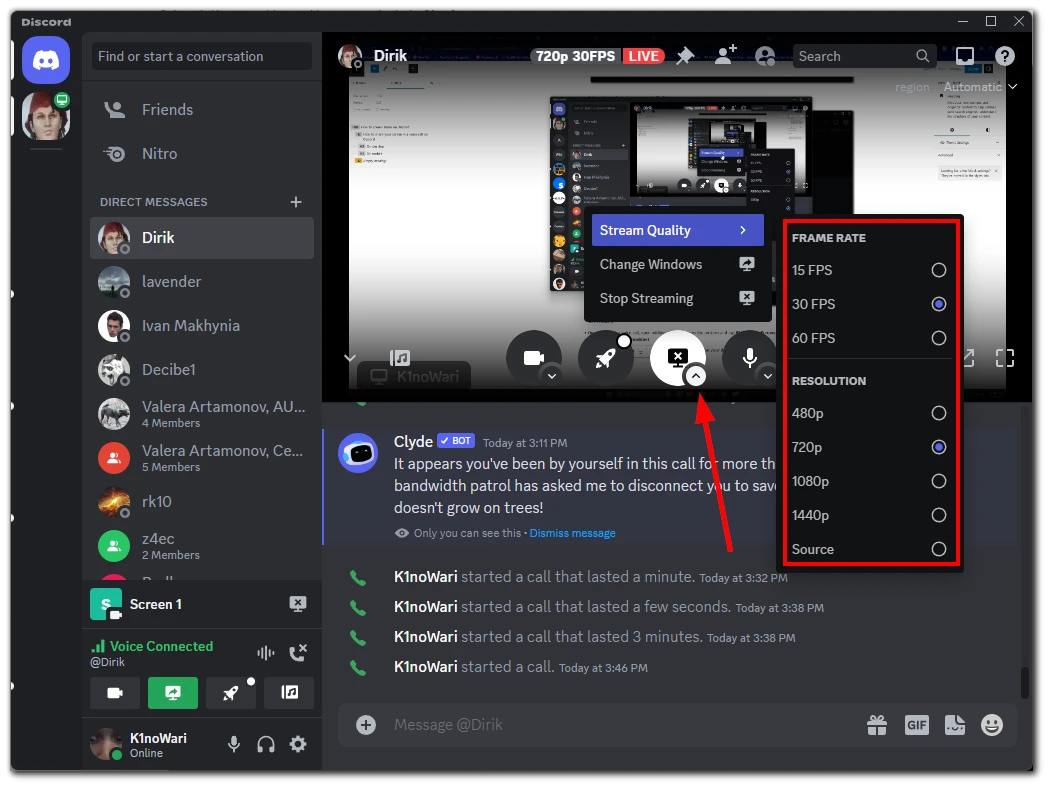
These options are only available for the Discord desktop app.
How to allow screen sharing on a Discord server
You can allow or prohibit screen sharing separately for each voice channel on your Discord server. Here’s how:
- Go to your server, highlight the voice channel, and click the gear icon to open its settings.
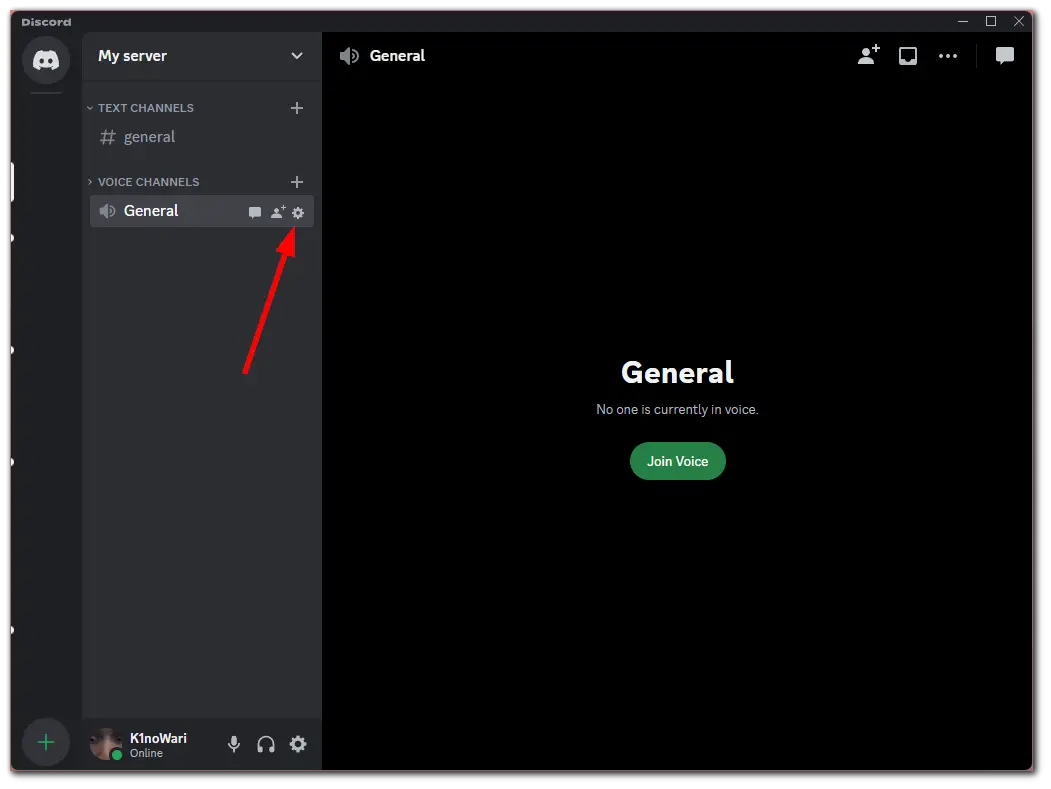
- Next, navigate to the Permissions tab and scroll down to Video.
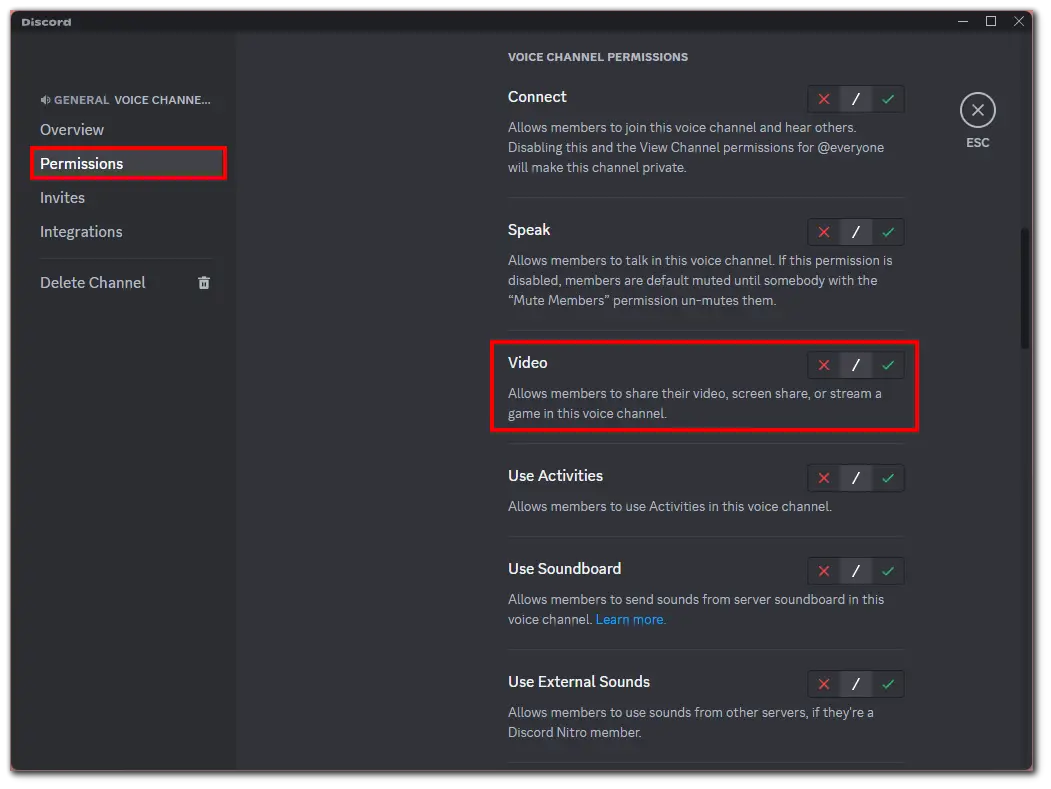
- To disable this permission for server members, click on the red cross icon. To allow it, click on the green checkmark.
- Finally, click Save Changes.
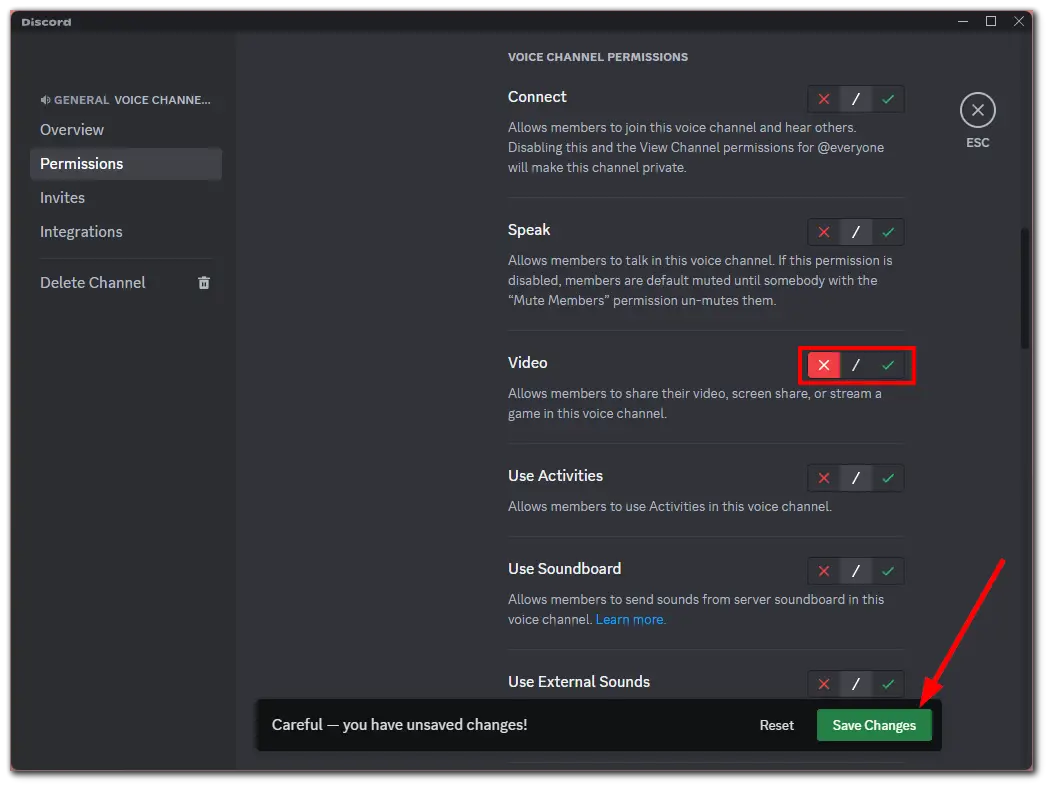
Once you have completed these steps, ask someone to start screen sharing on your server to check if everything works well.
Is it safe to screen share on Discord?
Screen sharing on Discord is generally safe when used within the platform’s intended guidelines. However, exercising caution and taking certain precautions is essential to protect your privacy and security. Here are some factors to consider:
- Trustworthy participants: Ensure you screen share with individuals or groups you trust. Only share your screen with people you know or those with a legitimate reason to view your content. Avoid screen sharing with strangers or in public servers where you’re unfamiliar with the participants.
- Private voice channels: Use Discord’s voice channels for screen sharing instead of public channels. Private voice channels limit access to a specific group, reducing the risk of unauthorized individuals joining the session.
- Limit sensitive information: Be mindful of the content you share on your screen. Avoid displaying sensitive or personal information, such as passwords, financial details, or personal conversations, as they can be inadvertently captured and shared.
- Check your settings: Review your Discord settings and ensure that your screen share options are configured to your preferences. For example, you can choose whether to include audio with your screen share or toggle overlays for voice chat. Adjust these settings based on your needs and your desired level of privacy.
- Keep your Discord client current: Regularly update your Discord client to ensure you have the latest security patches and feature enhancements. Discord frequently releases updates to address vulnerabilities and improve the overall user experience.
- Beware of malicious links or downloads: Avoid clicking on suspicious links or downloading files from untrusted sources during a screen share session. Exercise caution and be wary of potential phishing attempts or malware disguised as harmless content.
- Respect others’ privacy: If you’re participating in someone else’s screen share, respect their privacy and refrain from capturing or sharing any sensitive information without their consent.
While Discord has security measures to protect user privacy, it’s essential to remain vigilant and take responsibility for your actions when screen sharing.
How do I share my screen on Discord without black screen?
To share your screen on Discord without encountering a black screen, you can follow these steps:
- Update Discord and Video Drivers: Ensure that you have the latest version of Discord and that your video card drivers are up to date.
- Run Discord as an Administrator: Try running Discord with administrator privileges. Right-click on the Discord icon and select “Run as administrator”.
- Disable Hardware Acceleration: In Discord’s settings, go to the “Appearance” section and disable the “Hardware Acceleration” option.
- Check Screen Settings: Make sure that the resolution of the screen you are sharing is not too high for broadcasting. In some cases, too high a resolution can cause issues.
- Share a Specific Window Instead of the Entire Screen: Instead of sharing your entire screen, try sharing a specific application window.
- Restart Discord and Your Computer: If the problem persists, try restarting Discord and, if necessary, reboot your computer.
- Check Firewall and Antivirus: Ensure that your firewall or antivirus program is not blocking Discord.
- Contact Discord Support: If none of these methods work, reach out to Discord’s support team for assistance.
These steps should help to resolve the most common causes of a black screen when trying to share your screen on Discord.
How do I allow Discord to share my screen on Mac?
To enable screen sharing in Discord when using a Mac, follow these steps:
Check your screen recording permission:
- Go to your Mac’s “System Preferences” (found in the Apple menu in the upper-left corner of your screen).
- Select “Security and Privacy.”
- Click the “Privacy” tab.
- Scroll down and select “Screen Recording” from the list on the left.
- You’ll see a list of apps that have requested permission to record your screen. Find Discord in this list and check the box. If Discord is not on the list, you may need to open the app and try to share your screen to trigger the permission request.
You may have to unlock the settings by clicking the lock icon in the bottom left corner of the window and entering your admin password.
Restart Discord: Once you have these permissions, exit Discord (you can use the keyboard shortcut Command + Q) and reopen it. This will ensure that the permissions are applied.
Start screen sharing in Discord:
- Join a voice call or server channel in Discord.
- Click on the “Share your screen” icon (usually found in the lower left corner of the Discord window).
- Choose to share the entire screen or just a specific window.
- Select the screen or app window you want, and click “Go Live” to start sharing.
Check your Mac’s settings for additional permissions: If you’re still encountering problems, check other relevant settings under “Security and Privacy” in System Preferences, such as ensuring Discord has the necessary access permissions.
Remember that after updating any security or privacy settings, you often need to restart the app or even your Mac for the changes to take effect.


