
")
If your Nintendo Switch refuses to connect to Wi-Fi, it can cause many problems, from being unable to play online games to updating the console. There are several ways to fix this problem.
First, you should try restarting your console and then restarting your router. If that doesn’t help, try moving the console closer to the router so that nothing interferes with the signal.
You should also try running an internet test on your Nintendo Switch and see if airplane mode is disabled. Another way is to connect your console to the Internet via wire with a special adapter.
If nothing helps, you should try resetting your console to the factory settings. This will remove all settings and third-party applications which may cause this error. However, in this case, you will lose all the data you have saved on your console, including your saves or accounts.
Let’s look at all these methods (and a few more) in more detail below:
What are the ways to fix Nintendo Switch not connecting to Wi-Fi?
You should try a few fixes with your Nintendo Switch before seeking help from Nintendo support or taking your console to a repair shop. Below I’ll list ways to help you get rid of this bug. You should start with the first one and try them one by one, from the easiest to the most complicated.
Try to restart Nintendo Switch
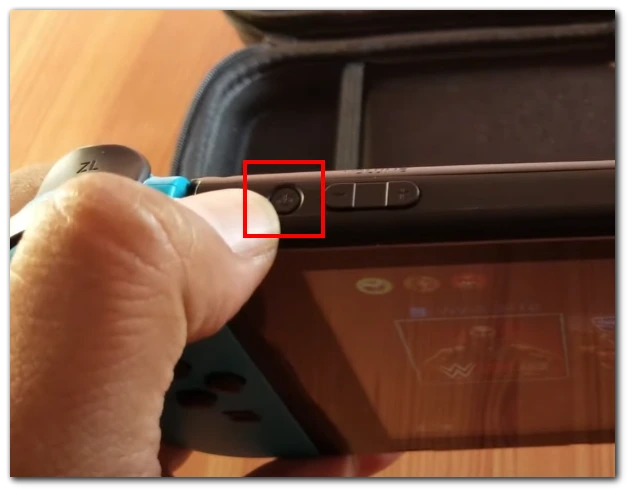
If you have a problem with the Nintendo Switch and can’t connect to the Internet via Wi-Fi, all users should try rebooting the device. Remember that pressing the power button or leaving the device in sleep mode doesn’t mean that you have restarted your Nintendo Switch completely. Here’s how to do it right:
- First of all, press and hold the physical Power button in the top left corner of the system for a few seconds
- Then, choose Power Option and click Restart
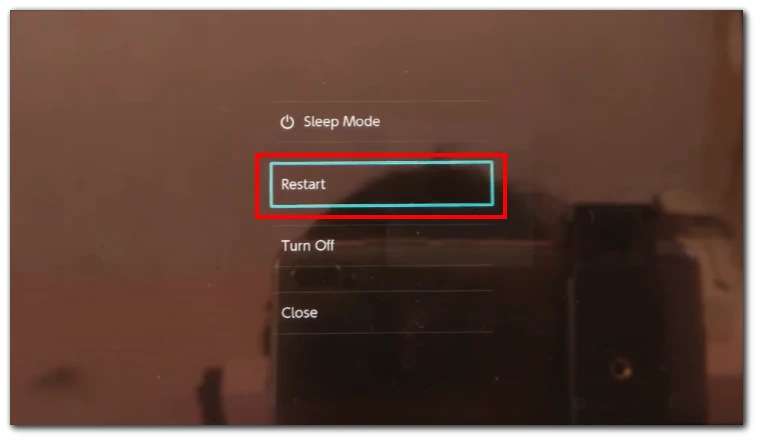
- Finally, the system will reboot. Give it time, then check to see if your Switch is connected to the Internet.
If you turn off your console, all running games or applications will be closed. So you should save all necessary progress before you restart your console.
Try to reboot your Wi-Fi router
Next, if the above method doesn’t help, it’s time to deal with the router. Often a router can fail, affecting the quality of the Internet and how other devices can connect to it.

First, try pressing the power button on the router to reboot it. The button should be somewhere on the back or the side. When you press it, all lights indicating that the router works should go off. Some routers may require you to press and hold the power button for a few seconds. You should find the manual for your particular model.
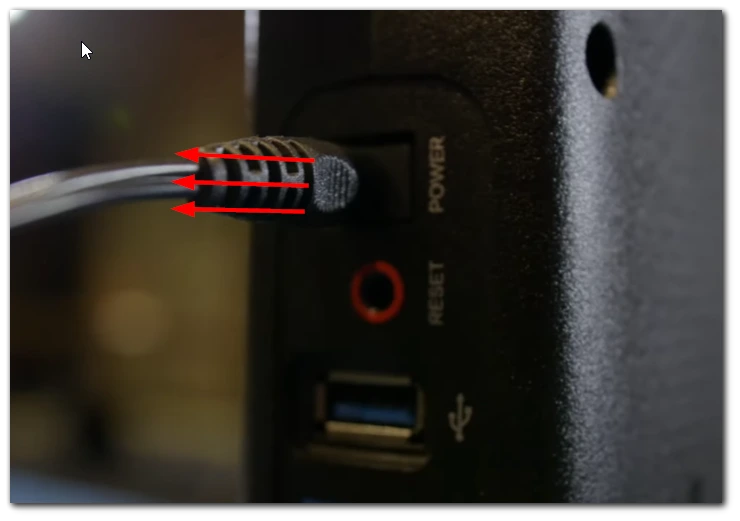
If nothing changes, try unplugging the router. Once you have unplugged the router, you must wait a few minutes for it to shut down completely. Then you can plug it back in. It’s almost the same, but sometimes the difference in the result is enormous.
Test Wi-Fi using other devices
Before diving into the specific troubleshooting steps, confirming whether the issue lies with your Nintendo Switch or your Wi-Fi network is a good idea. Test the Wi-Fi connection with smartphones, tablets, or laptops. If they can connect without problems, the issue may be specific to your Nintendo Switch.
Try to move Nintendo Switch closer to the router
The distance between your Nintendo Switch and the Wi-Fi router can impact the signal strength. If your console is far away from the router, try moving it closer to see if that helps establish a more stable connection. Physical barriers such as walls or large objects can also interfere with the signal, so ensure no obstructions between the console and the router.
Pay special attention to various electronic devices or metal objects. These are the most common reasons for a poor signal.
Check your routers security protocol
The Nintendo Switch supports specific security protocols for Wi-Fi connections, including WEP, WPA-PSK(AES), and WPA2-PSK(AES). To ensure compatibility between your router and the Nintendo Switch, check your router’s security protocol.
To do this, access your router’s settings through a web browser by entering the router’s IP address. Look for the wireless settings or wireless security section and check the available security protocol options.
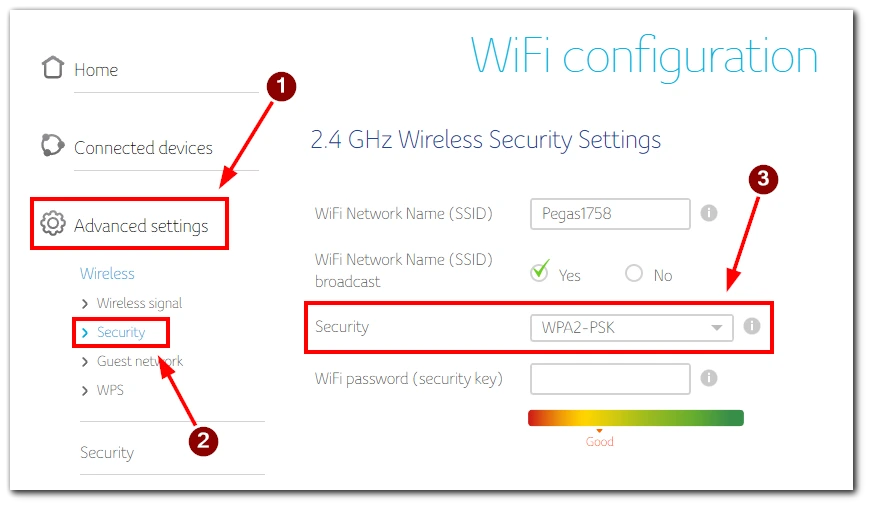
Ensure that your router is set to use one of the supported protocols mentioned earlier. If a different protocol is selected, switch to either WEP, WPA-PSK(AES), or WPA2-PSK(AES). Once you have made the necessary changes, connect your Nintendo Switch to the Wi-Fi network to see if the issue is resolved.
Try to test internet connections on Nintendo Switch
Testing the connections on your Nintendo Switch is a helpful method to diagnose and understand the network issues you might be facing. Here’s a step-by-step guide to performing a connection test on your Nintendo Switch:
- From your Nintendo Switch home screen, navigate to the System Settings.

- Scroll down in the System Settings menu and select “Internet.”
- On the right side of the screen, select “Test Connection.”
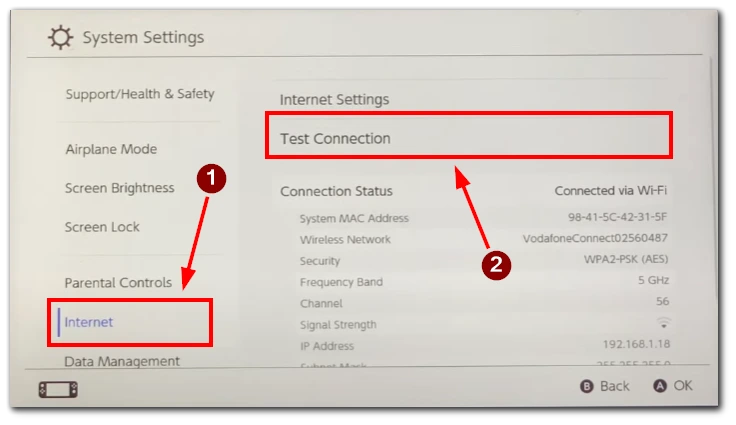
- The Nintendo Switch will perform a series of tests to check the connection between your console, the local network, and the Internet. These tests include checking the Wi-Fi signal strength, confirming the local network connectivity, and verifying the internet connectivity.
- Wait for the test to complete. The results will be displayed on the screen, indicating whether the connection was successful or if any issues were encountered.
- The Nintendo Switch may display an error code if the connection test fails. Take note of the error code, as it can be useful when seeking further assistance or searching for specific solutions online.
Depending on the test results, you can try troubleshooting steps accordingly. For example, if the test indicates a weak Wi-Fi signal, you might consider moving closer to the router or addressing any potential interference.
Performing a connection test on your Nintendo Switch helps you gather valuable information about the state of your network connection and identify potential issues. This knowledge can aid in troubleshooting and finding appropriate solutions to connect your Nintendo Switch to the Internet successfully.
Try to change DNS settings
One troubleshooting step you can try is changing the DNS (Domain Name System) settings. The DNS settings determine how your console connects to the Internet and resolves domain names to their corresponding IP addresses. Here’s how you can change the DNS settings on your Nintendo Switch:
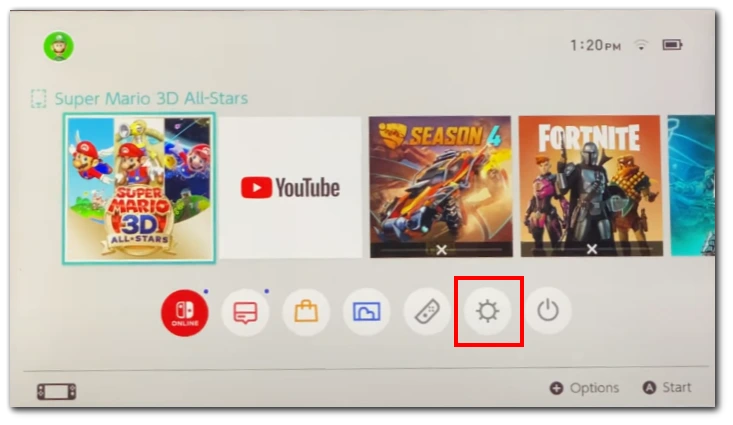
- From the home screen, navigate to the System Settings. Look for the gear-shaped icon at the bottom of the screen.
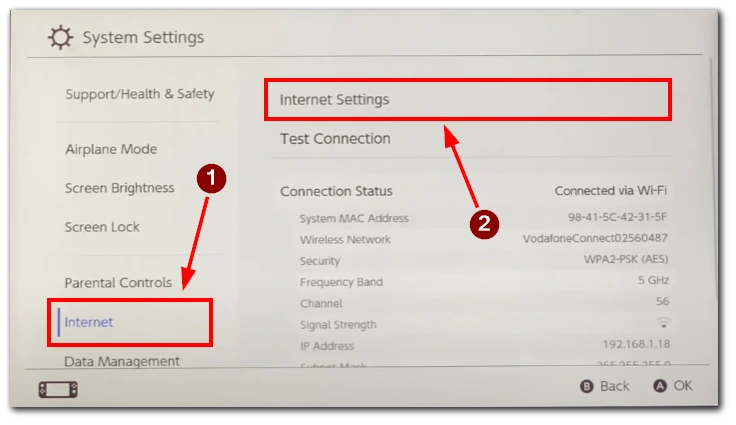
- Scroll down in the System Settings menu and select “Internet.”
- After that, you should choose “Internet Settings.”
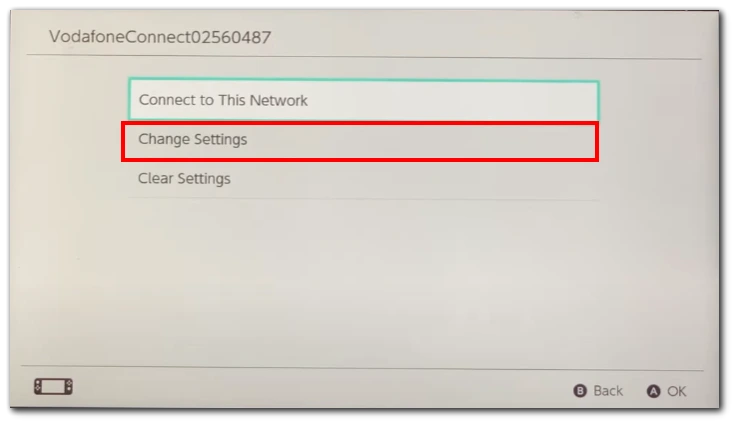
- Choose the network you’re currently connected to or want to modify the DNS settings for.
- Select “Change Settings.”
- Scroll down and select “DNS Settings.”
- Choose “Manual.”
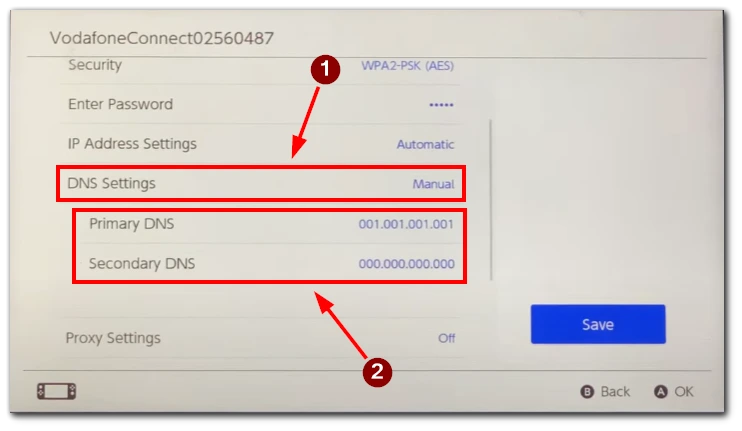
- You’ll see two fields where you can enter Primary DNS and Secondary DNS values. These are the DNS server addresses you want to use. You can use public DNS servers such as Google DNS (8.8.8.8 for Primary and 8.8.4.4 for Secondary) or Cloudflare DNS (1.1.1.1 for Primary and 1.0.0.1 for Secondary).
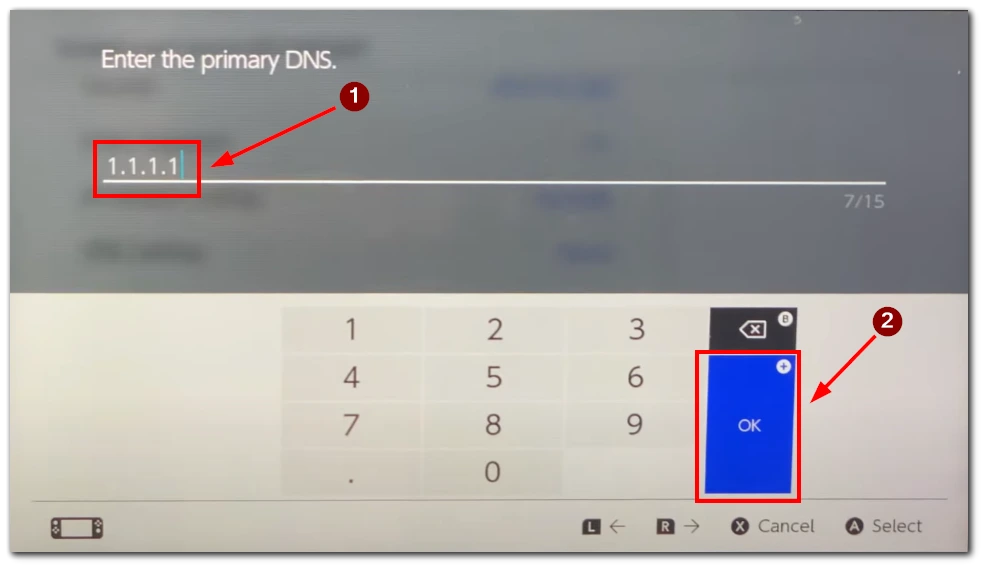
- Enter the desired DNS server addresses and apply the changes.
- Exit the settings and try connecting to the Internet on your Nintendo Switch to see if the connectivity issues have been resolved.
By changing the DNS settings, you can potentially improve connection stability and resolve issues related to DNS resolution. If the problem persists, you can also try reverting to the default DNS settings or contacting your internet service provider or Nintendo Support for further assistance.
Try to disable airplane mode on Nintendo Switch
If you’re experiencing issues connecting your Nintendo Switch to Wi-Fi, one simple troubleshooting step is ensuring that Flight Mode is disabled. Here’s how you can disable Airplane Mode on your Nintendo Switch:
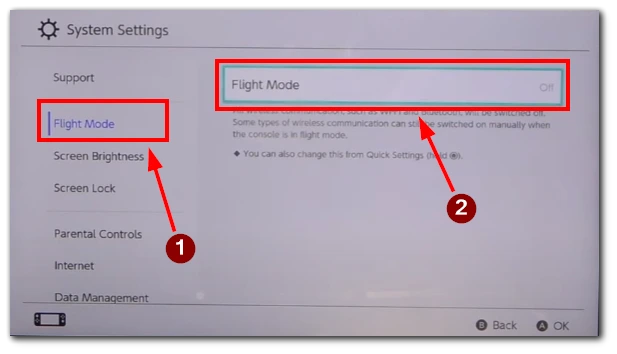
- Look for the “System Settings” icon at the bottom of the Nintendo Switch screen. It resembles a gear and is located on the right side.

- In the System Settings menu, scroll down and select “Flight Mode.”
- On the right side of the screen, you will see the Flight Mode toggle switch.
- To disable it, simply tap on the toggle switch, and it will turn gray and move to the left.
- Now you can attempt to connect your Nintendo Switch to Wi-Fi again.
Disabling Flight Mode ensures that wireless communication features on your Nintendo Switch, including Wi-Fi connectivity, are activated. Sometimes, Flight Mode can accidentally be enabled, preventing the console from connecting to Wi-Fi networks.
Check if Nintendo web services aren’t down
Sometimes, the problem is not with your console but with Nintendo’s servers. To determine if this is the case, you can visit the official Nintendo “Network Maintenance Information / Operational Status” website or check their official social media accounts for any announcements or updates regarding service interruptions. They often provide information about any ongoing maintenance or outages that may be affecting their online services.
Try a wired internet connection on Nintendo Switch
If you’re experiencing persistent Wi-Fi connectivity issues with your Nintendo Switch, one effective solution is to use a wired internet connection instead. Connecting your Nintendo Switch directly to the router using an Ethernet cable can potentially achieve a more stable and reliable connection, especially for online gaming.
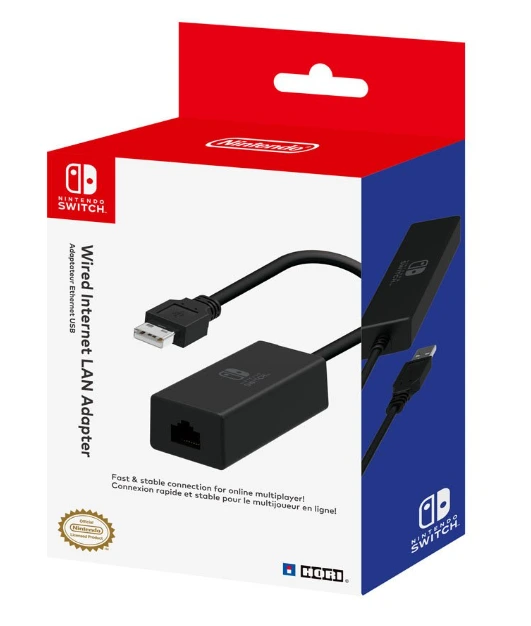
To begin, you’ll need a compatible USB Ethernet adapter for the Nintendo Switch. This adapter should be designed specifically for the Switch’s USB ports and support wired internet connectivity. Connect the USB Ethernet adapter to the USB port on the Nintendo Switch dock or use a USB-C to Ethernet adapter if you’re using the Switch in handheld mode. Then, connect one end of an Ethernet cable to the Ethernet port on the adapter and the other end to an available LAN port on your router or modem. The Internet should start working at this point.
Try to factory reset your Nintendo Switch
If you’re facing persistent connectivity issues with your Nintendo Switch and have exhausted other troubleshooting methods, performing a factory reset can help resolve the problem. However, it’s important to note that a factory reset will erase all data and settings on your Nintendo Switch. Therefore, it’s crucial to back up any important information before proceeding. Here’s how you can factory reset your Nintendo Switch:
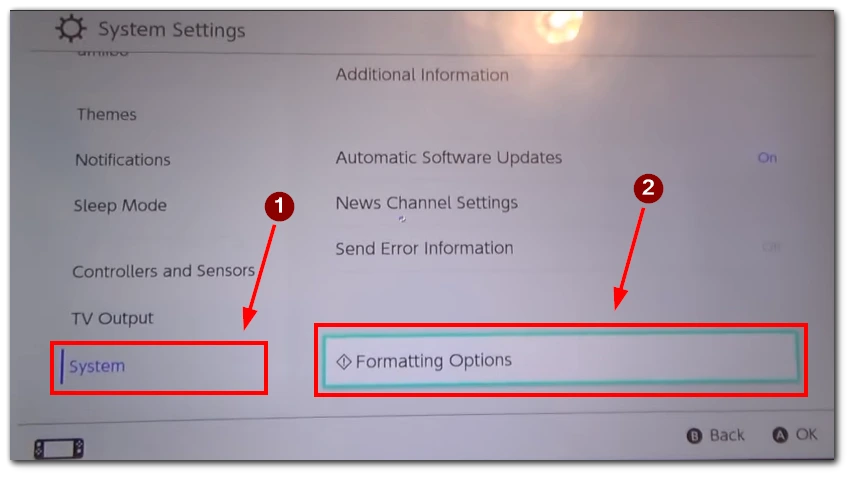
- From the home screen, navigate to the System Settings. Look for the gear-shaped icon at the bottom of the screen.

- Scroll down in the System Settings menu and select “System.”
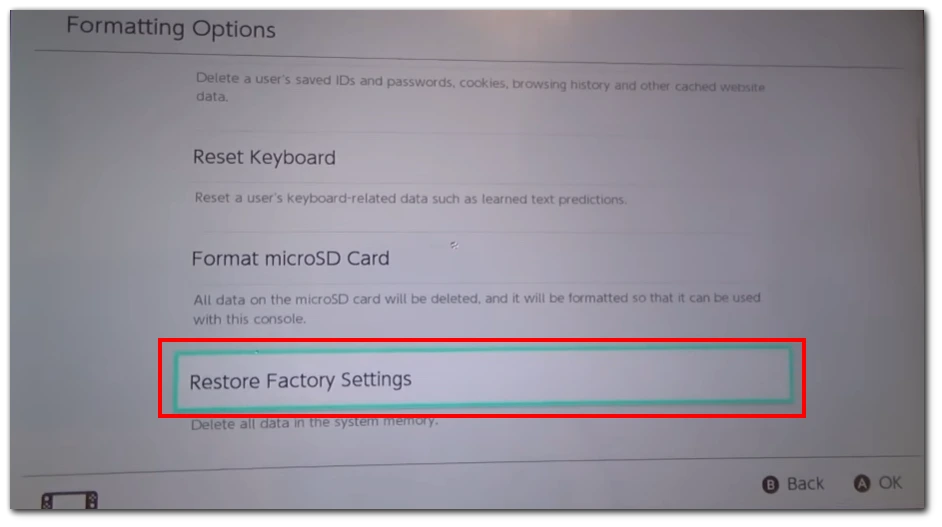
- Within the System menu, scroll down and choose “Formatting Options.”
- Select “Restore Factory Settings.”
- Read the information and warnings displayed on the screen and confirm your selection.
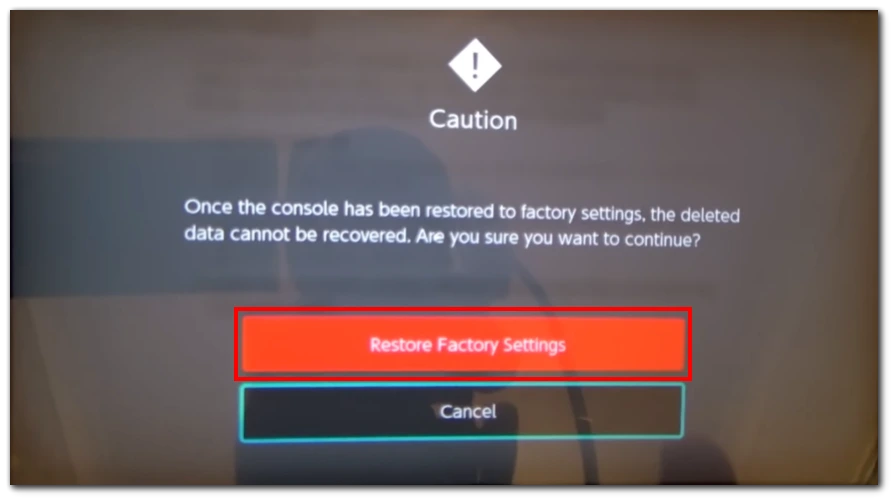
The console will begin the reset process, which may take a few minutes. Follow the on-screen prompts to complete the factory reset. Once the reset is complete, your Nintendo Switch will be restored to its original factory settings.
Performing a factory reset can resolve persistent software-related issues that may be causing connectivity problems on your Nintendo Switch. However, remember that a factory reset should be considered a last resort after trying other troubleshooting methods.
Try to contact Nintendo support
If you have tried everything to fix the connectivity issue with your Nintendo Switch but still have problems, contacting Nintendo Support for help is a good idea. They have a team of experts who can provide personalized assistance for your specific problem. Contacting Nintendo Support is an effective way to get professional help tailored to your situation.
To reach Nintendo Support, visit the official Nintendo Support website. You will find different ways to contact them there, such as phone support, live chat, or email support. Choose the best method for you, and be ready to explain your issue. Nintendo’s support team is there to help you fix any technical difficulties you may be experiencing with your Nintendo Switch so you can return to enjoying your gaming sessions.


