

If you want to disable voice control on your Chromebook, you should start by turning off Google Assistant. This is the voice assistant which is installed on all Chromebooks by default. To disable it, go to Settings and then select the “Search and Assistant” tab on the left side menu. After that, click on “Google Assistant” and disable the switch at the top of the open menu.
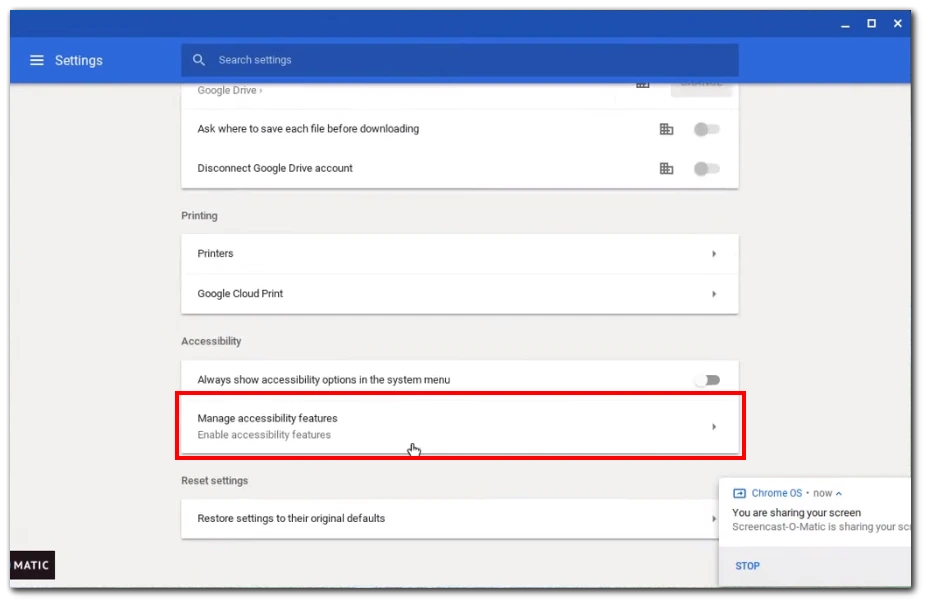
If your goal is to disable voice accessibility features, such as dictation or text narration, the instructions will be slightly different. Go to Settings and scroll down until you find the “Accessibility” section. Then select the “Manage accessibility features” option and make sure that “ChromeVox,” “select-to-speak,” and “Enable Dictation (speak to type)” are disabled.
Let’s look at this in detail.
How to disable voice assistant on Chromebook
The built-in Google Assistant is the main function responsible for voice control in Chromebooks. It will help you to control Chromebook functions with simple voice commands and text queries. Follow the steps below to turn off voice assistant control easily:
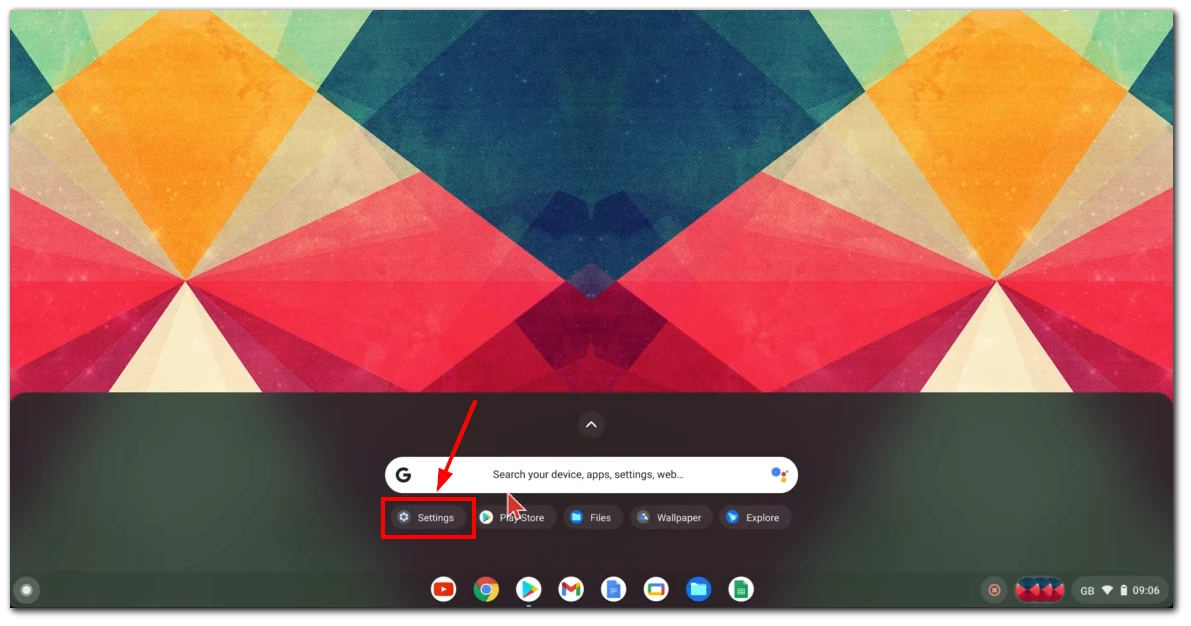
- Begin by opening the Settings menu on your Chromebook. You can do this by clicking on the system tray located in the bottom-right corner of your screen and then selecting the gear icon.

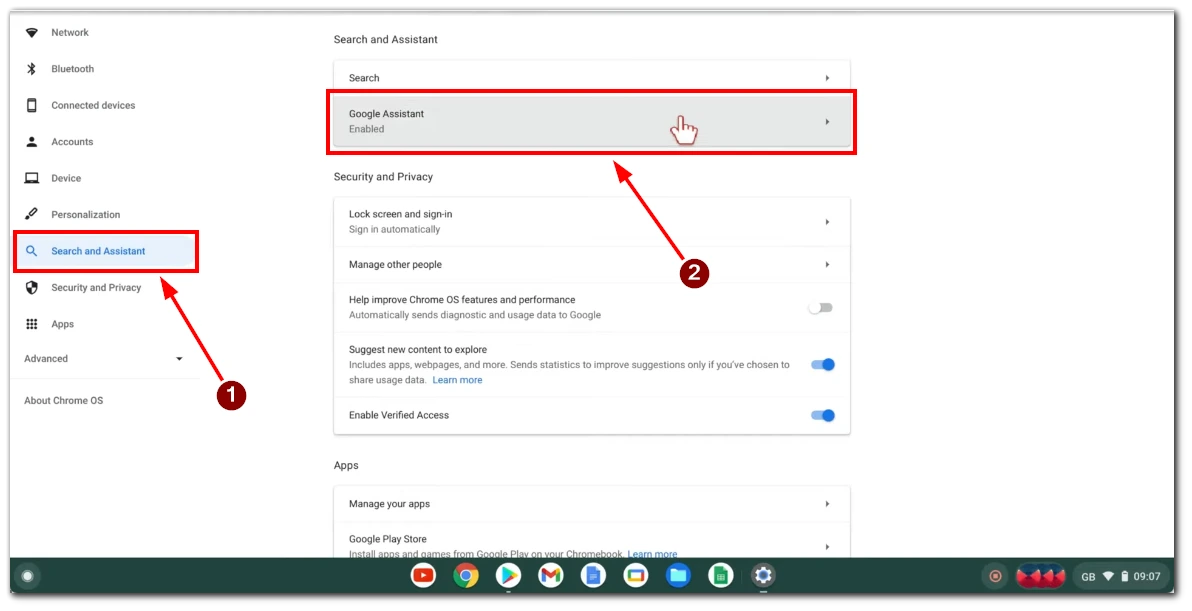
- Within the Settings menu, locate and click “Search and Assistant” from the options in the left sidebar.
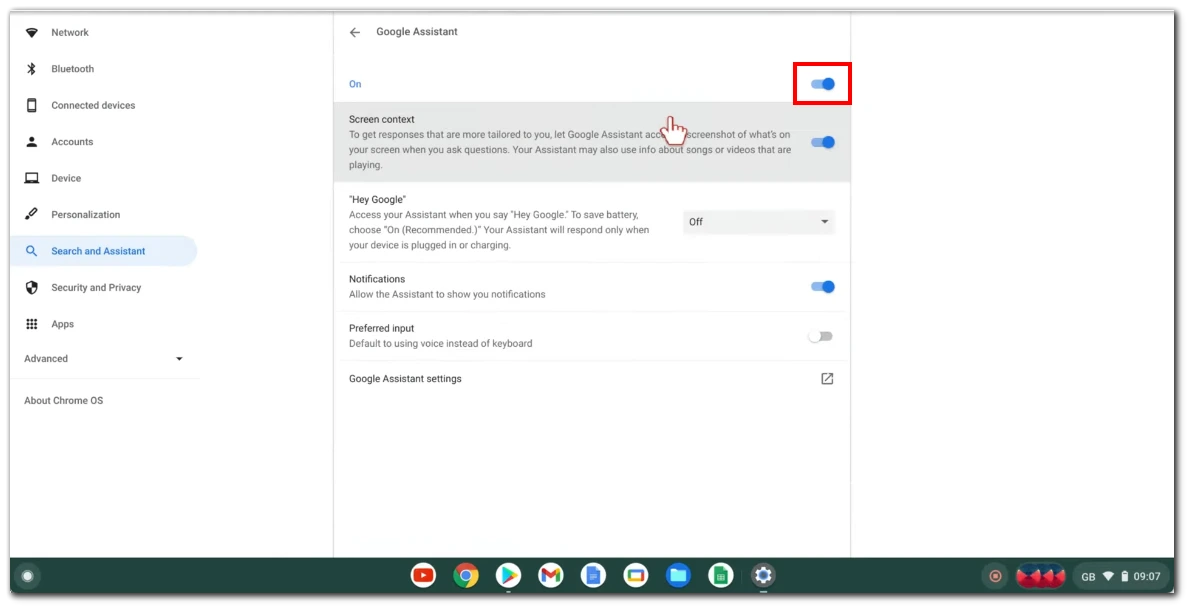
- After that, you need to select “Google Assistant”. This will bring up the settings related to the Google Assistant on your Chromebook.

- You will find a toggle switch labeled “On” next to Google Assistant in the Search and Assistant settings. To completely disable Google Assistant, simply turn off this toggle switch. By doing so, the voice control feature will be turned off entirely.
After completing these steps, the voice control functionalities of Google Assistant will be disabled on your Chromebook. Feel free to explore alternative options or enjoy a voice-control-free experience.
How to turn off “Hey Google” on Chromebook
Alternatively, you can simply disable the “Hey Google” command. This will prevent you from disabling Google Assistant and its accidental activation. If you want to turn off the “Hey Google” voice command on your Chromebook, follow the steps below:
- Click on the system tray in the bottom-right corner of your Chromebook’s screen. Then click on the gear icon to open the Settings menu.

- In the Settings menu, look for and click on “Search and Assistant” in the left-hand sidebar. This will open the Search and Assistant settings.
- In the Search and Assistant settings, you will find a section labeled “Google Assistant.”
- You will see a drop-down menu next to the “Hey Google” option. Click on it and switch to the “Off” position.

- After turning off the “Hey Google” voice command, close the Settings window. The changes will be saved automatically.
You have successfully turned off the “Hey Google” voice command on your Chromebook by following these steps. Google Assistant will no longer be triggered by saying, “Hey, Google.”
How to disable text-to-speech features on Chromebook
If we talk about text-to-speech functions, Chromebook has two of them. The standard select-to-speak function speaks the text that you highlight with the cursor and ChromeVox. ChromeVox is a built-in screen reader developed by Google specifically for Chrome OS. ChromeVox converts on-screen text into spoken feedback, allowing users to navigate through menus, web pages, and applications using audio cues.
If you wish to disable the text-to-speech features on your Chromebook, you can follow these steps:
- Click on the system tray in the bottom-right corner of your Chromebook’s screen. Then click on the gear icon to open the Settings menu.

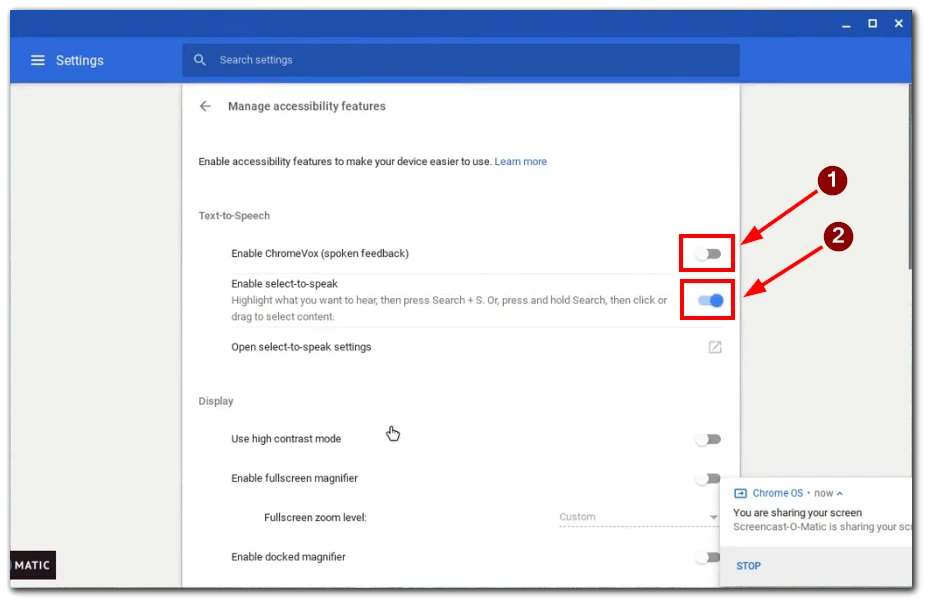
- In the Settings menu, scroll down until you find the “Accessibility” section in the list. You may need to click on the “Advanced” setting to reveal the Accessibility section.
- Within the Accessibility settings, look for the section related to the “Manage accessibility features” and click on it.

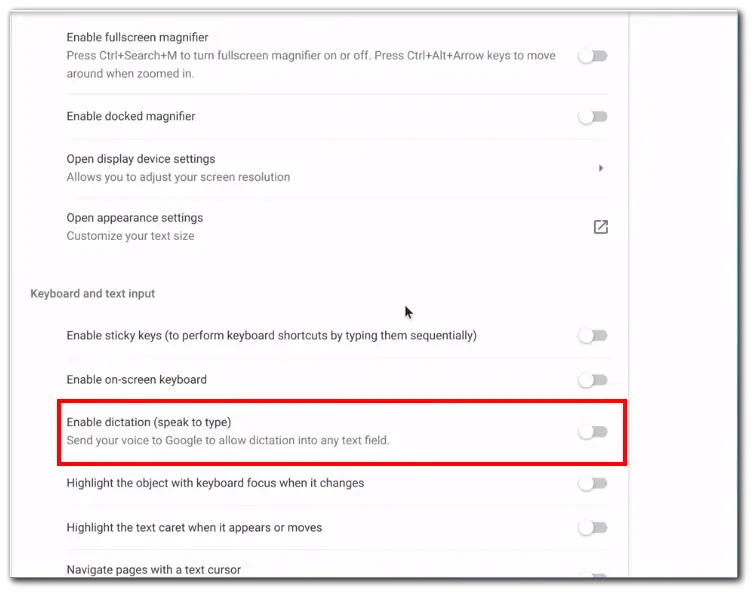
- Here you will find a toggle switch or checkbox that allows you to enable or disable the “ChromeVox” and “select-to-speak” features. Simply toggle the switch to the “Off” position or uncheck the box to disable text-to-speech.
- After disabling text-to-speech, close the Settings window. The changes will be saved automatically.
Following these steps will disable the text-to-speech feature on your Chromebook. This means that your Chromebook will no longer audibly read out the text displayed on the screen.
How to turn off dictation on Chromebook
Another feature that relates to voice control is the ability to dictate text instead of typing it on the keyboard. To turn off dictation on your Chromebook, you can follow these steps:
- Click on the system tray in the bottom-right corner of your Chromebook’s screen. Then click on the gear icon to open the Settings menu.
- In the Settings menu, scroll down to the “Accessibility” section. This will reveal the Accessibility settings.
- Within the Accessibility settings, look for the section related to “Manage accessibility features.” Click on it to access the accessibility features.
- In the Accessibility settings, you will find an option for “Enable Dictation (speak to type)”. Toggle the switch next to it to the “Off” position.
- After disabling dictation, close the Settings window. The changes will be saved automatically.
You have successfully turned off dictation on your Chromebook by following these steps. This means that your Chromebook will no longer convert your spoken words into a text input.
Why do you need to turn off voice control on your Chromebook?
You might want to turn off voice control on your Chromebook for several reasons. Here are a few common reasons:
- Privacy concerns: Voice control features typically require your device to listen for specific trigger phrases, such as “Hey, Google.” Some individuals may have privacy concerns about having their devices constantly listening to their conversations. Disabling voice control ensures that your Chromebook is not actively listening for voice commands, providing a sense of privacy and control over your personal information.
- Accidental activations: Voice control can sometimes be triggered accidentally, leading to unintended actions or disruptions. For example, if the trigger phrase is spoken during a conversation or while watching a video, it may activate voice commands unintentionally. Turning off voice control helps prevent such accidental activations and provides a more consistent user experience.
- Preference for other input methods: Not everyone finds voice control convenient or comfortable. Some individuals may prefer using traditional keyboard and mouse inputs or have physical conditions that make voice control challenging. Disabling voice control allows users to rely on their preferred input methods, ensuring a more comfortable and efficient computing experience.
- Noisy environments: Voice control may not work effectively in noisy environments where ambient noise interferes with accurate voice recognition. Disabling voice control prevents the device from misinterpreting surrounding noise as voice commands, ensuring a more reliable and frustration-free user experience.
- Specific accessibility needs: While voice control can be beneficial for individuals with certain accessibility needs, it may not suit everyone. Some users may have specific requirements or alternative assistive technologies that better cater to their needs. Disabling voice control allows them to utilize other accessibility tools more effectively.
Ultimately, turning off your Chromebook’s voice control depends on your preferences, privacy concerns, specific usage scenarios, or individual accessibility requirements. Chromebooks offer the flexibility to customize settings to align with your needs and provide a more personalized computing experience.


