

Windows 11 is the latest operating system released by Microsoft, and it offers numerous enhancements and new features over its predecessor, Windows 10. One of these features is improved audio settings that allow you to customize your sound to your liking. However, sometimes you may encounter audio issues, and the easiest way to fix them is by resetting all audio settings. This article will explain how to reset all audio settings in Windows 11 in a step-by-step manner.
Resetting all audio settings in Windows 11 is a straightforward process that can help resolve common audio issues. Whether you use the Settings app or the Control Panel, the process is the same and takes just a few minutes. If you encounter any issues, refer to the troubleshooting section for potential solutions. Always keep your drivers updated to ensure that your audio experience in Windows 11 is the best.
How to reset audio settings via Windows 11 Settings app
The Windows 11 Settings app is a central location for managing the settings and configuration of your device. It provides easy access to various settings, including audio settings. If you are experiencing audio issues, resetting the audio settings through the Settings app is often the first step in troubleshooting and resolving the issue. To reset audio settings in Windows 11 using the Settings app, follow these steps:
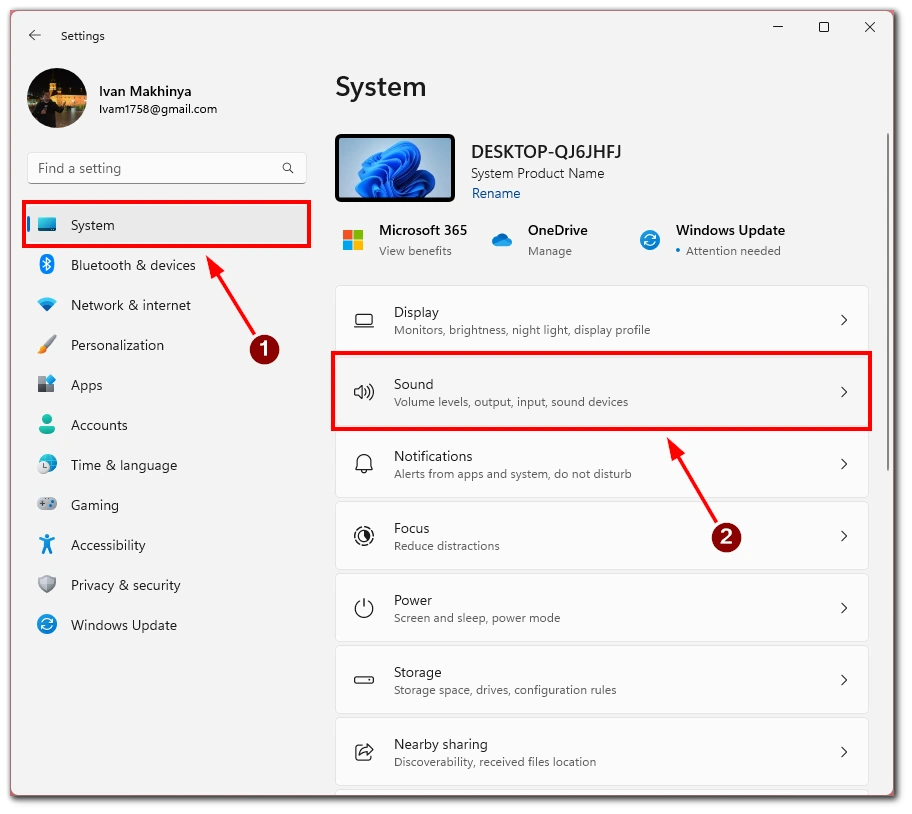
- Click on the Windows Start button and select the Settings option.
- In the Settings app, select the System category.
- In the System section, select the Sound option.
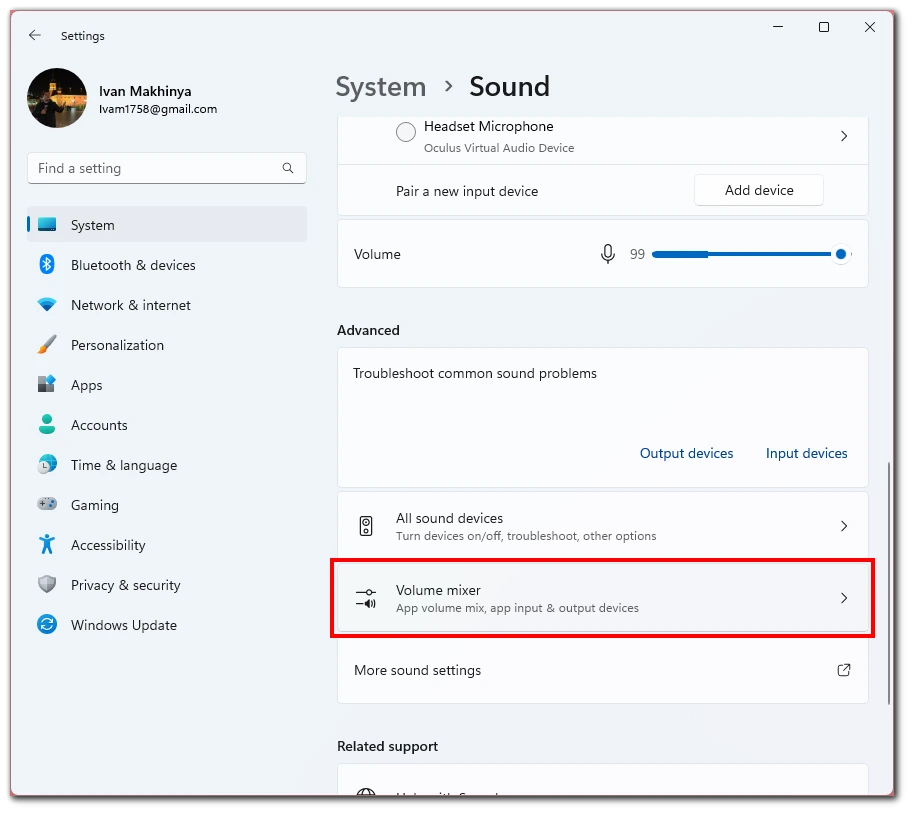
- Here click on Volume Mixer.
- Scroll down and select Reset.
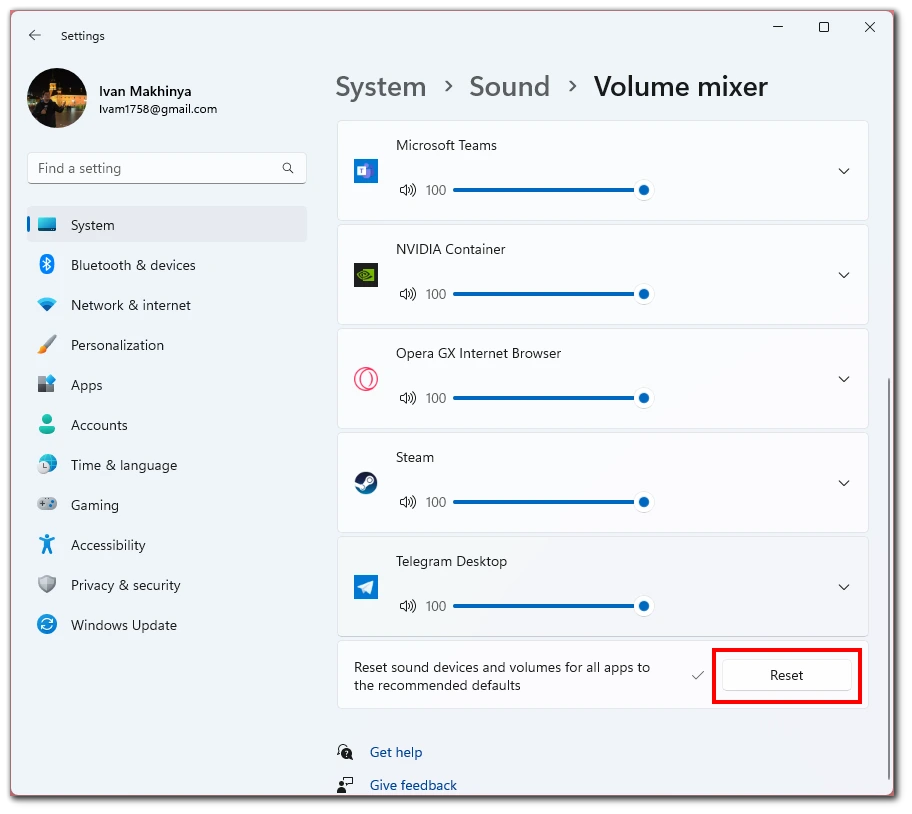
This will reset the settings for the different audio devices on your computer to defaults. This will also reset the volume settings for various applications that you may have changed in the mixer. Note that this method will reset all audio devices and applications in general. The following section will discuss how you can reset one specific device.
How to reset audio settings for a specific audio device via Control Panel in Windows 11
The Control Panel in Windows 11 is a tool for managing various system settings and configurations, including audio settings. If you are experiencing issues with a specific audio device, you may want to reset its audio settings. To reset audio settings for a specific audio device in Windows 11 using the Control Panel, follow these steps:
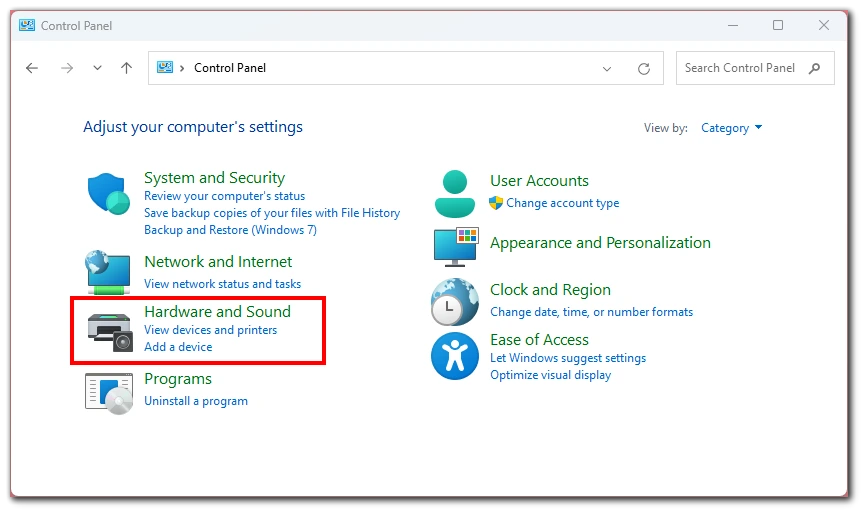
- Click on the Windows Start button and select the Control Panel option.
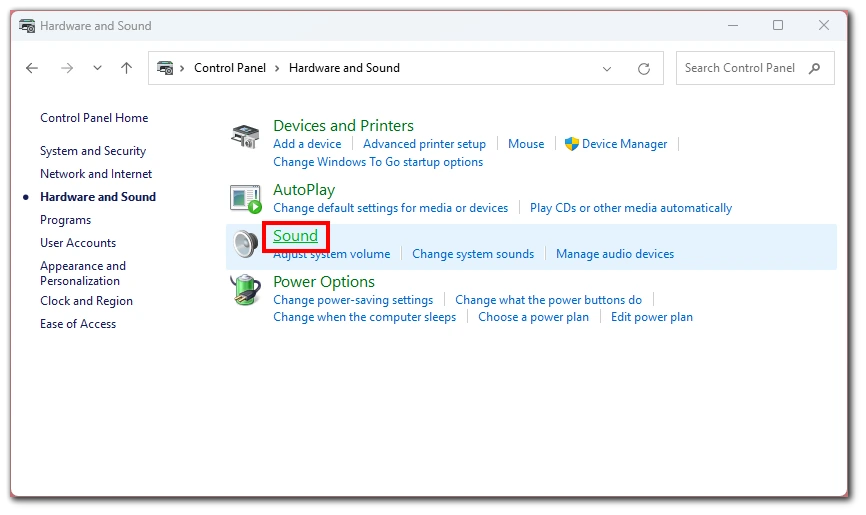
- Here, select the Hardware and Sound category.
- In the Hardware and Sound section, select the Sound option.
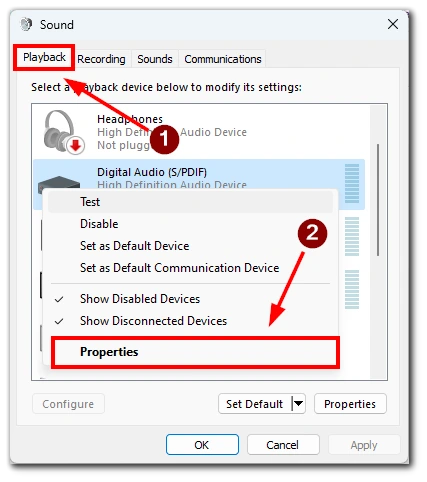
- Next, select the Playback tab.
- In the Playback tab, select the audio device you want to reset from the list of available devices.
- Right-click on the audio device and select the Properties option.
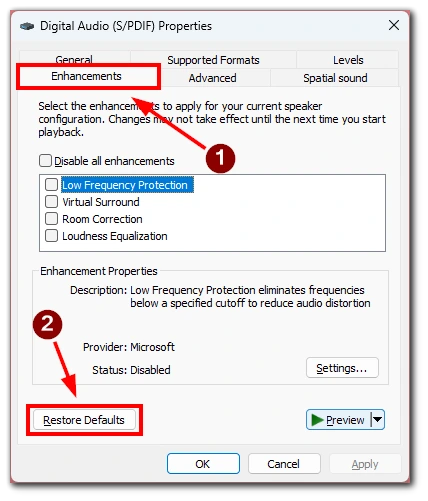
- In the Properties window, select the Enhancements tab and click on the Restore Defaults button.
- You will be prompted to confirm the reset. Click on the Reset button to confirm.
- Restart your computer to complete the process.
This feature will help you solve bugs and bugs with one particular device. If, after resetting your audio device, your problem is not solved and you still have some errors in audio playback, you should skip to the next section of this article. There you can find more extreme methods for fixing your audio device problems.
How to update and reinstall audio drivers in Windows 11
In Windows 11, audio drivers play a crucial role in ensuring the smooth functioning of audio devices and the overall audio experience. If you encounter any audio issues, resetting the audio driver is often the first step in troubleshooting and resolving the issue. In this article, we will explain step-by-step how to reset the audio driver in Windows 11.
Updating the Audio Driver
Before resetting the audio driver, it is essential to check if the driver is up to date. Outdated drivers can cause various audio issues, so updating the driver is the first step in resolving any issues. To update the audio driver in Windows 11, follow these steps:
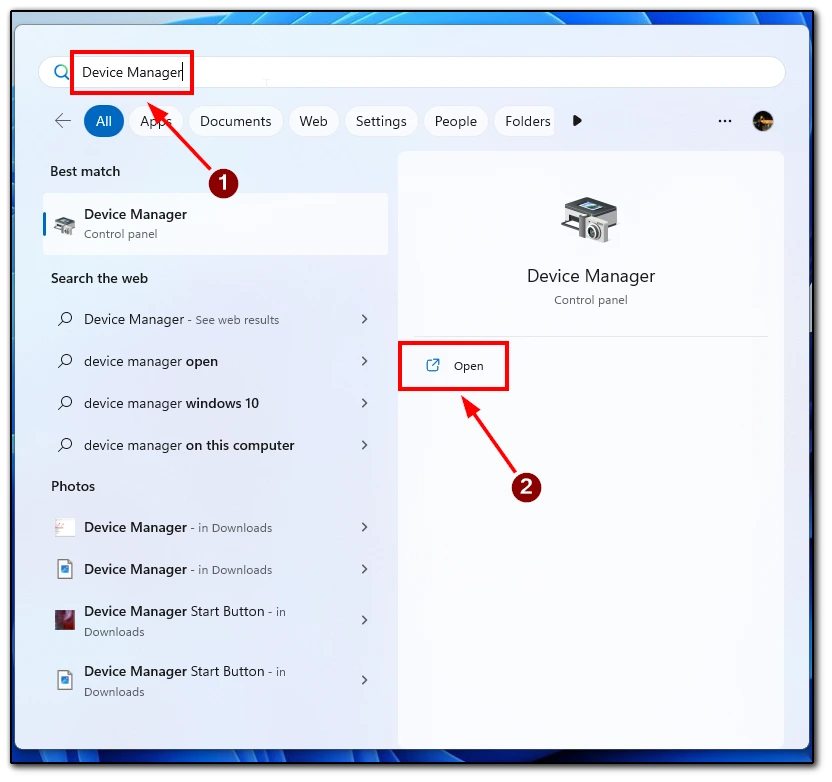
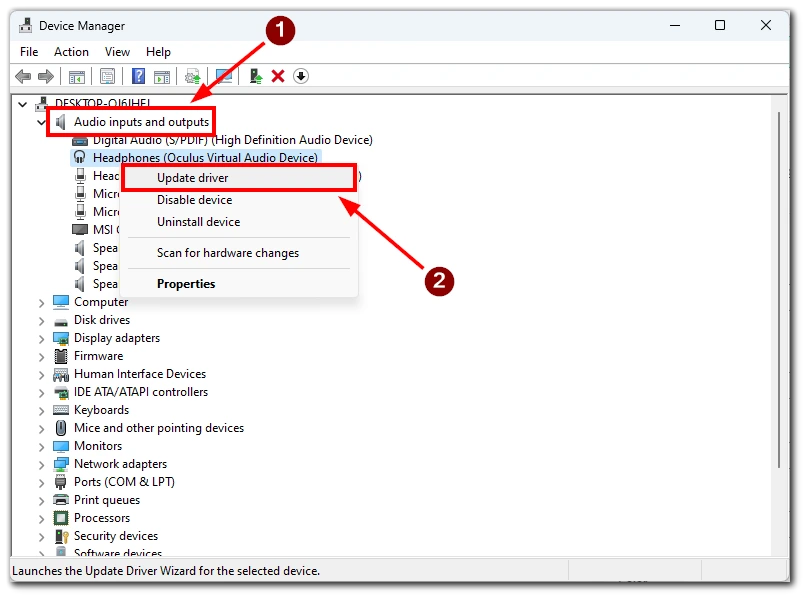
- Click on the Windows Start button and search for Device Manager.
- Expand the Device Manager’s Audio inputs and outputs categories.
- Right-click on the audio device and select the Update driver option.
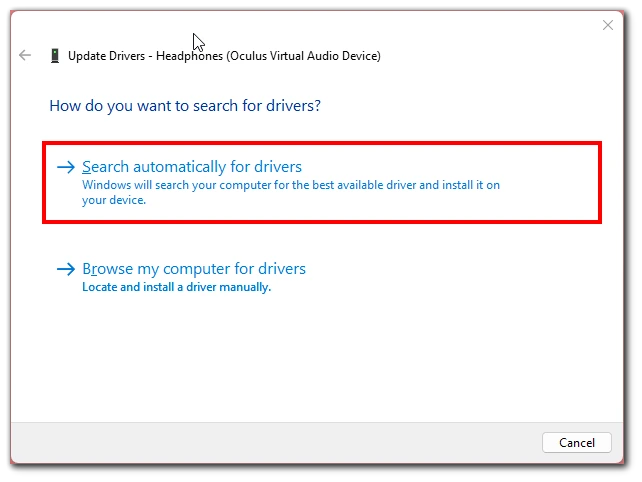
- Windows 11 will now search for any available updates for the audio driver. If an update is available, follow the on-screen instructions to install it.
Note that you can also update your drivers manually. To do this, you need to find the drivers on the manufacturer’s website of your audio device and select the manual installation of drivers during the installation. After that, you need to specify the path to the downloaded driver on your computer.
Resetting the Audio Driver
If updating the audio driver does not resolve the issue, you can try resetting the audio driver. This will remove and reinstall the audio driver, which can often resolve any issues. To reset the audio driver in Windows 11, follow these steps:
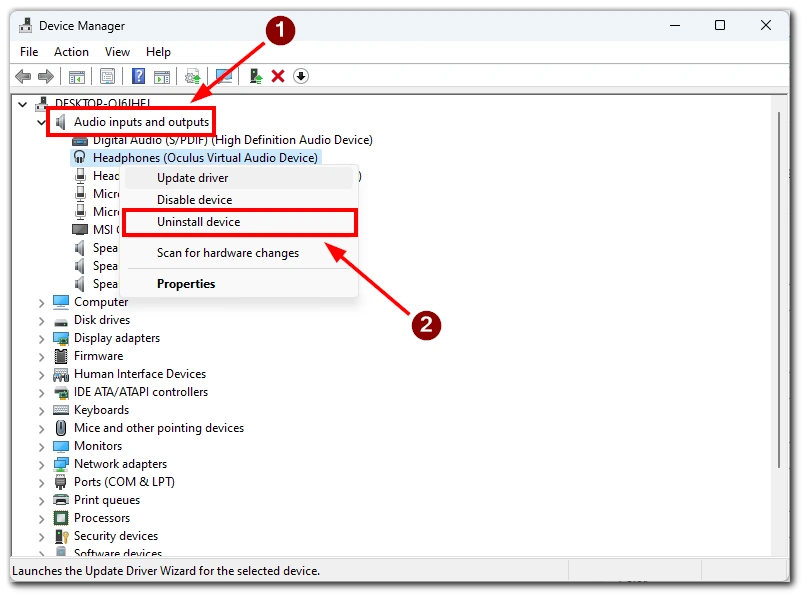
- Click on the Windows Start button and search for Device Manager.
- Expand the Device Manager’s Audio inputs and outputs categories.
- Right-click on the audio device and select the Uninstall device option.
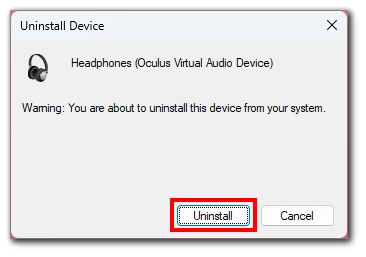
- In the confirmation window, check the Delete the driver software for this device option and click on the Uninstall button.
- Restart your computer to complete the process.
- After the restart, Windows 11 will automatically detect and install the audio driver.
If reinstalling the driver did not help, you should look at the solution for your specific device. Perhaps the manufacturer has released an application where you can configure your device, or there is a special driver that will fix your problem.


