

Modern computers have quite a few functions and tools you use every day and do not even think about it. For example, most laptops and PCs use a Wi-Fi module to access the Internet. This is the standard for wireless data transfer today. With Wi-Fi, you can quickly transfer large amounts of data between your router and the device that receives the signal (in this case, your computer). However, you need special software and drivers to ensure the Wi-Fi is stable and works correctly.
If you are a Windows PC user, you probably do not need to install or reinstall drivers because Windows can find and install drivers for all the hardware upgrades or add-ons on your PC, if available. But if you find that the drivers do not work correctly, are not updated, or Windows has not installed them, then you need to install them manually using the Device Manager on your PC. Let’s find out how this works and what steps you need to take.
How to install a driver for Wi-Fi on Windows 10 or Windows 11
Let’s first understand what a driver is and why you need one. Drivers are software that your operating system uses to interact with the devices that you connect to your computer. That is, you need drivers for any device you connect, including the WiFi adapter, even if it is built into your motherboard.
As mentioned above, Windows 10 and Windows 11 have a feature to auto-install drivers for external and internal hardware on your computer. This means you must plug in a Wi-Fi adapter, connect it to your motherboard, and start your computer with Windows. After that, the system will automatically install the driver.
In addition, some devices come with either links or data carriers with drivers. You can usually just plug them into your computer and download a proprietary application that will update your computer drivers. This is the main advantage of Windows: the system will automatically install the drivers for your devices, and they should work out of the box. However, let’s take a closer look at how to update an outdated driver, as this is where problems most often arise.
How to update Wi-Fi drivers on Windows
You should update the hardware driver if you’re having trouble with your Wi-Fi adapter drivers. Usually, Wi-Fi failures are either due to an outdated version of Windows or outdated Wi-Fi drivers that may not support some of your router’s functions. You can update drivers in two ways: you can automatically find them using the built-in Windows tool, or you can download them from the website of your Wi-Fi adapter manufacturer. In both cases, you’ll need to follow approximately the same steps. To do this, you will need the following:
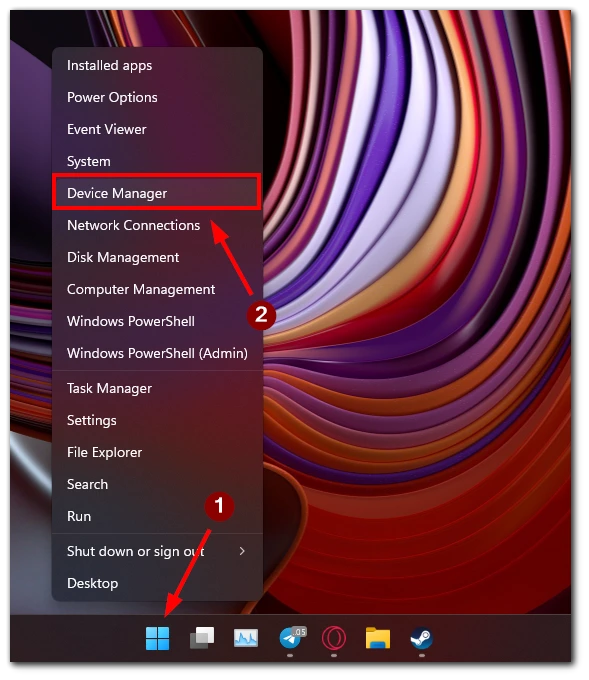
- Right-click the Start button on your desktop.
- In the drop-down menu, select Device Manager.

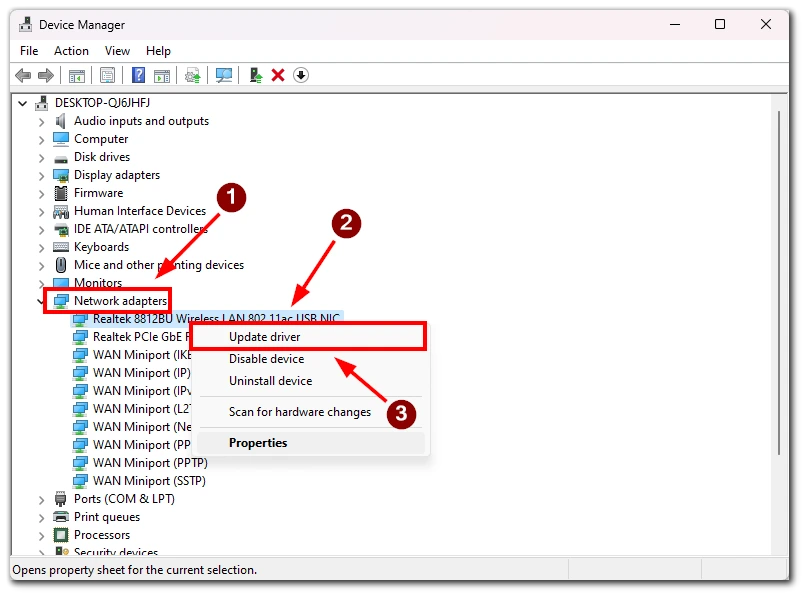
- After that, you need to find Network Adapters and click on them.
- In the drop-down list, find your WiFi Adapter and right-click on it.
- From the list that appears, select Update Driver.
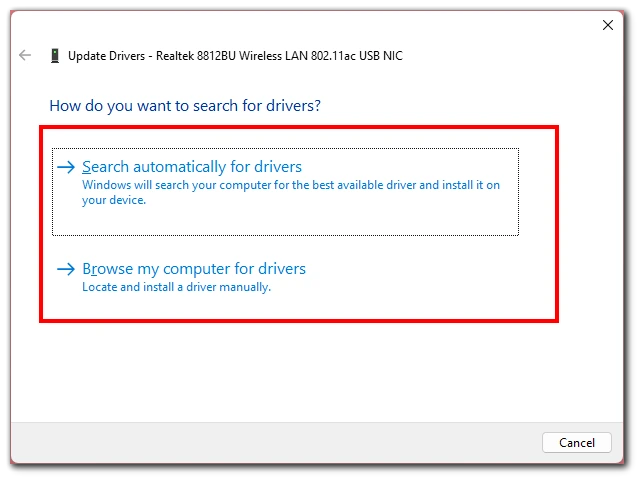
- Then you will see a window where you will be offered two choices:
- Search automatically for drivers. In this case, Windows will find the latest driver for your device on the Internet.
- Browse my computer for drivers. This option is good for you if you have downloaded the driver in advance and it is already on your PC. Just specify the path to it.
After that, you need to finally restart your computer for the driver to install. Note that the automatic search Windows can not always install the latest driver, as they often go out it is on the sites of manufacturers. And only then add them to the search Windows system. So I advise you always to check the version of your driver and compare it to the most recent version on the manufacturer’s website.
How to check the Wi-Fi driver version on Windows
Based on the previous paragraph, you may need to periodically check the Driver version installed on your PC. However, many users do not understand where they can check the version of the driver for their Wi-Fi adapter. Let’s understand what exactly is needed to do this:
- Right-click on the Start button in Windows.
- From the drop-down menu, select Device Manager.
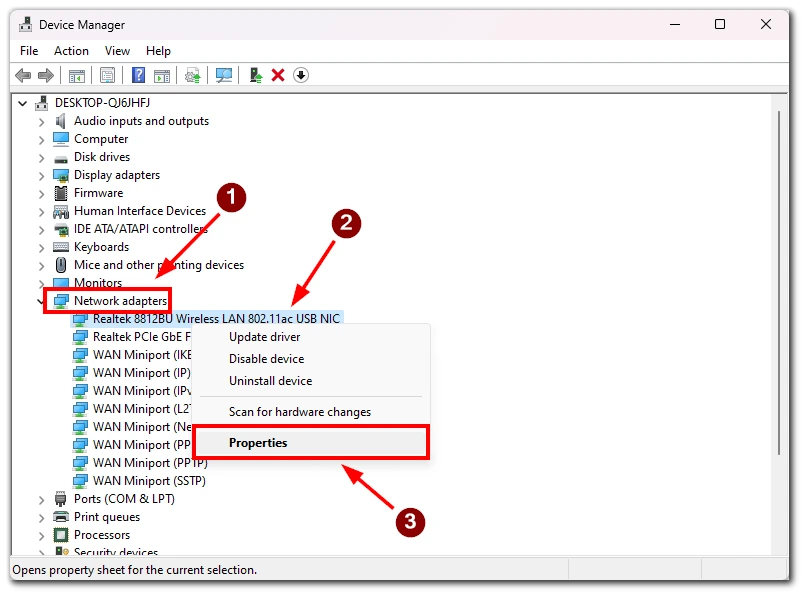
- In the list, find Networks adapters.
- Once there, locate your device and right-click on it.
- Click on Properties in the drop-down menu.
- Go to the Driver tab at the top of the window that appears.
- This is where you will see the Driver Version field.
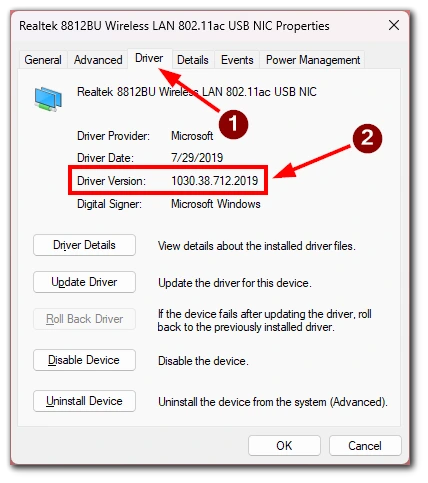
As I described above, you should compare this version with the driver on the site of the manufacturer of your Wi-Fi adapter or your motherboard if it is integrated. Also, note that you can find an Uninstall Device button here. It will help you to reinstall the drivers. Uninstall the device and restart your PC. Windows will automatically reinstall the driver.


