

There are two ways to disable the touchscreen on your Windows laptop. You can do it using Device Manager or Registry Editor. The steps are the same for both Windows 10 and Windows 11.
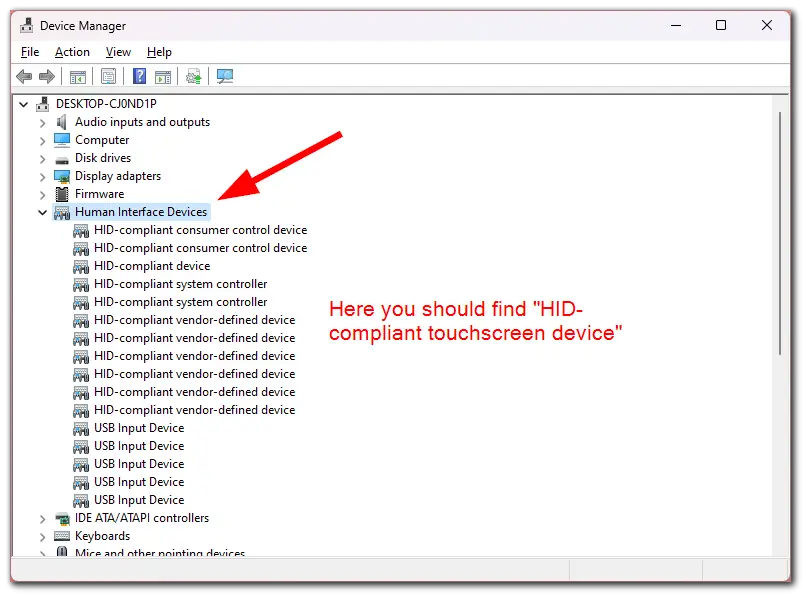
So if you want to use Device Manager, you need to open it from the Start menu, go to the Human Interface Devices category and expand it. From there, you need to find a HID-compliant touchscreen device and disable it. You may also need to disable Surface Touch devices just in the same way if you have a Surface Pro.
Regarding Registry Editor, you need to create a new value on the path provided in the article below and set it to 1.
So now, let’s look at how it works in more detail.
How to turn off a touchscreen on Windows using Device Manager
So follow these steps:
- Open the Start menu, search for Device Manager, and open it.
- Expand the Human Interface Devices category.
- Right-click on the HID-compliant touchscreen device and select Disable device. (This screenshot is just an example.)
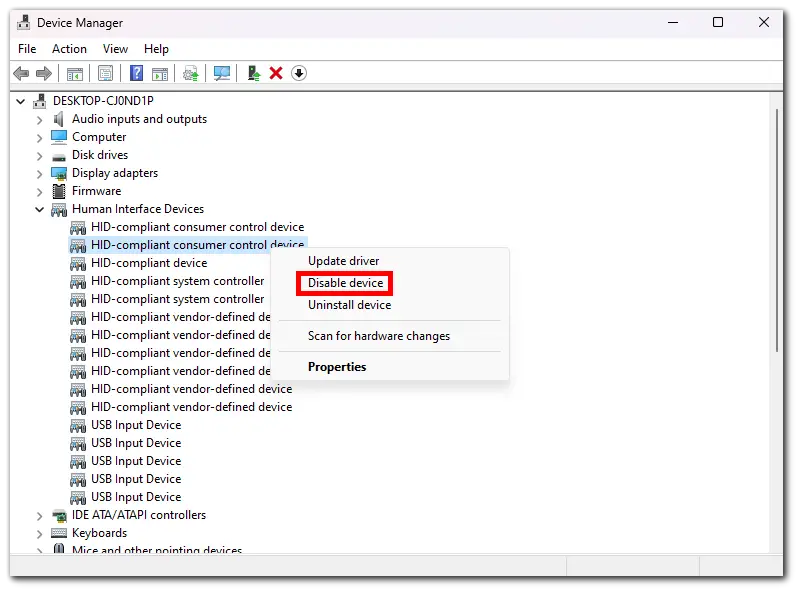
- After that, click Yes to confirm.
- Repeat the same steps if you want to turn it back on, but select Enable device.
In addition to this setting, you may also need to disable other touchscreen-related settings. For example, if you own a Surface Pro, you will also need to disable all Surface Touch devices.
How to turn off the touchscreen on Windows using Registry Editor
If you want to turn off the touchscreen on your Windows 11 laptop using the registry editor, you have to follow these steps:
- Open the Start menu, search for Registry Editor, and open it.
- Navigate to the following key:
HKEY_LOCAL_MACHINE\SYSTEM\CurrentControlSet\Control\Touch
- Create a new DWORD (32-bit) value and name it DisableTouch.
- Set the value of DisableTouch to 1.
To re-enable the touch screen, follow the same steps and set the value of “DisableTouch” to 0.
Can I disable the touchscreen from BIOS?
Yes, you can disable the touchscreen from BIOS. The exact steps to do this will vary depending on your computer’s manufacturer and BIOS settings, but here are the general steps:
- Restart your laptop and press the appropriate key to enter the BIOS. The most common keys are F2, F10, F12, Del, or Esc.
- Use the arrow keys to navigate to the Advanced or System settings.
- Look for the option to disable the touch screen. This may be called “Touchscreen Support” or something similar.
- Set the option to Disabled and save your changes.
Once you have disabled the touch screen in BIOS, it will be disabled even after you boot into Windows.
Is there a keyboard shortcut to turn off the touchscreen on Windows?
There is no keyboard shortcut to turn off the touch screen in Windows. However, you can use the Windows key + X keyboard shortcut to open the Device Manager and then follow the steps above to turn off the touch screen.
What are the benefits of disabling the touchscreen on Windows?
There are a few benefits to disabling the touch screen on Windows.
- First, it can help to improve battery life.
- Second, it can prevent accidental touches from interfering with your work.
- Third, it can make using your laptop or tablet easier in public, as you don’t have to worry about people accidentally touching the screen.
I disabled the touchscreen, but it’s still working. What should I do?
If you have disabled the touch screen and it’s still working, you can try a few things.
- First, make sure that you have followed the steps correctly.
- Second, try restarting your computer.
- Third, you can try updating your drivers.
If you are still having problems, you can contact your laptop or tablet manufacturer for help.


