
")
If you have too many screenshots on your Mac, you can delete them in different ways also if you want to free up space on your desktop. Because by default, when you take a screenshot on your Mac, it’s saved as a PNG file on your desktop.
At the same time, you can change where all other screenshots you take will get saved. To start managing screenshots on your Mac, you should read the following steps.
What to do to delete a screenshot?
To find screenshots to delete them later, you can use Spotlight search. To do this, use the Command + Space shortcut and enter the name of the screenshot if you have changed it. If you didn’t do that, you can write in the field ‘Screenshot’ and specify the time or date as the screenshot will be saved automatically with the name ‘ScreenShot<data>at<time>.’
Regardless of the location of your screenshot, if it’s on the desktop or in a folder, your actions will be the same. It also doesn’t matter how many screenshots you delete. You must do the same steps whether you delete one or many screenshots. So to delete a screenshot, you have to follow these steps:
- The first step is to select one or more screenshots and right-click them.
- Then the next step is to select ‘Move to trash.’
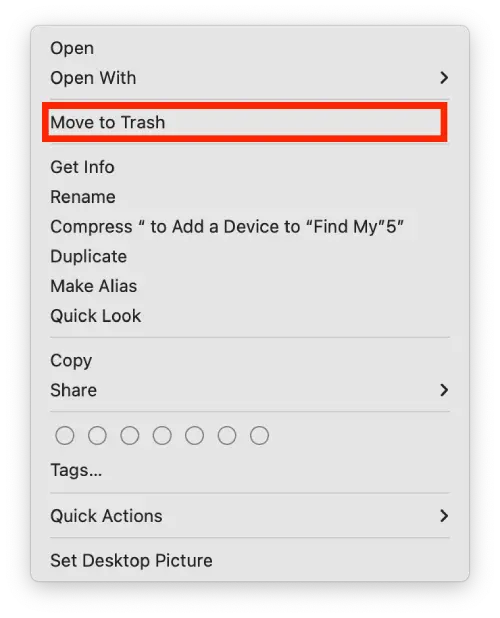
After these steps, your screenshot will be moved to Trash. You can return it if necessary. If you want to remove a screenshot permanently, you must delete it from Trash. To do that, select ‘Delete Immediately.’ If you wish to return the screenshot to the same folder, you have to click on ‘Put back.’
Read also:
- How to schedule a time to open or close an app on Mac?
- How to remove quick search on Chrome on Mac?
- What to do if MacBook Pro isn’t turning on
How to delete a screenshot on Mac using a shortcut?
There are other ways to delete screenshots. You can use shortcuts to do this. Many shortcuts allow you to manage, make various kinds of, and delete screenshots. Shortcuts to delete screenshots:
- Command + Delete – Move the screenshot to Trash. To do this, you must first select the desired screenshot.
- Option + Command + Delete – Delete the screenshot permanently without moving it to the Trash. After using this shortcut, you won’t be able to return the screenshot.
This method will help you delete screenshots faster if necessary.
How to change where screenshots are saved on Mac?
Since screenshots are saved on the desktop by default, this can create a mess. This is a frequent reason to delete screenshots because they don’t take up much space. One screenshot is about 1 MB. You can do that if you want to get rid of that and have your screenshots in a specific folder. To do this, you need to change where screenshots are saved on Mac:
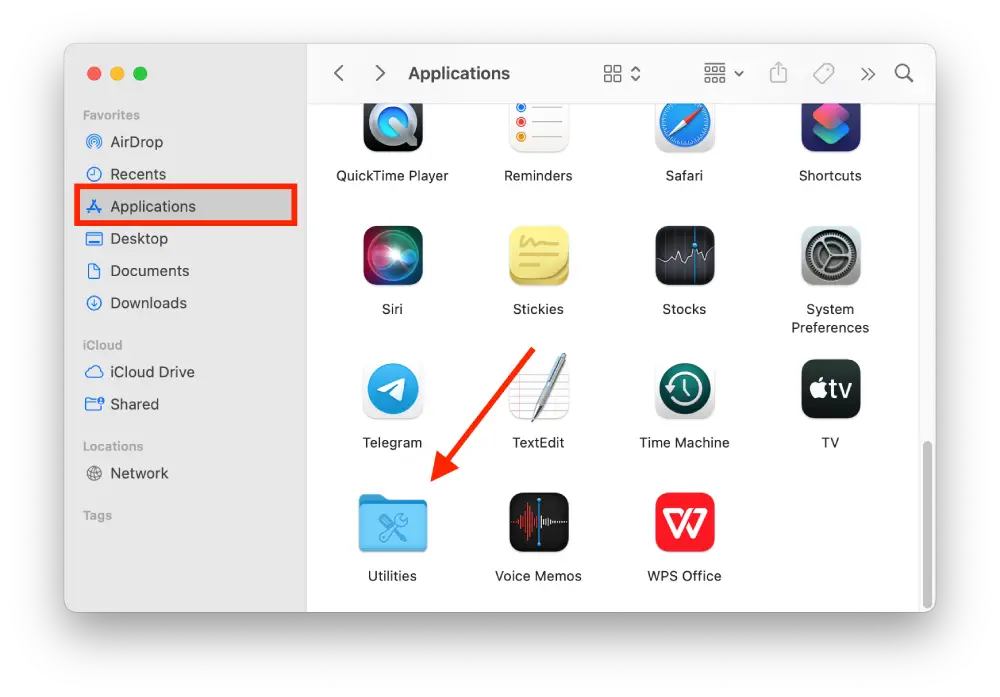
- The first step is to open the Finder app.
- After that, select the Applications section.
- Then the next step is to locate the Utilities folder and press the Enter button.
- Next, you need to open the Screenshot app.
- Then press Shift + Command + 5 to open the Screenshot app directly.
- Then you’ll see the bottom screenshot management menu. Click on Options.
- After that, in the Save To menu, you’ll see options. Click on the one you want, this will be the place to save your screenshots.
This way, you can create a separate folder and store all the necessary screenshots. This will allow you not to have chaos on your desktop but also give you the ability to have quick access to the files you need and use them.


