

Recording audio-only content is essential for various purposes, such as creating podcasts, extracting music from videos, or capturing audio for specific projects. OBS (Open Broadcaster Software) is a versatile tool primarily used for live streaming and recording video content, but it can also be configured to capture audio-only files. However, you should understand that the OBS is not designed to record audio only and may not be the best solution for this task.
How to set OBS to record audio only?
As I mentioned before, OBS is not the best solution for capturing audio from your computer. However, by changing some settings, you can make this program more suitable. If you’re looking to record audio-only content using OBS (Open Broadcaster Software), follow these detailed instructions:
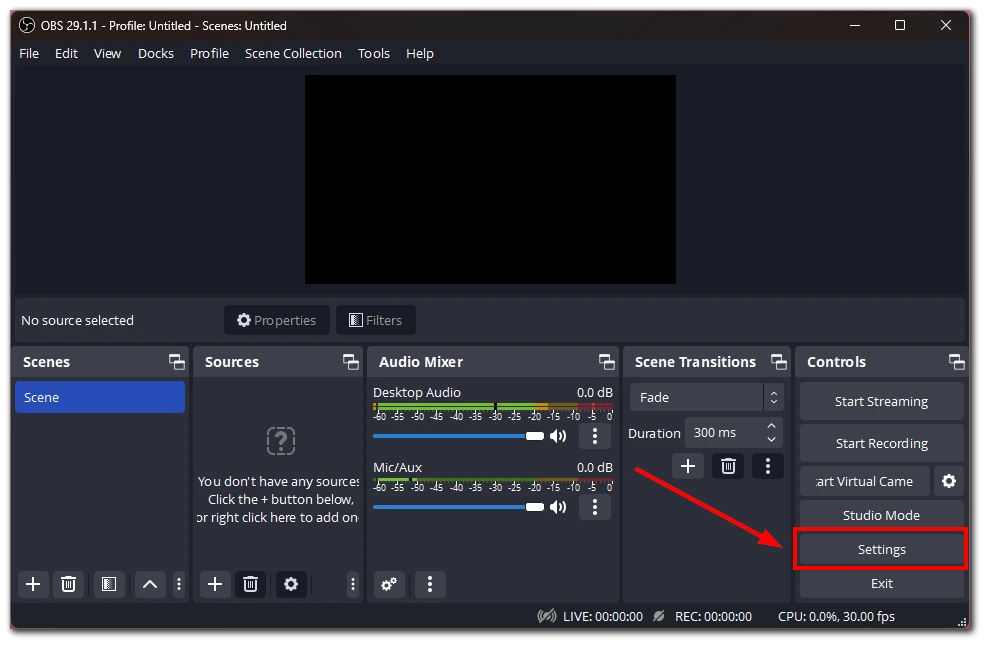
- In the OBS main interface, click on the “Settings” button at the screen’s bottom right corner. This will open the Settings window.
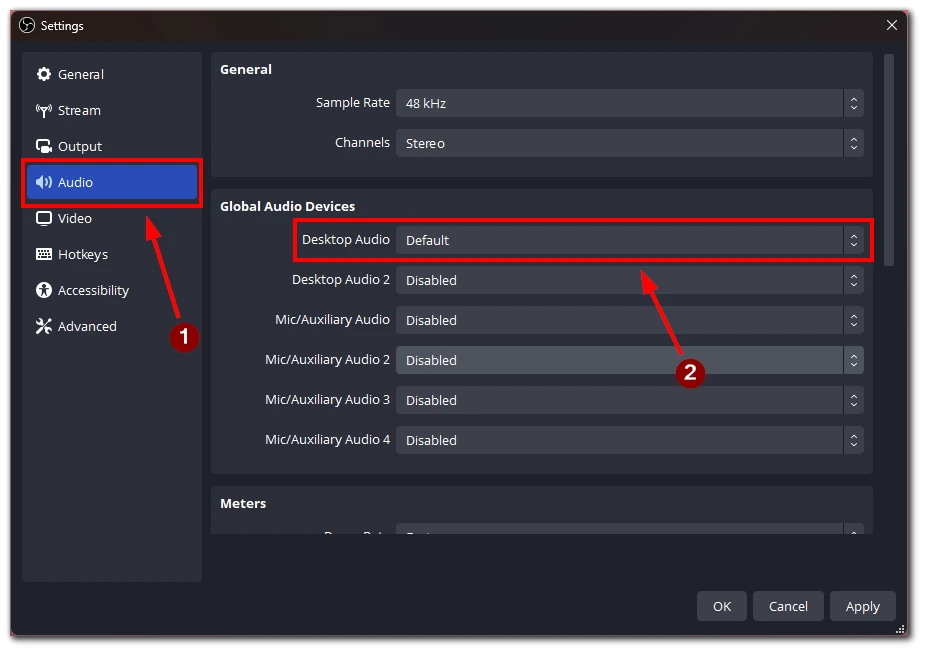
- Within the Settings window, navigate to the “Audio” tab. Under the “Audio Mixer” section, locate the “Desktop Audio” option and set it to “default.” This ensures that OBS captures the audio from your computer’s default audio output.
- If you want to exclude additional audio sources, such as microphones or external devices, disable them in the Audio Mixer section by clicking the eye icon next to each source you wish to turn off.
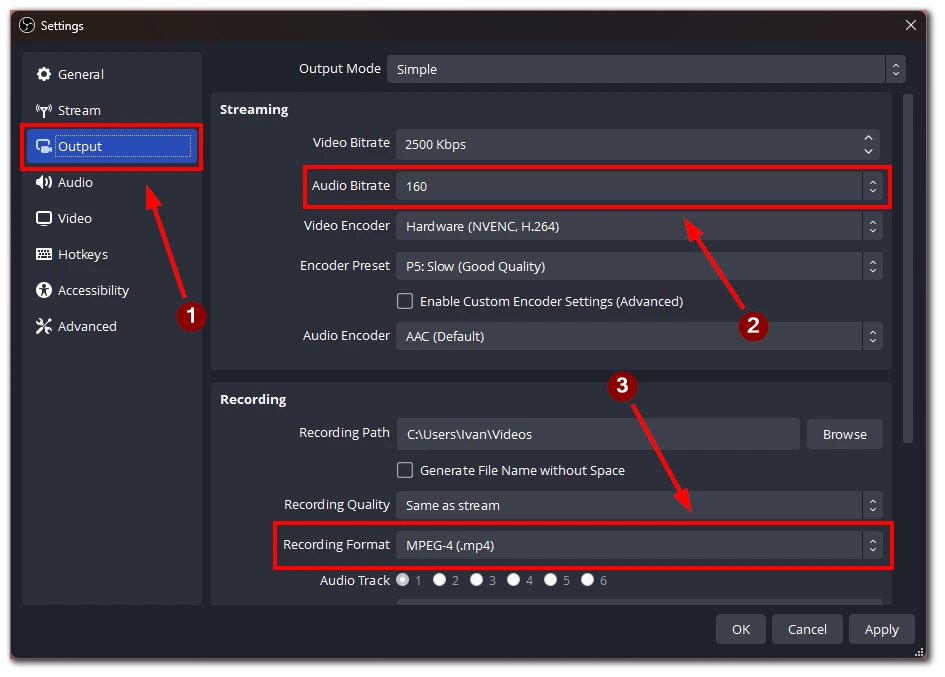
- In the Settings window, navigate to the “Output” tab. Here, you can specify the settings for your output file. Choose a video file format easily convertible to audio, such as MP4 or MOV, to capture the game audio. Ensure the file format is compatible with the program or website you plan to use to extract the audio later.
- In the Output tab, locate the “Audio Bitrate” option. Adjust the bitrate to your desired level. Higher bitrates typically result in better audio quality, but they also result in larger file sizes.
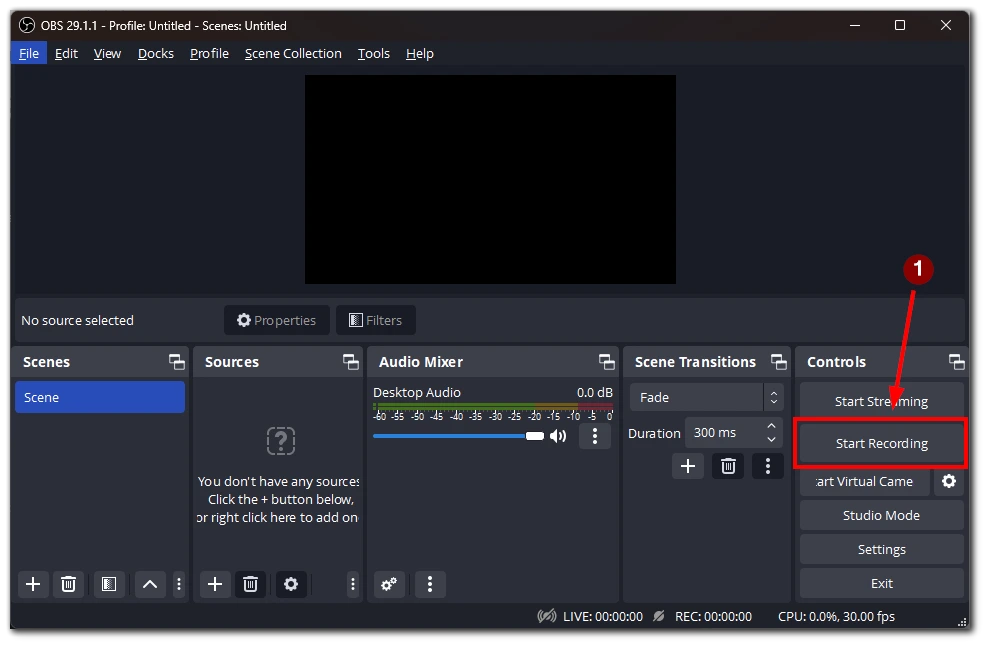
- Return to the main OBS interface and click the “Start Recording” button to capture the audio. Ensure that the game or application you want to record audio from is playing during the recording session.
- After capturing the desired audio, click the “Stop Recording” button in OBS. The recording will be saved to your specified output file location.
Since OBS can only save files in video format, you will get a video file with a black screen and captured audio. After that, you will need to use a program or online service to reformat the video file into an audio file.
What services can be used to convert a video file into an audio file
There are several services available that allow you to convert a video file into an audio file. Here are some popular options, along with detailed instructions on how to use them:
OnlineVideoConverter
- Visit the OnlineVideoConverter website.
- Click on the “CONVERT A VIDEO LINK / URL” button if you have the video file hosted online. Alternatively, click on the “CONVERT A VIDEO FILE” button if the video file is stored locally on your computer.
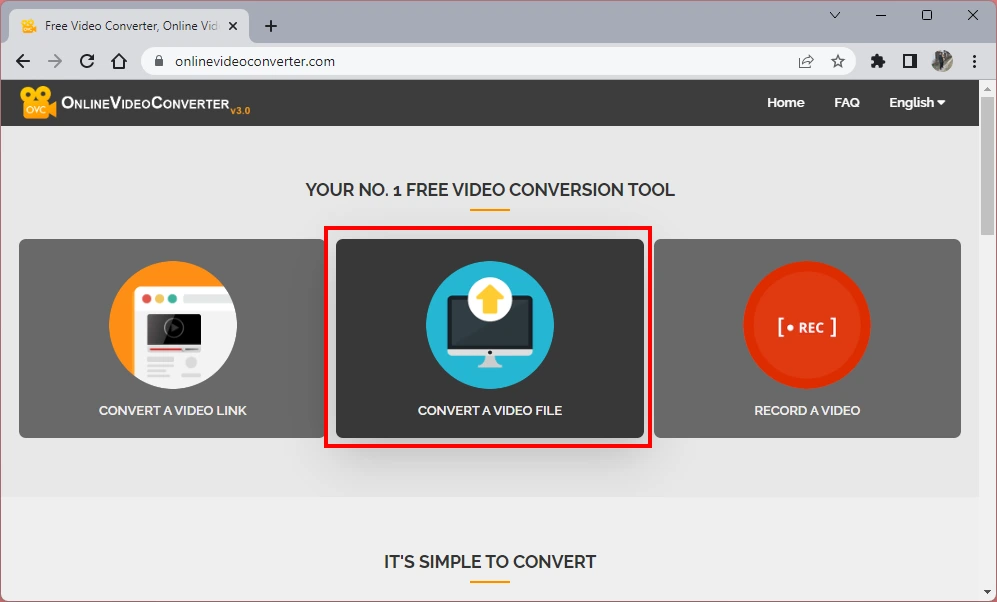
- If you choose to convert a video file from your computer, click on the “Select or Drop File” button and navigate to the location where the video file is stored. Select the file and click “Open.”
- Once the video file is uploaded, select the desired audio format for conversion. For example, you can choose MP3 as the output format.
- Click on the “START” button to initiate the conversion process. The service will convert the video file into an audio file in the selected format.
- After the conversion, click the “DOWNLOAD” button to save the audio file to your computer.
Online Audio Converter
- Go to the Online Audio Converter website.
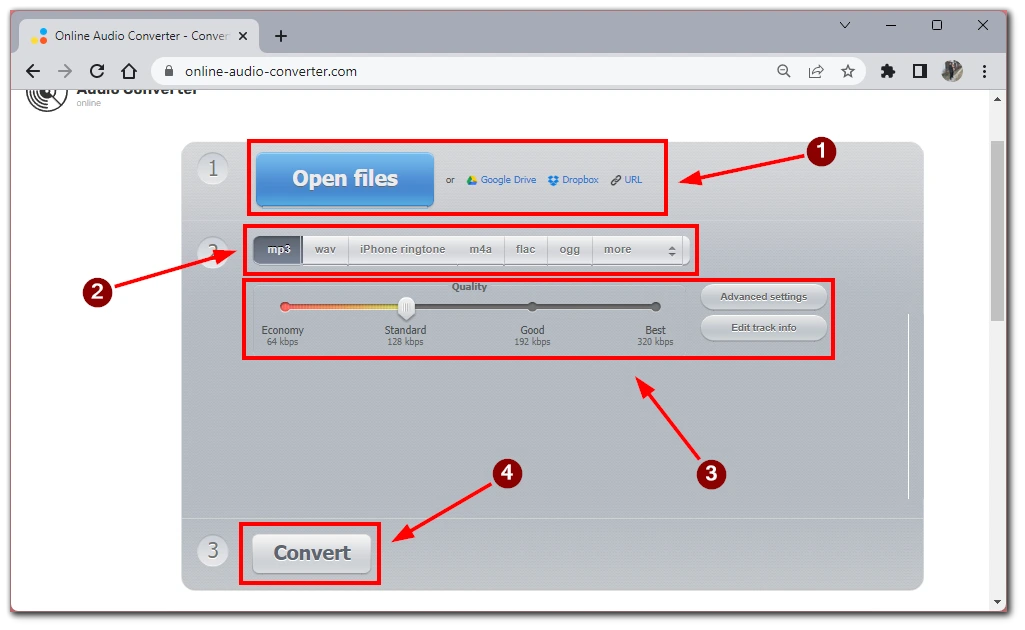
- Click the “Open Files” button to browse and select the video file from your computer.
- Once the video file is uploaded, you can choose the output format for the audio file, such as MP3, AAC, or WAV.
- Optionally, you can customize the audio settings, including the bitrate, sample rate, and channels.
- Click on the “Convert” button to start the conversion process.
- Once the conversion is finished, click the “Download” button to save the audio file to your computer.
VLC Media Player:
- If you have VLC Media Player installed on your computer (available for free at www.videolan.org), you can convert video files into audio files.
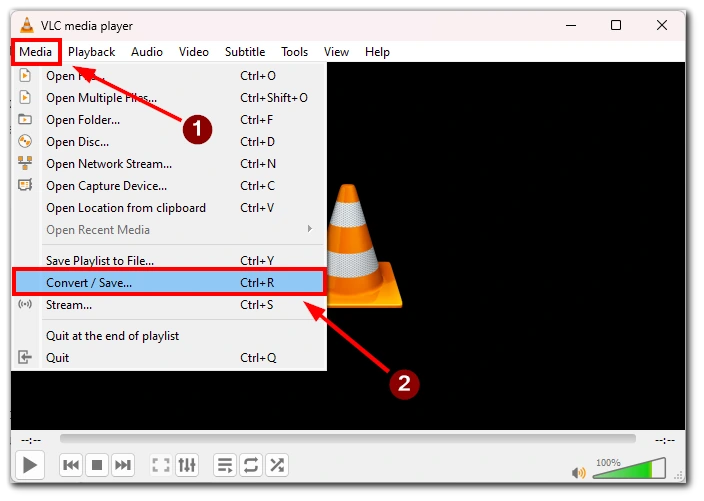
- Open VLC Media Player and click “Media” in the menu bar.
- Select “Convert/Save” from the drop-down menu.
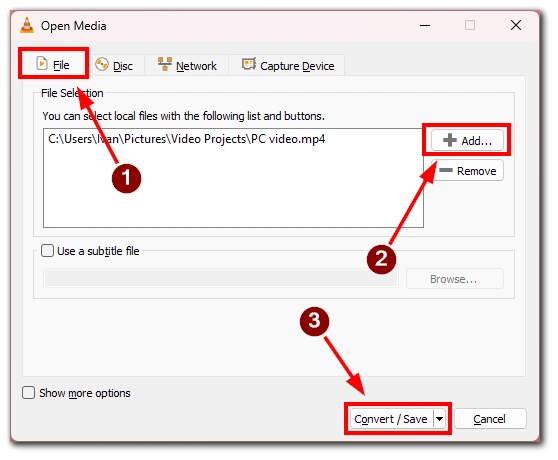
- In the “File” tab, click the “Add” button and browse for the video file you want to convert.
- Click on the “Convert/Save” button at the bottom of the window.
- Choose the desired audio format in the “Profile” section, such as MP3 or WAV.
- Specify the destination folder and file name for the converted audio file.
- Click on the “Start” button to begin the conversion process.
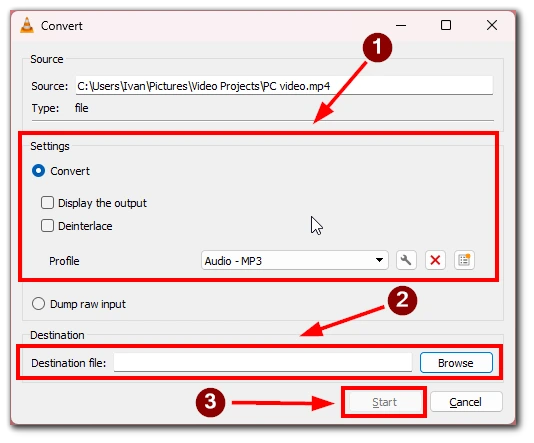
- Once the conversion is complete, the audio file will be saved in the specified location.
These services and tools provide convenient ways to convert video files into audio files, allowing you to extract the audio content from your recorded videos. Remember to check the terms of use and ensure you have the necessary rights to convert and use the video audio content.
What other programs can you use to record audio only?
If you do decide to use a specialized application to record audio then I can advise you on a few options. There are several programs available for recording audio-only content, each offering unique features and functionalities. Here are some popular options:
- Audacity: Audacity is a free and open-source audio recording and editing software. It provides a user-friendly interface and allows you to select your desired audio input source, such as a microphone or system audio. Audacity offers various editing tools and effects to enhance your audio recordings, and you can export the final result in different formats.
- Adobe Audition: Adobe Audition is a professional audio recording and editing software. It offers comprehensive features, including multitrack recording and advanced audio editing capabilities. With Adobe Audition, you can select your audio input source, record high-quality audio, apply effects, and export the final audio file in your preferred format.
- GarageBand (Mac): GarageBand is a free audio recording and editing software for Mac users. It provides an intuitive interface and lets you choose your audio input source, such as a built-in microphone or external audio interface. GarageBand offers a range of tools and effects to edit and enhance your audio recordings, and you can export the final audio file in various formats.
- VoiceMeeter: VoiceMeeter is a virtual audio mixer and recorder for Windows. It allows you to route and record audio from different sources, including microphones and system audio. VoiceMeeter offers options to adjust audio levels, configure settings like sample rate and buffer size, and save recorded audio files in your desired format using compatible audio editing or conversion software.
These programs cater to different levels of expertise and requirements. Whether you need a simple and free solution like Audacity, a professional-grade software like Adobe Audition, or a Mac-specific option like GarageBand, you can find a program that suits your needs for recording audio-only content. Consider the features, user interface, and compatibility with your operating system to make the best choice for your audio recording projects.


