

Do Not Disturb mode on Alexa devices is very easy to activate. All you need to do is to wake up Alexa and ask her to activate this mode with a voice command. You can also do it manually in the app. You need to go to your device and press the moon button to enable this mode. Note that when the mode is enabled, the light ring glows purple.
Also, if you go to Device Settings in the Alexa app, you can find the Do Not Disturb option there. In this tab, you can enable a schedule for this mode to turn on at certain times of the day automatically.
Below you will find detailed instructions on how to do this.
What does the Do Not Disturb mode do on Alexa?
The ‘Do Not Disturb’ mode on Alexa is a valuable feature that temporarily allows users to silence notifications and interruptions from their Echo devices. When this mode is activated, Alexa will not emit any sounds, including incoming calls, messages, timers, reminders, or notifications from other Alexa-compatible devices.
The primary purpose of the ‘Do Not Disturb’ mode is to create a peaceful and uninterrupted environment. It is especially useful when you need quiet, such as focusing on a task, having a conversation, or simply enjoying some downtime. By enabling this mode, you can ensure that Alexa remains silent and avoids any potential disruptions.
The ‘Do Not Disturb’ mode is highly customizable, allowing users to specify the exact periods during which they want to silence notifications. This can be particularly helpful during important events, meetings, or designated quiet hours in your home. With the ability to schedule the ‘Do Not Disturb’ mode, you can automate its activation and ensure that interruptions are minimized when needed.
How to turn on Alexa’s ‘Do Not Disturb’ mode
Enabling the ‘Do Not Disturb’ mode on Alexa is a simple process that can be done using the Alexa app on your mobile device or using voice commands. Here’s a step-by-step guide on how to turn on Alexa’s ‘Do Not Disturb’ mode:
Using voice command
To activate Alexa’s ‘Do Not Disturb’ mode using voice commands, simply wake up Alexa by saying the wake word, such as “Alexa.” Once Alexa is activated, say the command, “Alexa, turn on ‘Do Not Disturb.'” Alexa will then confirm that the ‘Do Not Disturb’ mode has been activated, and your Echo device will silence notifications and interruptions until you manually turn off the mode. This hands-free method provides a convenient way to enable ‘Do Not Disturb’ mode quickly without using the Alexa app or navigating through device settings.
Using Alexa app
Launch the Alexa app on your mobile device. Ensure that you are signed in with the same Amazon account used for your Alexa-enabled devices.
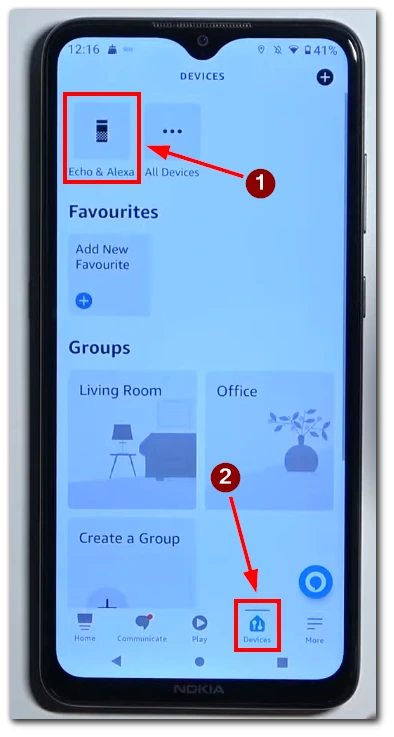
- Tap on the Devices icon, usually located at the bottom right corner of the screen.
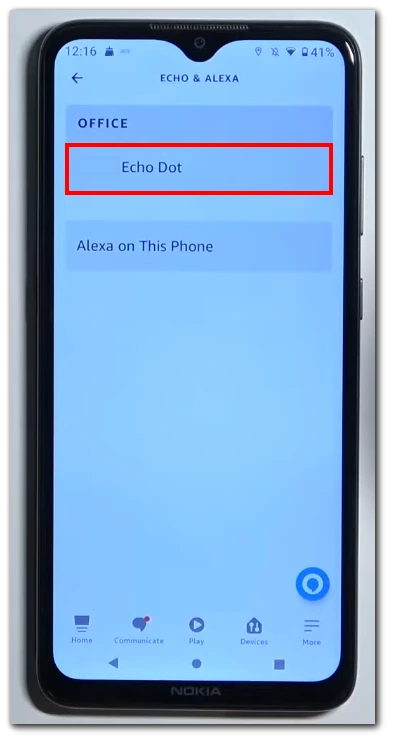
- Then tap on Echo & Alexa button. This will take you to the list of devices associated with your Alexa account.

- From the list of devices, choose the specific Echo device for which you want to enable the ‘Do Not Disturb’ mode.
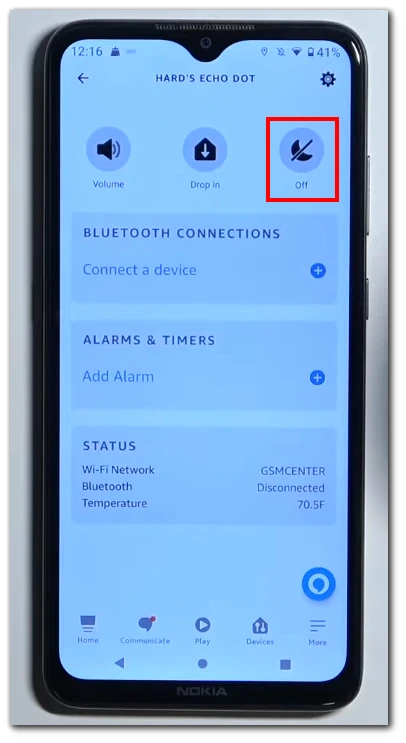
- Tap the moon button at the top right of the page to activate Do Not Disturb mode.
It’s important to note that enabling the ‘Do Not Disturb’ mode on one Echo device will not automatically apply it to all your Alexa-enabled devices.
If you wish to activate this mode across multiple devices, you must repeat these steps for each device individually. Or you can tap the Synchronize button to apply this mode to all devices connected to your Alexa account at once.
How to schedule Alexa’s Do Not Disturb mode
Scheduling Alexa’s ‘Do Not Disturb’ mode allows you to automate the activation of the mode during specific periods of the day. This feature is especially useful if you want to establish quiet hours or ensure uninterrupted sleep without manually enabling the mode each time. Here’s how you can schedule Alexa’s ‘Do Not Disturb’ mode:
- Launch the Alexa app and tap on the Devices icon, usually located at the bottom right corner of the screen.
- After that, tap on Echo & Alexa button. This will display a list of your connected devices.
- Choose the specific Echo device for which you want to schedule the ‘Do Not Disturb’ mode.

- Then tap on the settings gear icon at the top right corner of the screen.

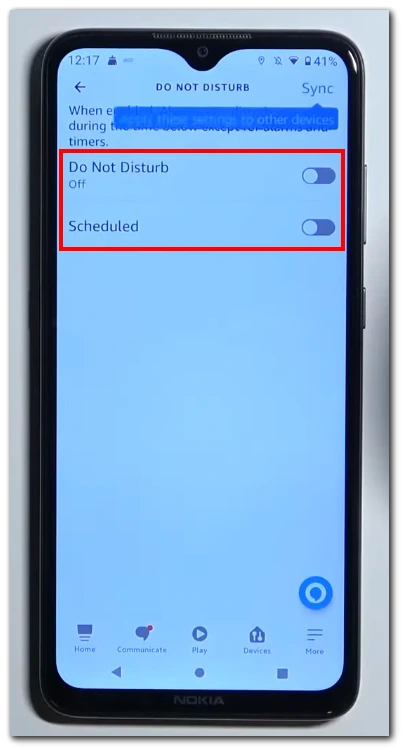
- Scroll down the device settings page until you find the ‘Do Not Disturb’ option. It is typically located under the General settings.
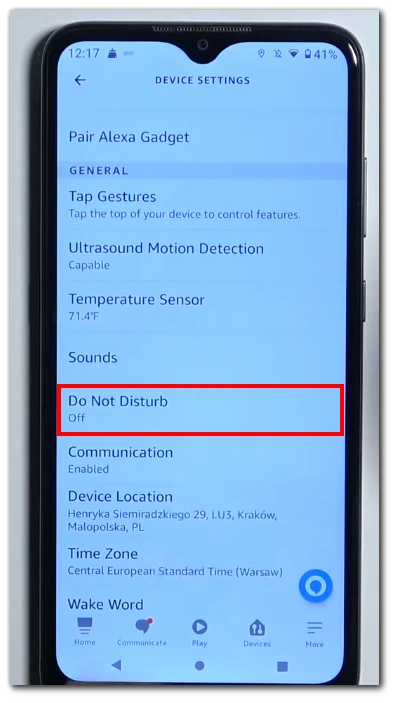
- Toggle the switch next to ‘Do Not Disturb’ to turn it on.
- After enabling the ‘Do Not Disturb’ mode, tap on the ‘Scheduled’ option. This allows you to define the specific days and time range during which you want the ‘Do Not Disturb’ mode to be active.
- Select the time during which you want to schedule the ‘Do Not Disturb’ mode to activate.
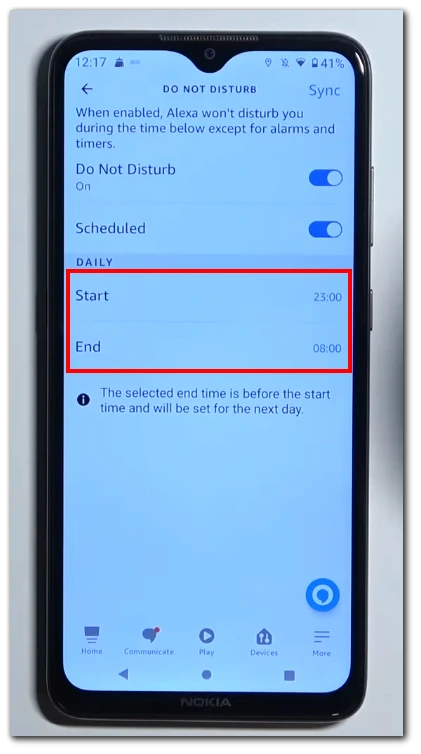
Next, set the start and end time for the ‘Do Not Disturb’ mode. This determines the time range when notifications and interruptions will be silenced. For example, you can set it to start at 10:00 PM and end at 7:00 AM to establish a quiet period during your sleep hours.
How to know if Alexa’s Do Not Disturb mode has been activated
Most Echo devices have a light ring that reflects the device’s status. When the ‘Do Not Disturb’ mode is enabled, the light ring will emit a solid purple glow. This serves as a visual indicator that notifications and interruptions are being muted.
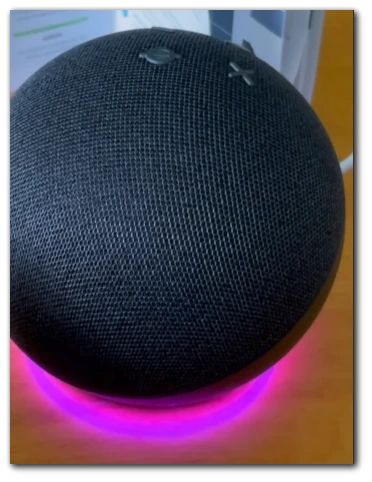
Simply glance at your Alexa device and observe the color of the light ring. If it is purple, it means the ‘Do Not Disturb’ mode is active. If the light ring displays a different color or is turned off, it indicates that the ‘Do Not Disturb’ mode is not currently enabled.
How to fix you cannot turn on Do Not Disturb mode
Suppose you are experiencing difficulties when trying to turn on the ‘Do Not Disturb’ mode on your Alexa device. In that case, you can take several troubleshooting steps to resolve the issue. Here are some potential solutions:
- Check device compatibility: Ensure your Alexa device supports the ‘Do Not Disturb’ feature. Some older or specialized devices might not have this functionality. Check the device specifications or consult the manufacturer’s documentation to confirm if the ‘Do Not Disturb’ mode is supported.
- Verify internet connectivity: Alexa devices rely on a stable internet connection to function properly. Ensure your device is connected to the internet and has a strong and stable Wi-Fi signal. If your internet connection is weak or experiencing disruptions, it might prevent the ‘Do Not Disturb’ mode from being enabled. Try restarting your router or moving the Alexa device closer to the Wi-Fi source.
- Check for software updates: Outdated software can sometimes cause unexpected issues. Ensure that both the Alexa app on your mobile device and your Echo device’s firmware are up to date.
- Restart your Alexa device: A simple restart can often resolve minor glitches and restore proper functionality. To do this, unplug the power adapter from the device and wait for about 10 seconds. Then plug the power adapter back into the device.
- Reset the Alexa device: If the issue persists, you can try resetting your Alexa device to its factory settings. Keep in mind that resetting will erase all custom settings and preferences, so it should be considered a last resort. Consult the device’s user manual or the manufacturer’s website for instructions on how to perform a factory reset.
- Contact customer support: If none of the above steps resolve the issue, it’s recommended to reach out to Amazon customer support for further assistance. They have specialized knowledge and can provide specific troubleshooting steps or offer guidance tailored to your device and situation.
Following these troubleshooting steps can increase the chances of resolving the issue and successfully enabling the ‘Do Not Disturb’ mode on your Alexa device.


