

I want to tell my story with my Lenovo IdeaPad 5 laptop. I had been using the laptop for a little over a year and suddenly noticed that when I opened the lid on the left side, the frame near the left hinge began to pull away from the screen. I decided to deal with the problem as soon as possible. After a couple of days, the left hinge of the laptop stopped working, and the laptop cover broke on the left side. It was time for a repair; after looking at where the hinge was attached, I saw that it had been ripped out of the cover, along with the nuts and the screws that hold the hinge to the cover. Since the cover was broken, I decided to start the repair by replacing the laptop cover. So, here’s how to choose the right laptop cover. I decided to tackle the hinges later since hinges break very rarely, usually due to factory defects or excessive mechanical abuse.
Choosing the top cover for Lenovo IdeaPad 5 model (15IIL05, 15ARE05, 15ITL05), MTM (81YK, 81YQ, 82FG )
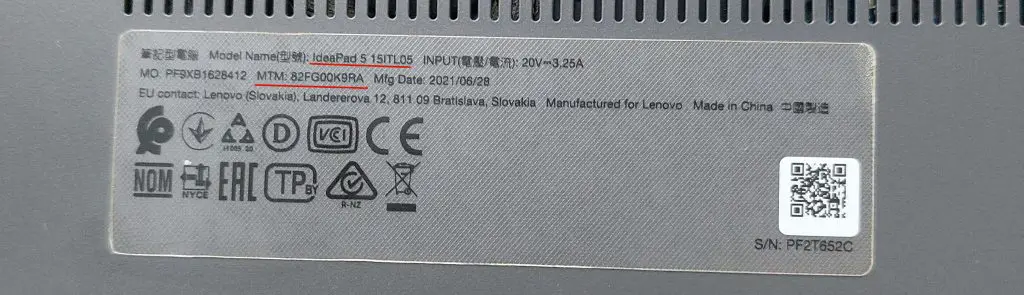
Find the sticker on the back of the laptop; on it, you will find the name IdeaPad 5 (this is the commercial name of the line of laptops, (it does not mean anything in our case). Next comes the model number of the laptop 15ITL05; the model is okay to look for the correct part, but pay attention to the inscription MTM 82FG00K9RA.
MTM Lenovo – is Machine Type Model (MTM), and for a general understanding of the laptop’s package, 82FG is the laptop’s housing type. I found the data I need; I need to find the cover for the laptop IdeaPad 5 15ITL05 in the case 82FG.
Where to Find a Lenovo Laptop Screen Cover
Great selection on Aliexpress, but long delivery time; you can buy it on Amazon a little more expensive, but you will get a new top display cover pretty quickly. Also, you can search on the internet for a company that sells spare parts for Laptops. Also, you can take the laptop to the service center; the top cover replacement will cost from $100 to $200.
How to change the top cover of Lenovo IdeaPad 5 15ITL05
Having received a new cover, I replaced it; how to change it can be seen on the official Lenovo website (repair video). But I will focus on some critical points, but they don’t tell you about them.
To repair, you will need a unique set of tools, screws on the bottom of the case under the hexagon, and other screws are cross-shaped but of different sizes.
Procedure for replacing the screen cover of Lenovo IdeaPad 5 15ITL05
- First, remove the bottom cover and disconnect the battery; it is a must. You’ll have to work hard with the tiny connector, and the hard wires from the battery make it quite tricky, but you’ll get through it.
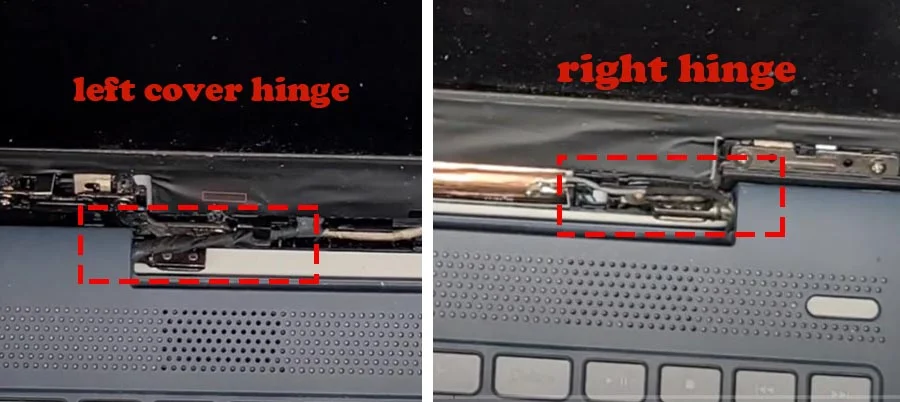
- Then remove the frame around the screen and unscrew the hinge from the laptop cover (the right one in my case, as the left one is broken), turn the laptop with the keyboard downwards (screen also), and disconnect the screen cable from the main board and remove the wires from the WiFi module that go to the antennas in the cover. Now you get the two parts of the laptop and the screen. The laptop cover is made so that it does not open at 180 degrees so as not to break something in the cover; I recommend you unscrew it first and then remove the connectors.
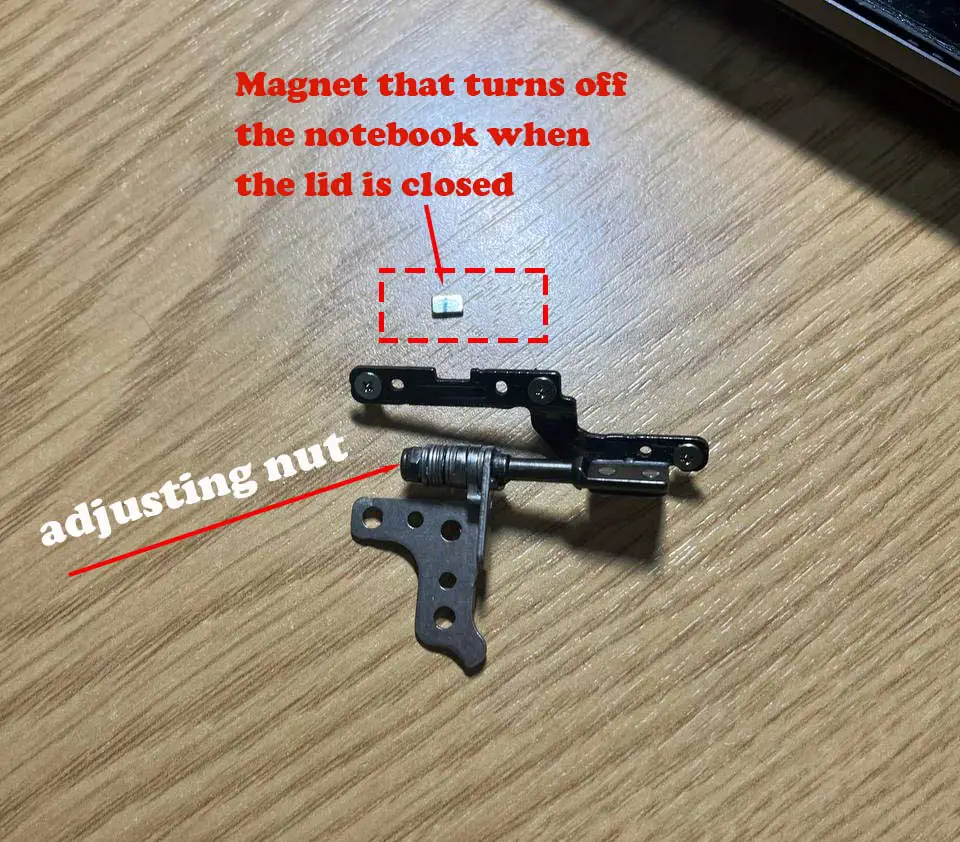
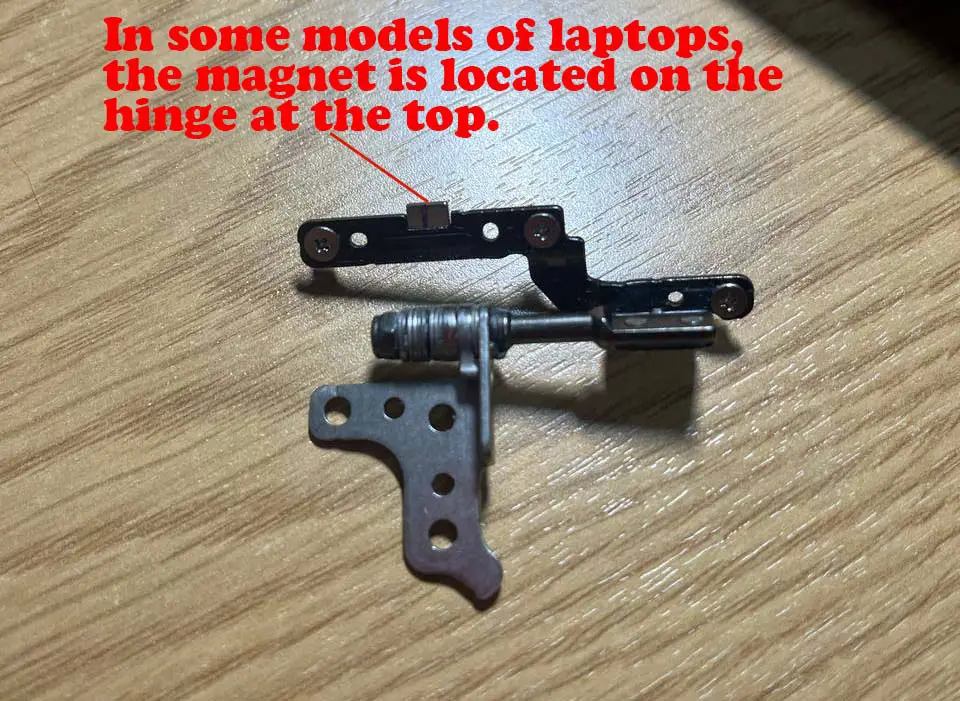
- Unscrew the hinges from the laptop. When disassembling, the left hinge should be a small magnet that controls the closing of the lid, do not lose it, and see if it is not stuck to any elements on the main board. I will tell you more about the magnet later.
- Also, I’ll describe how to adjust the hinges, but in the meantime, put the laptop and the hinges aside and replace the cover, it’s easy if everything goes right, but in my case, it didn’t go as expected.
Removing the display from the cover of the IdeaPad 5 15ITL05
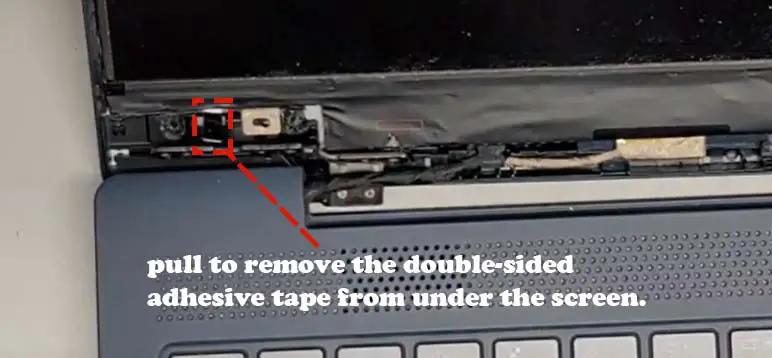
The display is attached to the cover with double-sided tape, but it’s not just tape. At the hinge point, there are little black plastic tails that you must pull on and pull double-sided special adhesive tape out from under the display. I quickly pulled the left side out, but the right side came off. I started thinking about how to remove the tape; ripping off the display was risky because it could have been damaged. The best idea was to get a plastic knitting hook and hook the ribbon with it to get it out from under the display, but I didn’t have one; I used a wooden sushi stick, ripped the ribbon off the screen, and case a bit first, then pulled a piece of ribbon from under the screen, and then pulled the whole ribbon out. Now the display can be easily removed (disconnect the connector) and set aside.
Then disconnect the cable to the camera and the camera itself from the cover; the old display cover can now be thrown away and proceed to replace it.
Laptop cover hinges, adjustment
If in my case, the hinge broke the cover on the left side, then there is something wrong with it. You should know that if you try to open and close the hinge with your hands, you will think that it moves very hard; in fact, it is not, it is just tiny and has a small lever, and you need to exert force to move it. But when it is mounted on the laptop’s cover, the lever increases at the expense of the cover itself.
There is an unspoken “one-handed” rule: if you can open the laptop with one hand and don’t have to hold the computer, then the hinges are adjusted correctly.
The Lenovo IdeaPad 5 has a left hinge with a self-locking nut, and the right hinge has a regular nut, but it only turns half a turn (this is the adjustment). I inspected the left hinge; it was moving very hard and had dust on it; I loosened the nut a bit and lubricated it with special oil (for mechanical watches). If you don’t have it, skip this point; watch oil is highly penetrating, doesn’t dry out, and is used for precision mechanisms. Do not loosen the left hinge too much. Otherwise, the laptop cover will not lock properly in the open position and will spontaneously open to the maximum. Loosen the hinge no more than half a turn of the nut. I also greased the right hinge, and that’s it; you can move on to replacing the cover and reassembling the laptop.
Do not grease the hinges with olive oil; it will dry out in a month, and your hinge will stop moving.
You can buy oil to lubricate mechanical watches, you can use it for door hinges or to lubricate refrigerator hinges.
Transferring the display to the new Lenovo IdeaPad 5 cover
Now you need to assemble everything in the new laptop cover.
- Install the camera and secure the cable from the camera across the laptop cover.
- Remove the protective tapes from the film on the cover.
- Take the display and install the flat cable into the connector; make sure it is installed correctly; once you put the display on the adhesive tape, you will lose access to it.
- Place the display on the cover, and pay attention to the gaps on the sides to ensure they are the same.
- Secure the hinges to the laptop case.
- Fasten the hinges to the laptop cover, and notice how the wires should lay left and right (the left is the display, and the right is the two wires to the WiFi antennas on the cover). They should lay on top of the hinge. Otherwise, you won’t install the display frame.
You can check how your laptop opens and adjust the hinges if necessary, but you will have to remove them to adjust them. If you are satisfied, install the magnet that controls the closing of the cover (more on that later).
- Install the display frame.
- Connect the battery.
- Install the bottom cover of the notebook.
How the laptop shuts down when closing the lid Lenovo IdeaPad 5
To ensure that the laptop turns off when closing the lid is very simple, a magnet is installed in the lid, and a sensor in the laptop, which reacts to the magnetic field and gives the command to shut down or put the laptop to sleep mode, depending on the settings. This little magnet is located near the left hinge of the lid. Depending on the model, there can be several placement options; there is a cutout in the hinge itself where you can put the magnet. But in my IdeaPad 5 laptop, the magnet is placed to the left of the hinge; you can see it in the picture. Then it is pressed by the frame and can’t fall out anywhere. If the left hinge is broken and the screen frame is not held on the left side, the magnet can get lost. Without the magnet, the laptop will not automatically go to the right side when you close the lid.
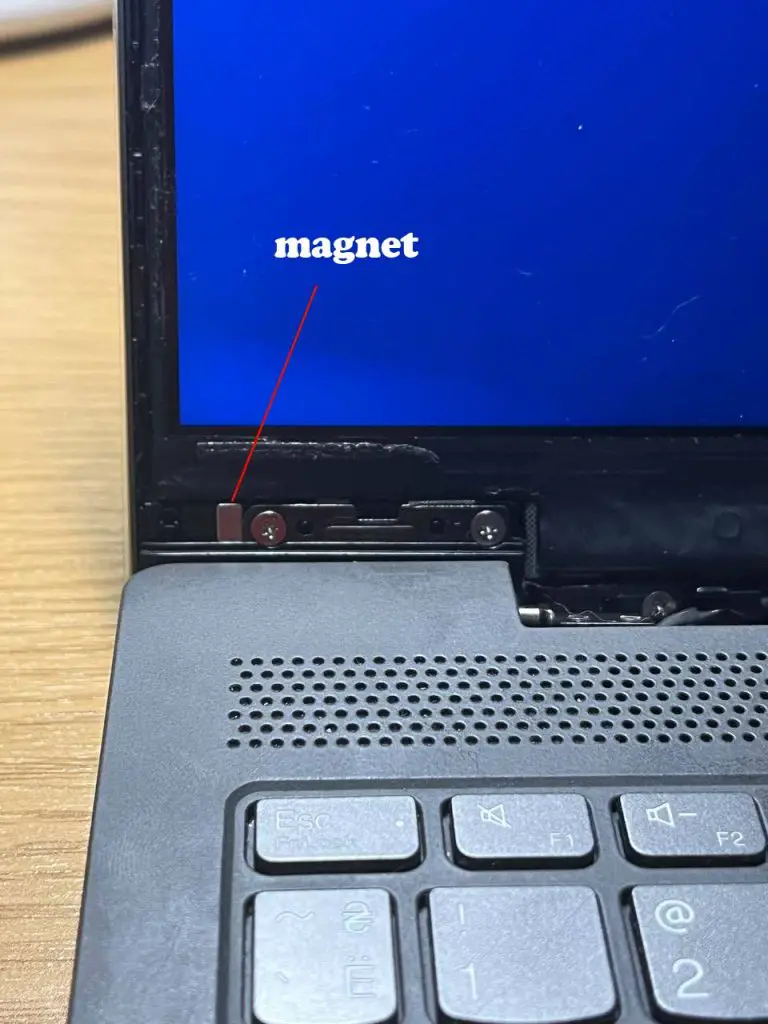
As I said, the magnet can be placed in other ways, such as on top of the hinge. The easiest way to determine where it should be located is to put it on the laptop and find where it shuts down. You can even find where the sensor is in any laptop; take your Bluetooth headphones, which have a pretty strong magnet, and move them around the body of the laptop. Usually, the sensor is near the cover; when the headphones are over, the sensor, the laptop will shut down.
It took me 3 hours to replace the top cover on my Lenovo IdeaPad 5 laptop. This was my first time replacing the cover, so it took me longer. If I have to replace the screen cover again, I could do it in an hour. After adjusting the hinges, the laptop opens and closes very easily, whereas before, I had to open the cover with one hand and hold the laptop against the table with the other.


