

Сreate a meeting in Outlook
As it happens, Outlook has become a work application widely used for work in companies. Let’s face it, and Outlook has become an application for companies. In addition, the email client also allows you to create invitations to rallies or create reminders for employees. If you work in a small company where everybody works locally, you won’t use Outlook. Still, if it is a big company with different locations, then the program is indispensable for managing the schedule of all employees in the company.
The calendar is an integral part of Outlook; the calendar is how you make your schedules work. For example, suppose you, as one of the managers, want to invite someone from another department to a meeting. In that case, you can use Scheduling Assistant and look at the attendees’ schedules. You can check to see if the person is available when you choose.
If you are new to Outlook or you need to refresh your memory about sending a meeting invitation, you have been tasked by an executive to create a meeting, and you need help with that; you will find how to do it in this article.
How to create a meeting and send an invitation in the Outlook desktop application
Since Outlook is part of the Microsoft Office applications and is most often used in desktop applications on your computer, let’s first look at the steps for this platform:
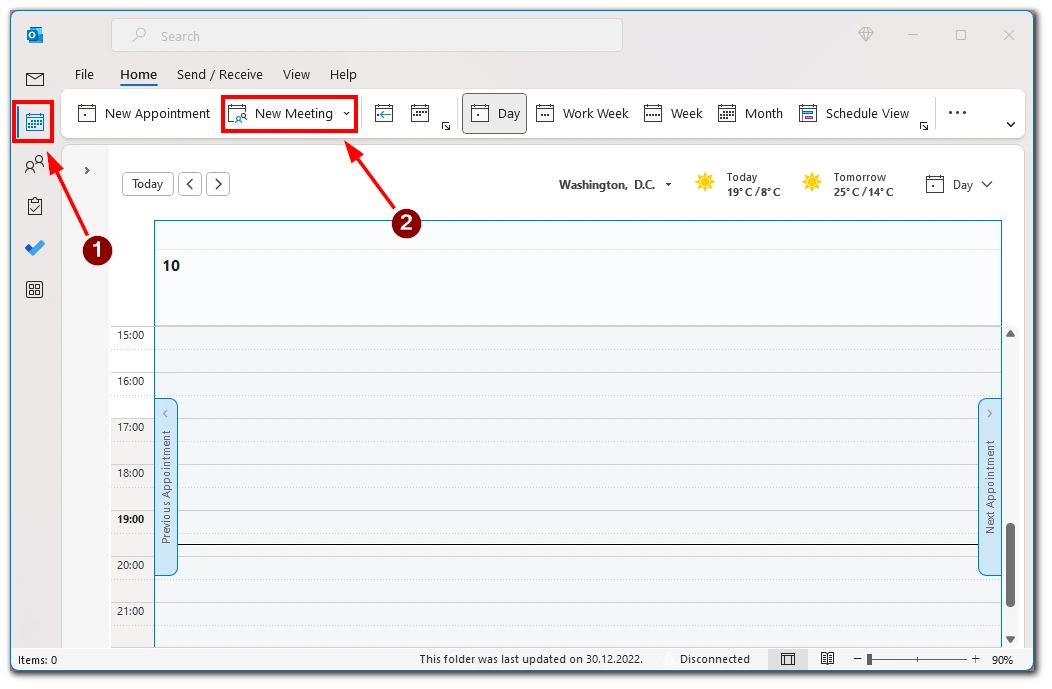
- Open Outlook and Navigate to the Calendar tab. Click on the Calendar icon on the left side of the Outlook window.
- Once you are in the calendar view, click on the New Meeting icon at the top of the screen. This will open a new meeting window.
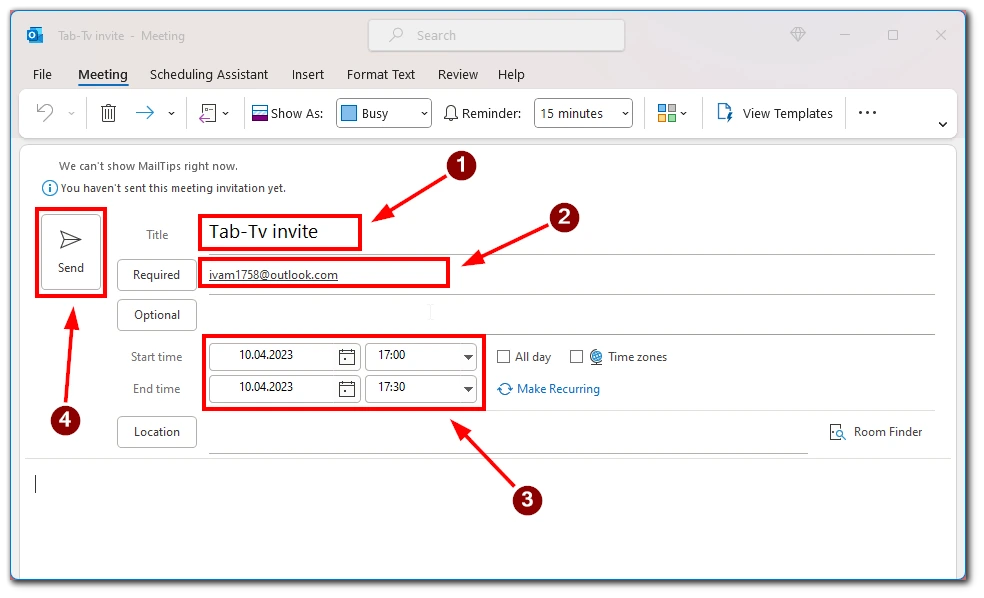
- In the To field, add the email addresses of the people you want to invite to the event. You can also add them from your Contacts or Address Book. You can add multiple attendees by separating their email addresses with a semicolon. It is very convenient to create lists and group them in advance.
- Next, you need to add details about the event. This includes the subject, location, start and end times, and additional notes or agenda items. You can also set a reminder for the event.
- Then choose a time that works for everyone.
- Once you have added all the necessary details, click the Send button to send the calendar invite to the attendees.
The attendees will receive an email with the event details and can choose to accept, decline, or propose a new time for the event. You can do so under the Attachments tab if you need to attach files or documents to the calendar invitation. This is useful for sharing important information or documents related to the event.
How to send a meeting invitation in the web version of Outlook
Outlook Web is a web-based version of the popular email and calendar application that allows you to access your email and calendar from any device with an internet connection. It is also worth noting that since the web version of Outlook works with any browser, its interface will be the same on any operating system where you run Outlook Web. To send a calendar invitation in the Outlook web app you will need to:
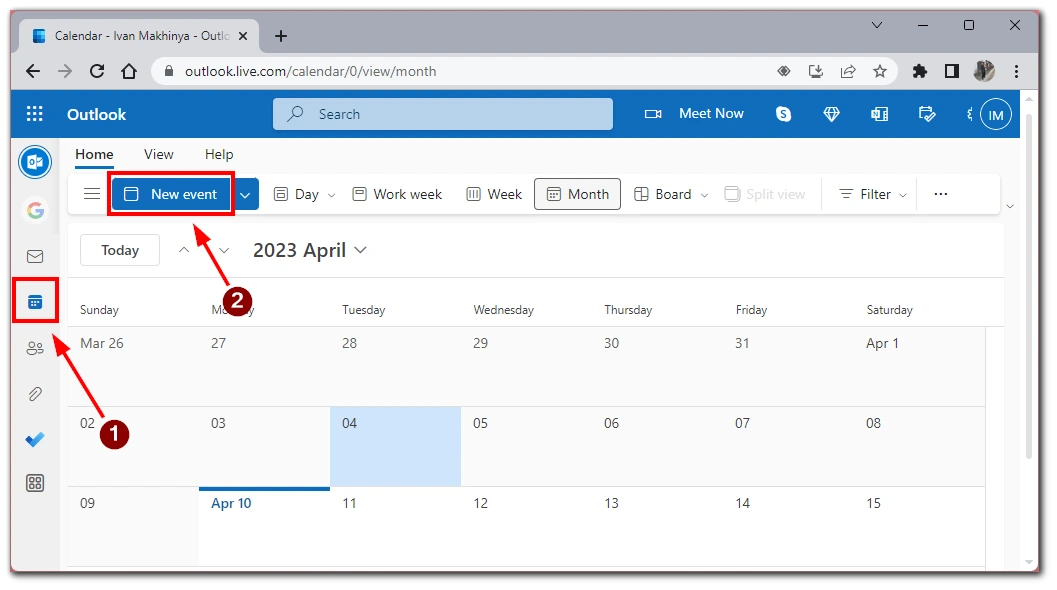
- Open Outlook web in any browser and navigate to the Calendar icon in the left corner of the Outlook web window.
- Next, click the New Event button in the top left corner of the screen.
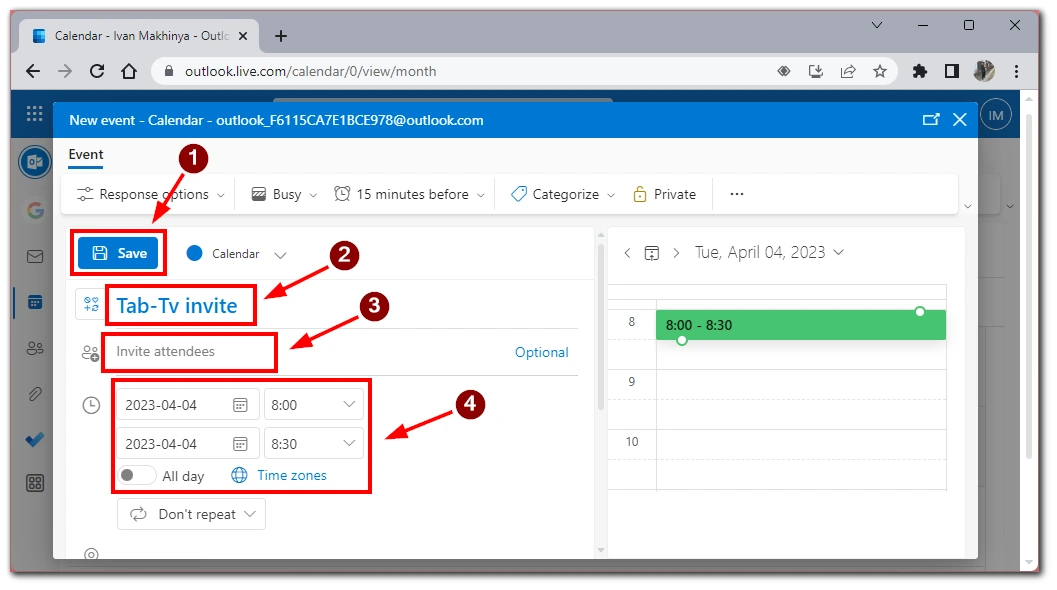
- To invite attendees to the event, enter their email addresses in the “Invite Attendees” field. You should print their names or emails and choose the right person from the drop-down list.
- Fill in the event details, such as the event title, location, start time, and end time. You can also add additional notes or agenda items if necessary.
- After you’ve added all the required details for the calendar invitation, you can send it to the attendees by clicking the Save button. The attendees will receive an email with all the event details, including the event title, date, time, location, and any additional notes or attachments.
Sending a calendar invitation in the Outlook web app is a simple and effective way to schedule meetings, appointments, and events. Whether you are a new user or a seasoned pro, Outlook’s calendar invitation feature is a valuable tool for managing your schedule and staying on top of your professional and personal commitments.
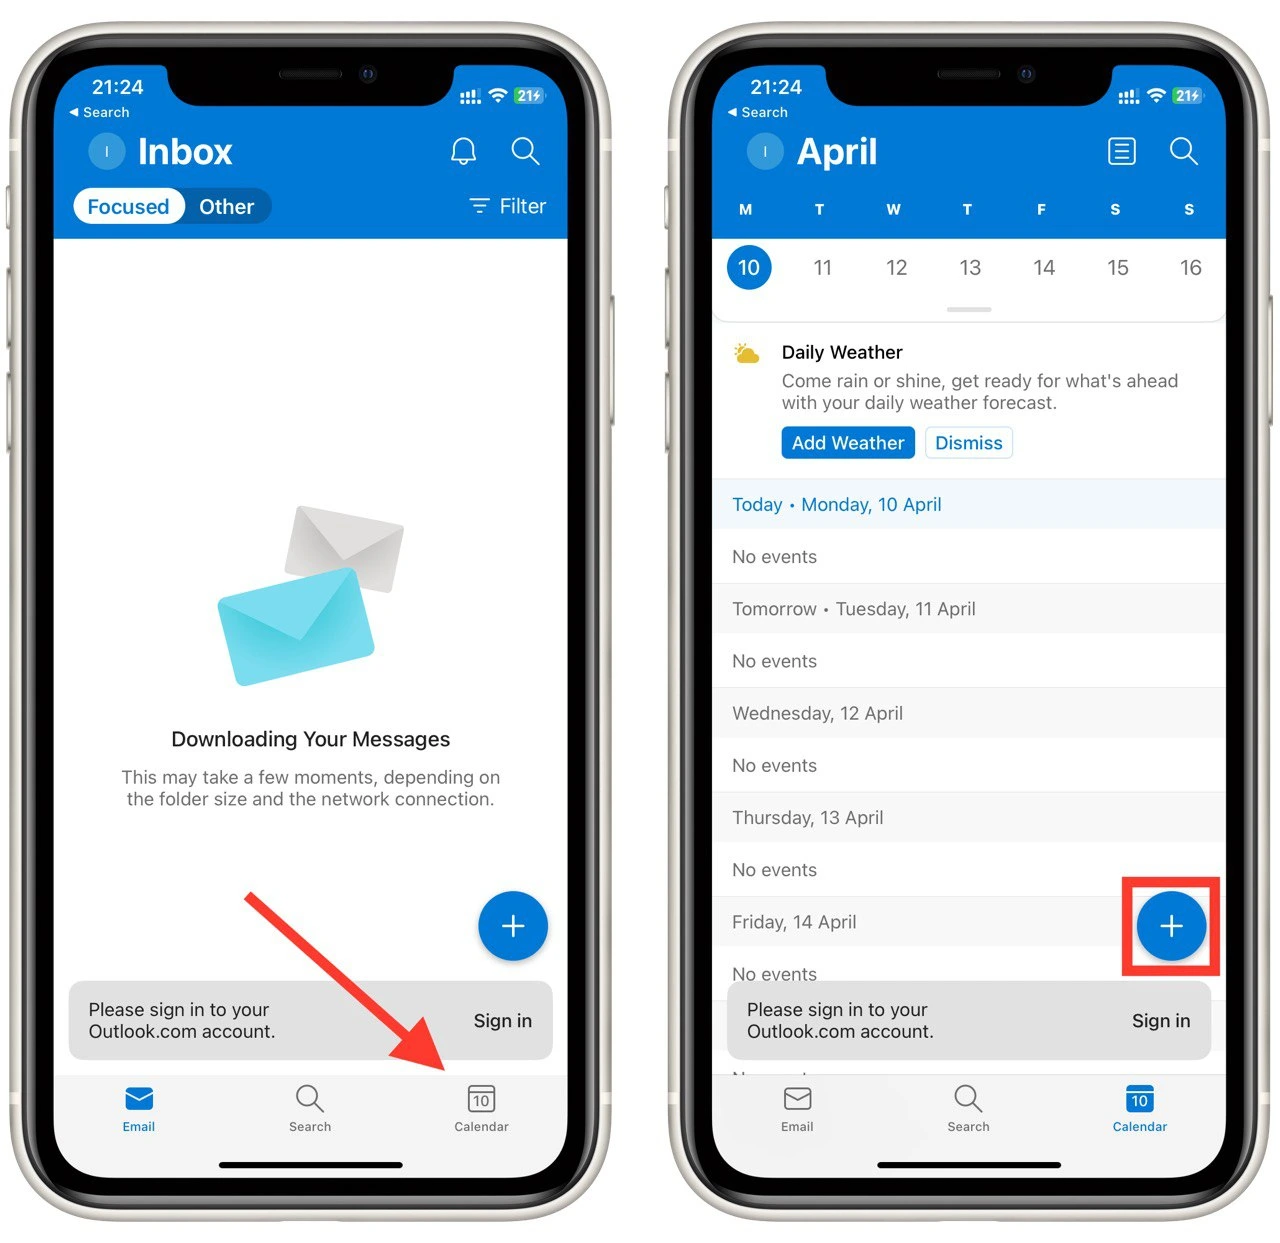
How to send an invitation to a rally in the Outlook mobile app
If you’re on the go and need to send a calendar invitation using the Outlook mobile app, it’s a quick and easy process. Here’s a step-by-step guide to sending a calendar invitation in the Outlook mobile app:
- Open the Outlook app on your mobile device and tap the Calendar icon at the bottom of the screen.
- Tap the plus (+) icon at the screen’s bottom right-hand corner to create a new event.
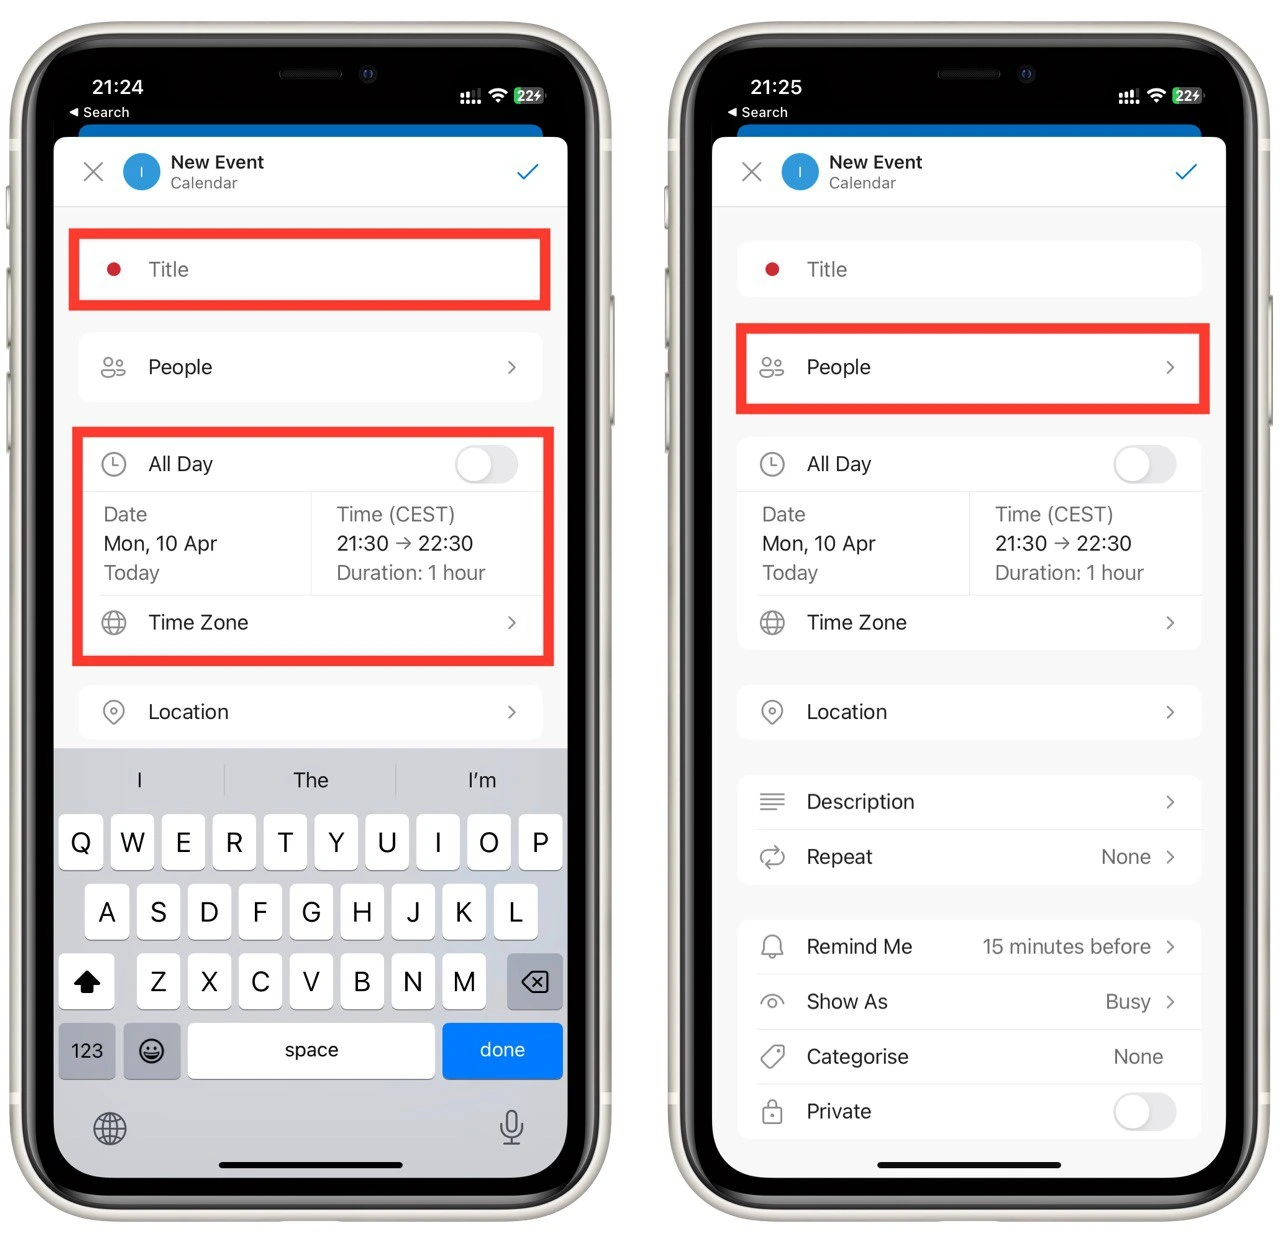
- Enter the event details, including the title, date, time, location, and any notes or attachments you want to include.
- Then find and tap the People button. It will bring you to the attendee list.
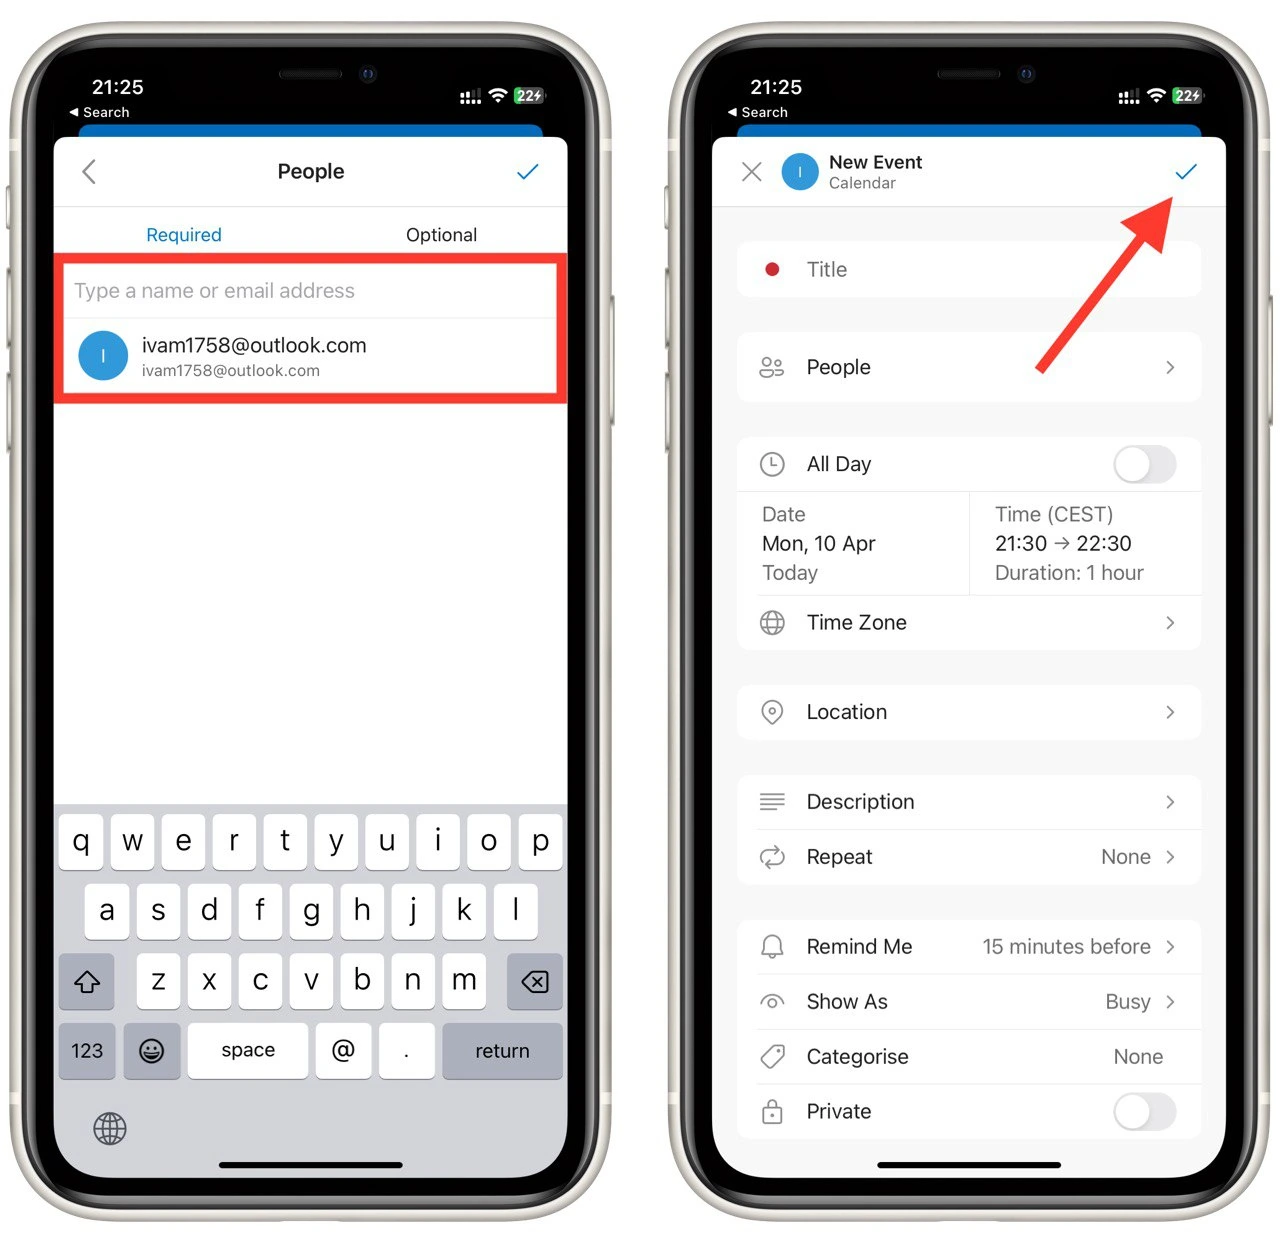
- To add a new attendee, type their email address and hit Enter.
- Once you’ve added all the necessary details, tap on the Save button (checkmark) at the screen’s top right-hand corner. Your calendar invitation will now be sent to all attendees, and you can track their responses by checking the event details in your Outlook calendar.
Sending a calendar invitation using the Outlook mobile app is a convenient way to manage your schedule while on the go. Note that the apps for Android and iOS have the same design and functionality. So this guide will be suitable for any mobile operating system.
Some additional tips for creating calendar invites via Outlook
Creating calendar invites using Outlook can be a great way to schedule events, meetings, and appointments easily. Here are some additional tips to help you create effective and professional-looking calendar invites using Outlook:
- Use descriptive and clear event titles: When creating a calendar invite, use a descriptive and clear event title. This will help attendees quickly understand the event and what they can expect from attending.
- Include all relevant event details: Be sure to include all relevant event details, including the date, time, location, and any additional notes or attachments. This will help attendees prepare for the event and ensure they have all the necessary information.
- Add attendees and allow for responses: Adding attendees to your calendar invite is essential for ensuring everyone is aware of the event and can attend. Be sure to allow for responses, such as accepting, declining, or proposing a new time for the event.
- Send reminders: Sending reminders to attendees is a great way to ensure everyone is aware of the event and is reminded to attend. Set reminders for yourself so you don’t forget about the event.
- Customize the invite: Add a logo, change the background color, or add a custom message. This will help make the invitation stand out and look more professional.
- Check for conflicts: Before sending the invite, check for any scheduling conflicts. This will ensure that the event does not conflict with other appointments or events.
- Follow up after the event: Follow up with attendees to thank them for attending and get any feedback. This will help you improve your events in the future.
By following these tips, you can create effective and professional-looking calendar invites using Outlook. With its user-friendly interface and robust features, Outlook makes it easy to schedule and manage events, meetings, and appointments.


