

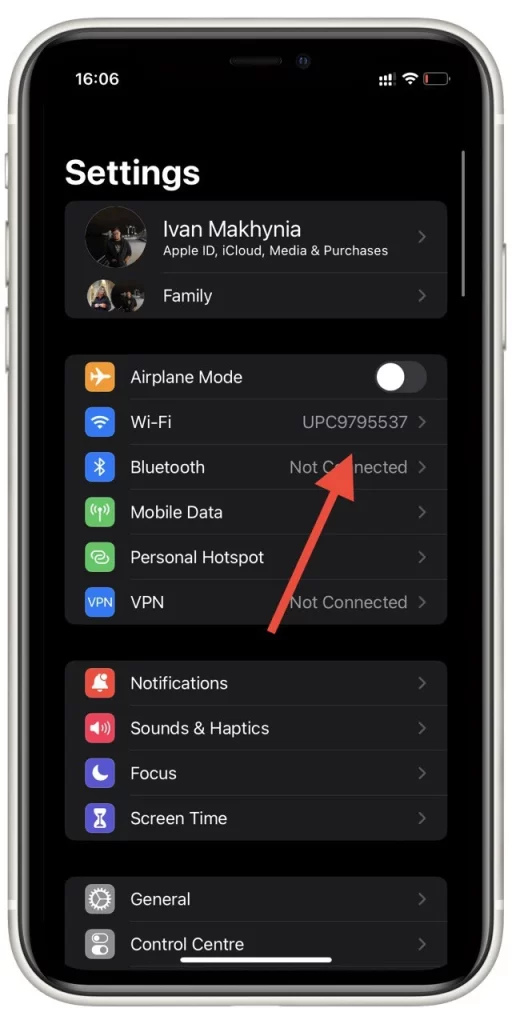
One of my favorite improvements in iOS 16 and iPadOS 16 is the ability to view passwords from connected Wi-Fi hotspots. It allows you to get the passwords to the desired Wi-Fi hotspots quickly, and you can now quickly copy them and send them to your friends. With this update, we can finally share passwords with the built-in feature between other Apple devices and manually with users of other systems.
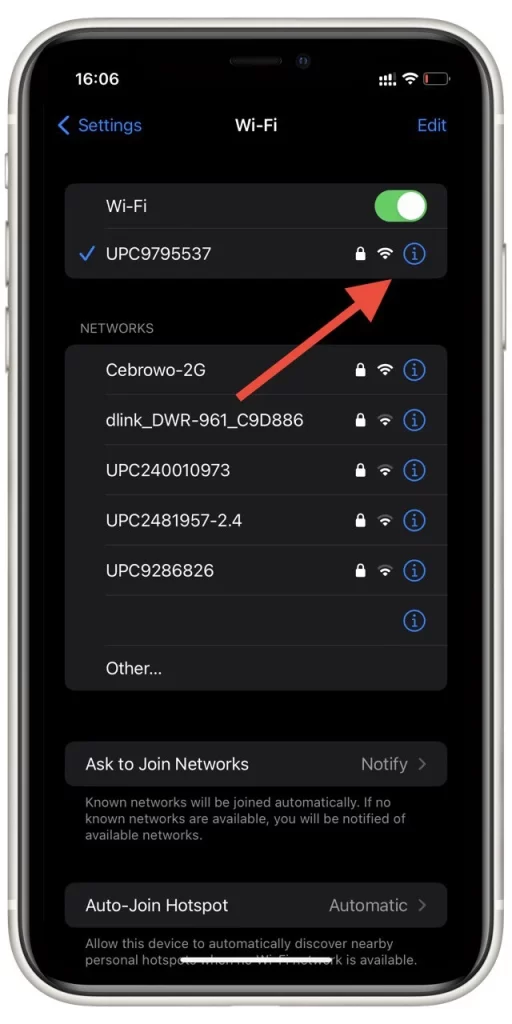
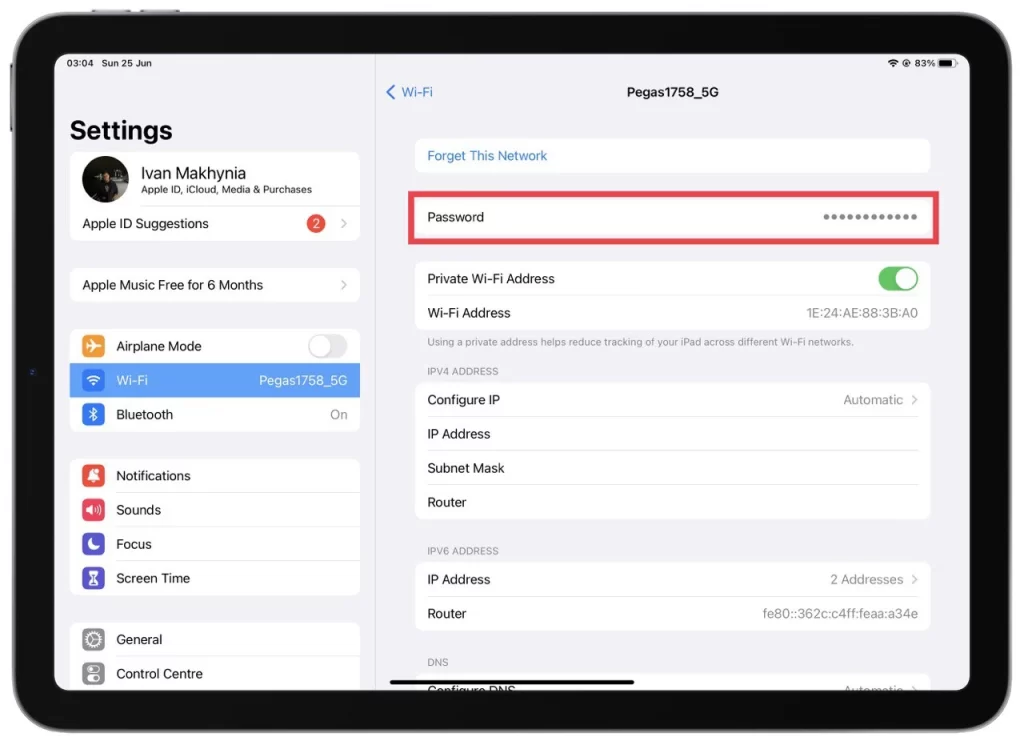
To do this, you need to go to Settings. Here, select the Wi-Fi tab and find the network you want. Click on the icon (I) next to the desired WiFi network. In the Wi-Fi settings menu, you will find the Password, which by default is protected by your Passcode or Face ID and Touch ID. Once you have authenticated, you will see the password to the Wi-Fi hotspot.
Let’s take a closer look at this process with pictures and details.
A quick guide to finding your Wi-Fi password on iPhone
Knowing how to access Wi-Fi passwords is essential to manage and troubleshoot Wi-Fi connections on Apple devices effectively. This can be particularly useful if you connect a new device to a network or share the password with others. Here’s a quick guide to viewing Wi-Fi passwords on an iPhone or iPad:
- Access Settings: Open the Settings app on your device.
- Go to Wi-Fi settings: Tap Wi-Fi to view the list of available networks.
- Authenticate: If necessary, authenticate using Face ID, Touch ID, or your device passcode.
- Tap the information icon: Tap the “i” (information) icon next to the Wi-Fi network whose password you want to view.
- View password: The password will be displayed here, provided the device is connected to the network and has the necessary permissions to access the password.
Note: This method is subject to limitations that Apple’s iOS/iPadOS imposes. In some cases, direct access to Wi-Fi passwords may not be possible due to security restrictions. Alternative methods may require using a Mac that is synced with the same iCloud account or third-party applications, although these methods have their security considerations.
How do I find my Wi-Fi password on my iPhone
Among the many improvements in iOS 16 is the ability to view passwords for saved Wi-Fi networks. This update has been awaited for quite some time. Previously, you had to use a third-party application or go into your browser’s settings. For this, you need the following:
- In Settings, go to the Wi-Fi tab.
- Find the desired Wi-Fi network in the list and click the information icon on the right.
- This is where you will see the Password field. You will be able to click on it to display your real password. You must unlock it with the password, Face ID, or Touch ID.
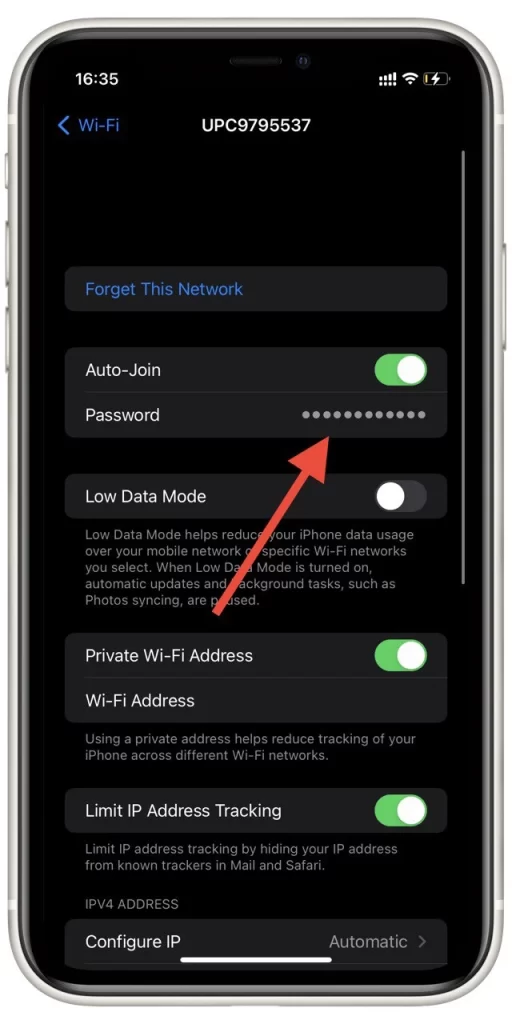
You also can copy this password and then share it with your friends. Just click on the already-open password and select Copy from the pop-up menu. Note that editing the password to the access point is impossible. If you have changed the password, you must delete the access point and reconnect to it using the new password.
How to see Wi-Fi passwords on iPad
As I mentioned before, this feature also appeared in iPadOS 16. The access to it is the same as on the iPhone. To see Wi-Fi passwords on an iPad, you can follow these steps:
- Open the Settings app on your iPad. The Settings app is on your home screen, usually represented by a gear icon.
- In the Settings menu, scroll down and tap on “Wi-Fi”. This will display the available Wi-Fi networks.
- Look for the network name (SSID) for which you want to view the password. Tap on the (i) icon next to the network name. This will bring up the network details.

- On the network details screen, you will see various information about the network. Look for the “Password” field. By default, the password field is hidden for security reasons.
- Tap the “Password” field to reveal the Wi-Fi password and enter your iPad’s passcode.
A pop-up menu will appear with options. Select “Copy” from the menu. This will copy the Wi-Fi password to your iPad’s clipboard. You can paste the password into any text field or note-taking app to view it. To paste, tap and hold on to the desired text field and select “Paste” from the menu that appears.
Please note that you need to have the necessary permission or be the owner of the iPad to access Wi-Fi passwords. Additionally, this method only allows you to view the password for Wi-Fi networks connected to or saved on your iPad.
How to delete Wi-Fi network on iPhone
In addition, you are able to remove the Wi-Fi network from the list. To do this:
- Select Wi-Fi in Settings.
- In the list of networks, select Edit at the top right of the screen.
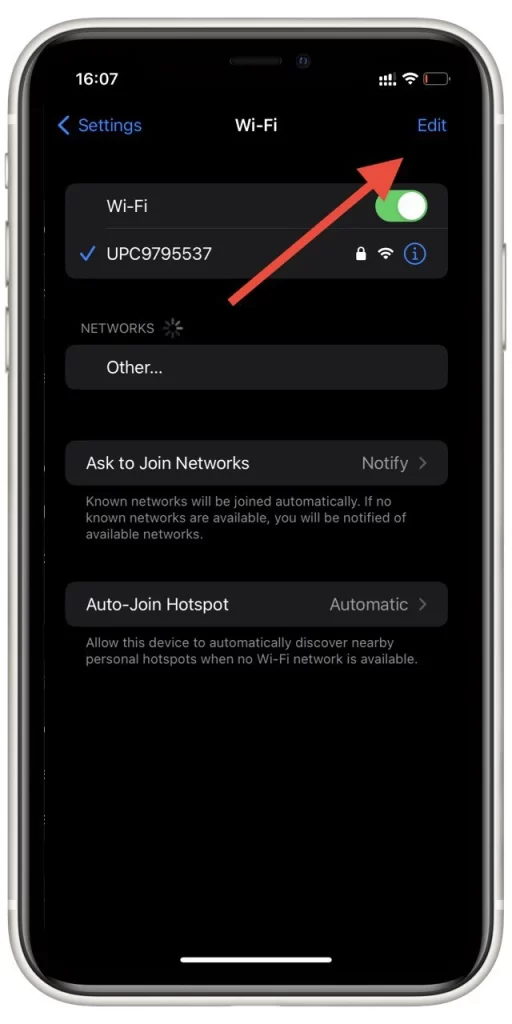
- Next to the unwanted items, click on “–” to delete them. After that, just click Done.
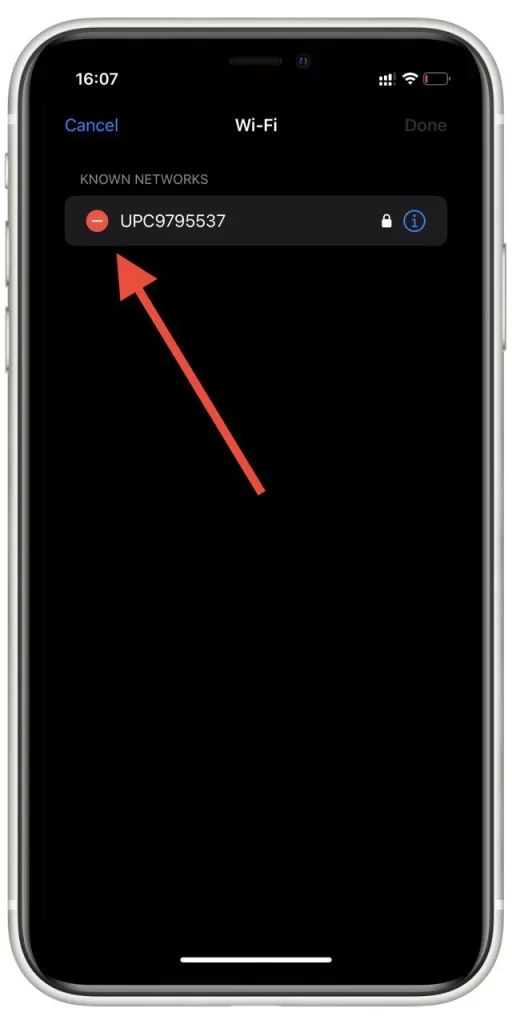
This way, you can remove all saved networks from your smartphone. If you want to do it all at once, you can also use Reset Network Settings. However, please note that in this case, all data related to wireless networks will be erased.
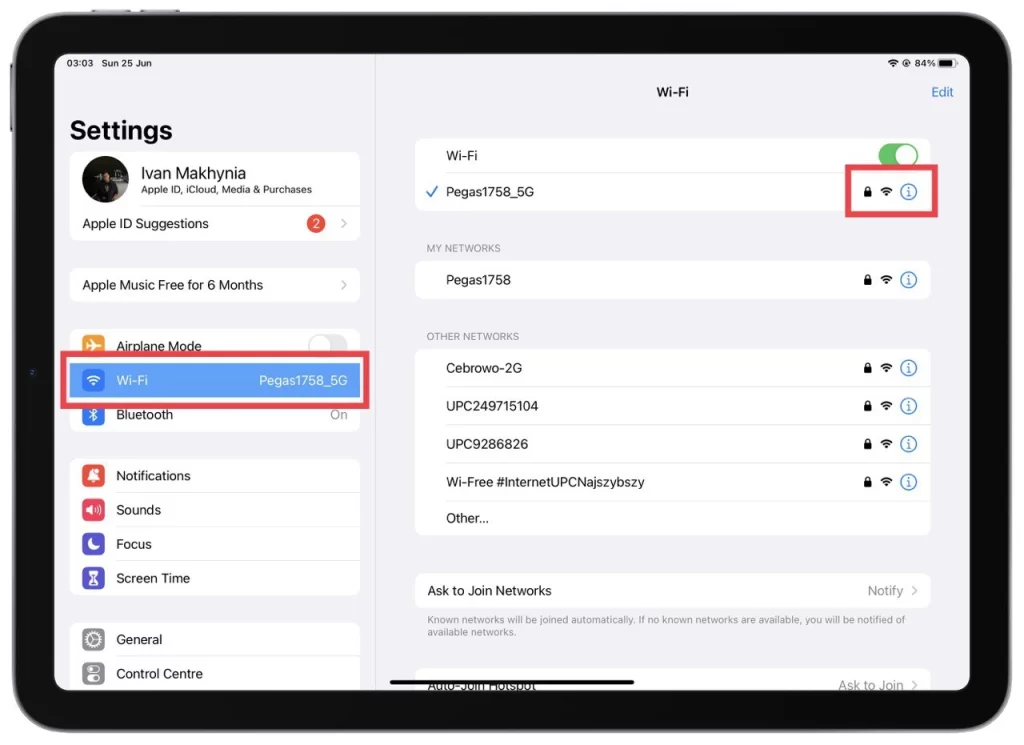
How to remove Wi-Fi network from iPad
If you wish to remove a Wi-Fi network from your iPad, you can follow these steps:
- Begin by accessing the Settings app on your iPad. Locate the app on your home screen, typically represented by a gear icon.
- Scroll down within the Settings menu until you find the “Wi-Fi” option. Tap on it to access the Wi-Fi settings.
- Locate the network name (SSID) you want to remove from your iPad’s saved network list. Tap on the (i) icon located next to the network name. This action will bring up the network details.
- Within the network details screen, you will find an option labeled “Forget This Network.” Tap on it to proceed. A confirmation message will appear on the screen.
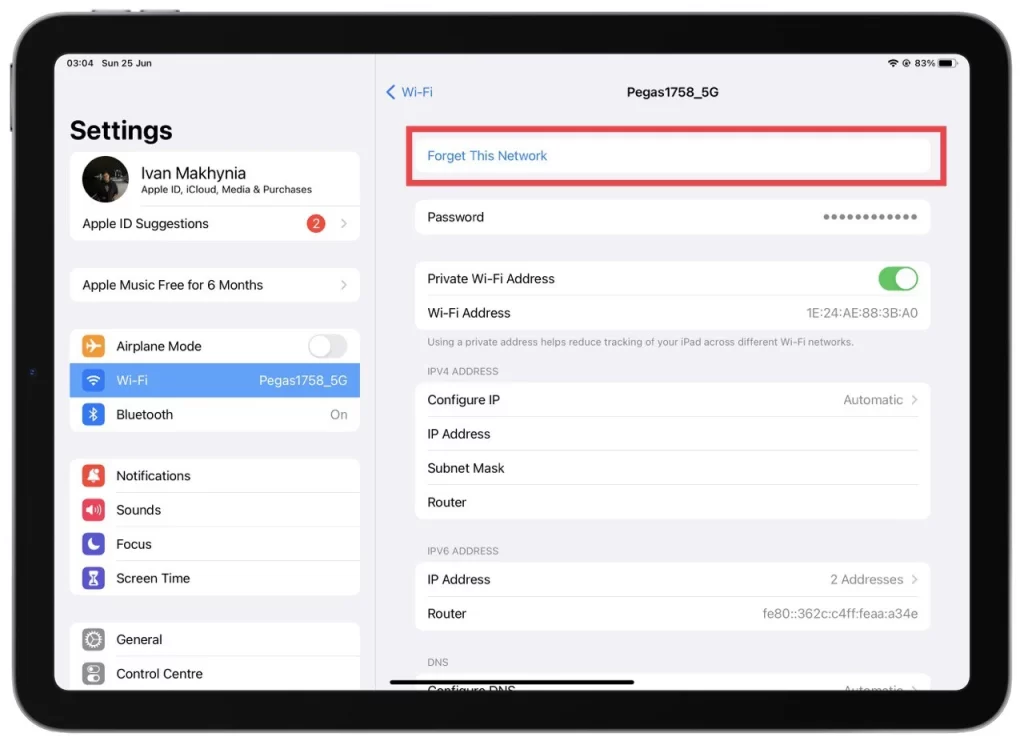
- To confirm the removal, tap “Forget” within the confirmation message. Doing so will remove the selected Wi-Fi network from your iPad.
It’s important to note that removing a Wi-Fi network from your iPad means that it will no longer automatically connect to that particular network when it is within range. If you wish to connect to that network again in the future, you will need to manually enter the password or go through the network setup process.
Removing a Wi-Fi network can be beneficial if you no longer want your iPad to connect to a specific network or if you want to clear the list of saved networks on your device.
How to share Wi-Fi passwords to other Apple devices
Sharing Wi-Fi passwords to other Apple devices is a convenient feature allowing you to share your Wi-Fi network credentials with trusted individuals securely. To share Wi-Fi passwords between Apple devices, follow these steps:
- Ensure both devices have Wi-Fi and Bluetooth turned on and are close to each other.
- Open the Wi-Fi settings on the device that wants to connect to the Wi-Fi network. This can typically be found in the Settings app under “Wi-Fi.”
- Select the desired Wi-Fi network from the list of available networks. A prompt will appear on the screen of the other Apple device.
- A notification displaying the Wi-Fi network name and a request to share the password will appear on the device with the Wi-Fi network saved.
- Tap on the notification or request on the device with the saved Wi-Fi network. The password will be securely shared with the other device.
- The password will be automatically entered on the device that wants to connect to the network, and the connection will be established.
Using this method, you can easily share Wi-Fi passwords between your Apple devices without needing to manually type or disclose them verbally. It streamlines the process and ensures the security of your network credentials.
Please note that both devices must be using Apple’s iOS 11 or later, and the Apple ID associated with the devices must be in each other’s contact lists or have each other’s Apple ID email addresses saved in their respective contacts. Additionally, both devices must have Wi-Fi and Bluetooth enabled, and Personal Hotspot must be turned off on the device sharing the Wi-Fi password.
What are managed Wi-Fi networks?
When you edit the list of networks on your iPhone or iPad, you can find a list of Managed Networks. Many users do not understand this and why these networks cannot be deleted. In fact, the answer is quite simple – these are the wireless networks provided to you by your carrier.
These networks are downloaded to your devices by cellular operators. Usually, they have names like this: for Verizon, you may see VerizonWiFiAccess and PrivateMobileWiFi, and in the case of AT&T, you may see attwifi and AT&T Wi-Fi Passport. These are added to your iPhone automatically. They can also be added when you install different profiles.
You should understand that you cannot delete these networks as they are automatically installed on the iPhone and are needed for the operator to transmit some data. Also, you cannot see the password to these networks. In general, you will only be able to see their name.


