

Windows 11 does not natively support the installation of Android apps and games. Previously, Microsoft offered Windows Subsystem for Android (WSA) as an official way to run them, but this feature was discontinued in March 2024. Support for existing users will remain until March 5, 2025. The discontinuation of WSA is due to the availability of numerous other solutions that allow Android apps to run on PCs and laptops with Windows 11. Among these solutions is an official offering from Google — Google Play Games for PC, which is, however, exclusively for games.
How to Install Android Apps on Windows 11 and Windows 10 Officially
If you are interested in running games only, Google offers the Google Play Games program. This official Windows application is currently in beta testing, but in the future, it is expected to support a wide range of games. By installing this program, you will be able to play games adapted for PCs. The application takes up about 2 GB of disk space and acts as a virtual machine that allows Android games to run in the Windows environment. Gameplay can be controlled using a keyboard and mouse, which is especially useful for devices without touch screens.
Google and Microsoft currently do not provide official ways to run regular Android apps, as there are hundreds of thousands of such programs, and many of them are not adapted for this platform. Moreover, not all PCs support Google Play Games. The minimum system requirements are as follows:
- Operating System: Windows 10 (version 2004) or later.
- Storage: SSD with at least 10 GB of free space.
- Graphics: Intel® UHD Graphics 630 or equivalent.
- Processor: 4 physical cores (some games require Intel CPUs).
- RAM: 8 GB.
- Windows Admin Account.
- Virtualization: Must be enabled in the settings.
Installing Google Play Games and Downloading Games
- Download the Google Play Games application from the official website and install it on your PC.
- During installation, you may need to enable virtualization. If it does not happen automatically, you will need to:
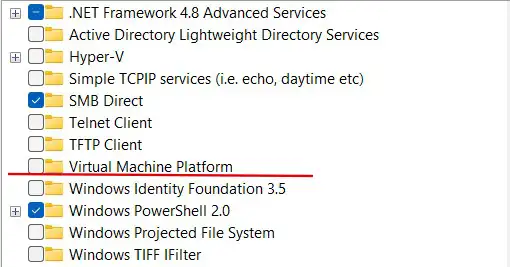
- Go to “Turn Windows features on or off.”
- Enable the Virtual Machine Platform option.
- Restart your computer to apply the changes.
- After installation, open Google Play Games, log into your account, and download the available games.
Installing Android Apps via Emulators
To run Android apps on Windows, you can use emulators. These programs allow you to download apps from Google Play and run them on your computer. However, the performance of such solutions varies: some emulators create full-fledged virtual machines, while others simply compile code into the Windows environment and open apps in separate windows.
There are also Chrome extensions that emulate the Android environment directly in the browser. However, their stability often leaves much to be desired. The proper functioning of apps depends on the complexity of their code: the more specific commands are used, the harder it is to find a suitable emulator.
Many popular apps, such as the Spotify music service, already have dedicated versions for Windows, making the use of emulators unnecessary in many cases.


