

In many cases, checkboxes are useful for creating different lists, from digital to-do lists to printed surveys.
But that’s not the dead end of how you can use them; there are a lot of scenarios. For example, I used them in my master’s graduate work to highlight some information. That’s a great illustrative instrument.
However, inserting a checkbox into a Word document isn’t as easy as it should be; at least, it’s not intuitive.
You have two options to add them: you can replace bullets in the list with empty squares (that’s handy if you need to print the document) or right-click the ribbon and add a checkbox to it.
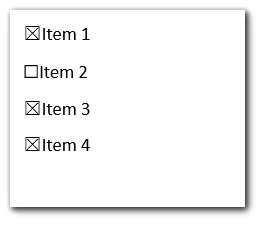
Here you can use it, and its standard checked sign would be X, but you can change the default X with something else. The second checkboxes are editable so that you can check and uncheck them.
Here’s how to make checkboxes in Word in all detail.
How to make a checklist in Word for printing
Let’s start with an empty checklist to print it. That’s useful for surveys, checklists (hah, sorry for the tautology), and other lists you can print. Such lists should be empty, people would fill them manually, so you just need to add squares in Word.
You can just copy this symbol ☐ and paste it each time you need an empty check box.
But you can also automate this, here’s what to do:
- In a Word document, create a list with pins.
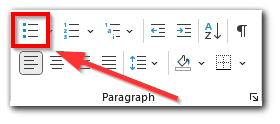
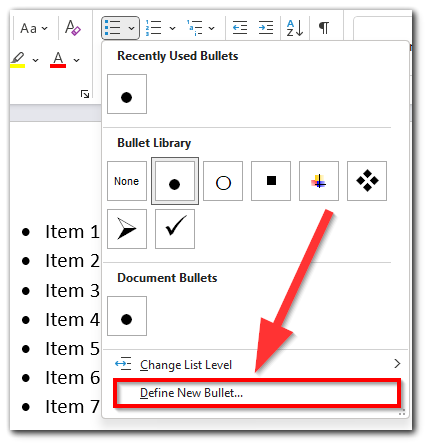
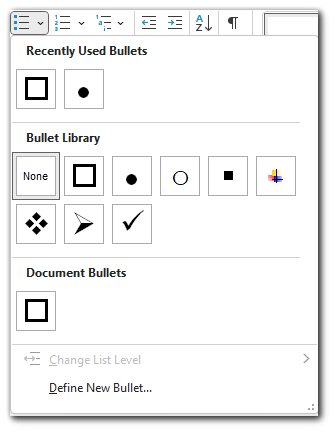
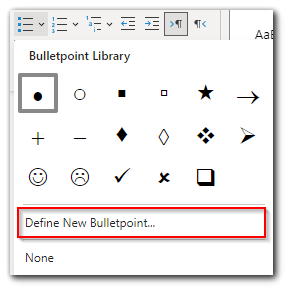
- Click on an arrow near the bullet list and click on Define New Bullet… at the bottom of the drop-down menu.
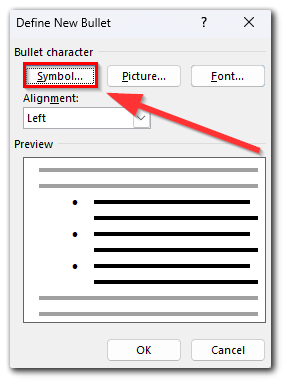
- Here, click on Symbol.
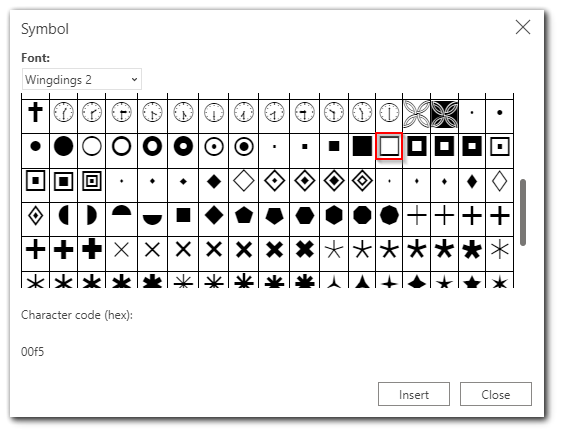
- Change Font to Wingdings, enter code 111 into the Character code box, and click OK. You can also change the Font to Wingdings 2, enter code 163 and click OK.
- The difference is that the first square would be bold, while the second would be light.
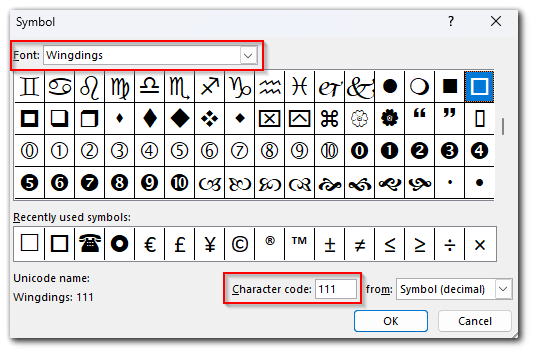
- Actually, there are a lot of squares, and you can choose whatever you like.
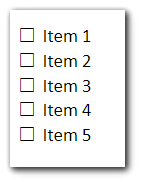
- Your list would look like this: an empty checklist ready to print.
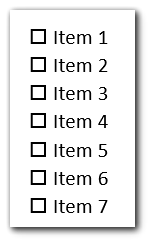
- And a square would be saved in the bullet library so that you can use it from here.
How to insert a checkbox in Word
If you need a checkbox, you can check/uncheck it in the Word document; you can make it. But first, you will need to add it to the ribbon. Here’s how:
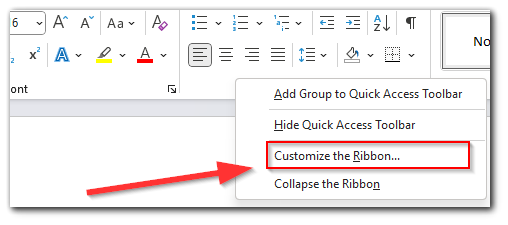
- Right-click anywhere on the ribbon’s empty space.
- Choose Customize Ribbon from the drop-down menu.
- Create a New Group.
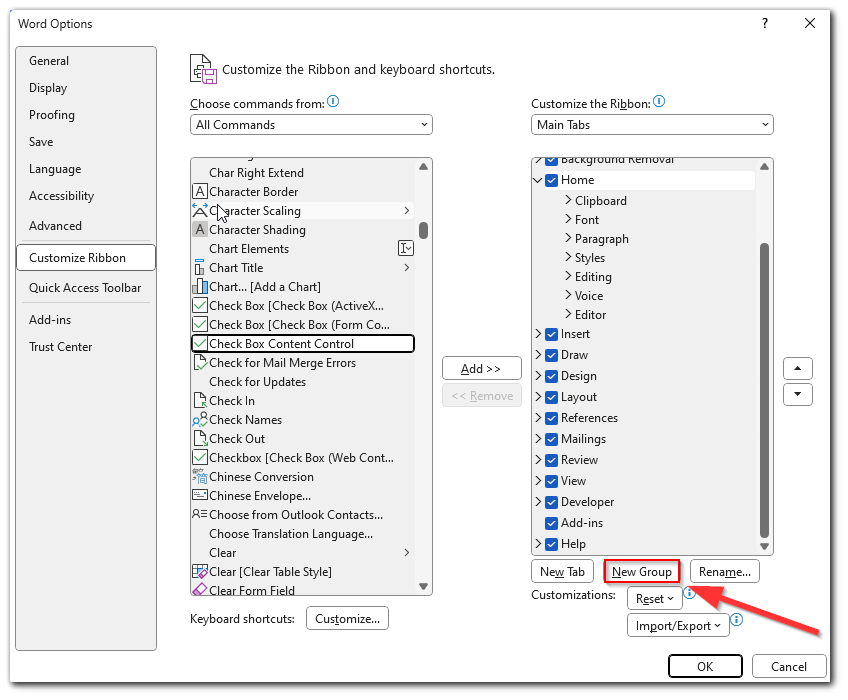
- In the new window, switch to All Commands and scroll down the list to find Checkbox Content Control. There’s no search through the list, but all commands are listed alphabetically.
- Click Add and then click OK.
- You can drag and drop your custom group to place it on the ribbon.
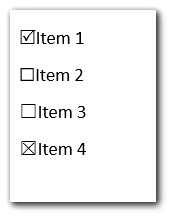
- Now, there’s a checkbox content control on your ribbon, and you can click on it to insert a checkbox.
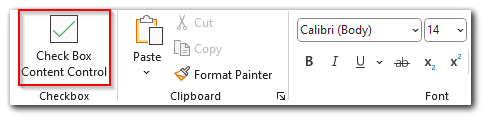
- Click on it to add a checkbox; it’s interactive, so you can check and uncheck it.
How to insert a checkbox via Developer
You can also turn on the Developer tab to add the checkbox button; that’s useful if you don’t want it to appear on the ribbon at the Home tab.
- Right-click the ribbon anywhere and choose Customize the Ribbon from the drop-down menu.
- Check the Developer and click OK.
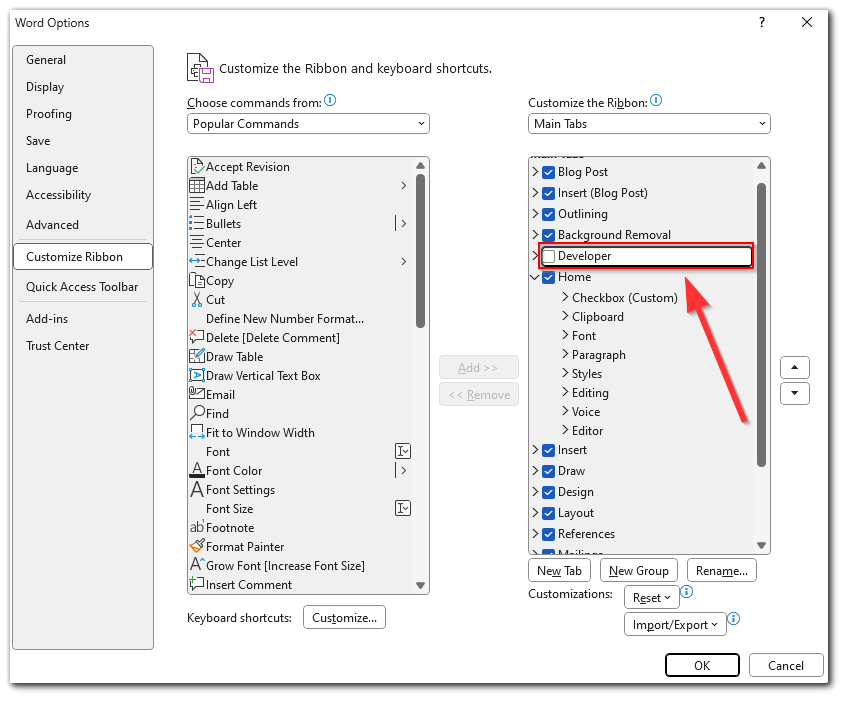
- You can also drag and drop this item to place it as you wish on the ribbon.
- After you enable Developer, there will be a checkbox icon in the Developer tab.

How to change checkboxes from an X to a checkmark
By default, when you check the box, it will be filled with X. But you can change this. For example, a checkmark (but you can choose any symbol). Here’s how:
- Highlight the checkmarks you want to change the checkbox for.
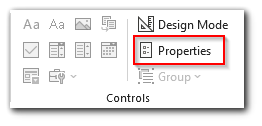
- In the Developer tab (the guide on how to enable it is below if you skipped the previous paragraph), click on Properties.
- Click change next to the checked symbol.
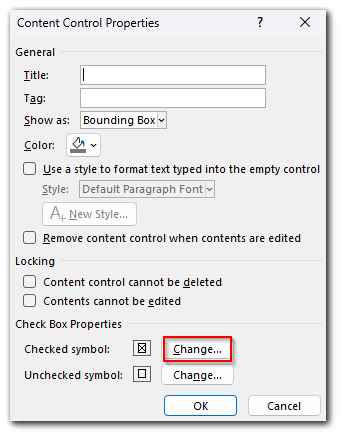
- Select font Wingdings 2 and enter code 82 into the Character code field.
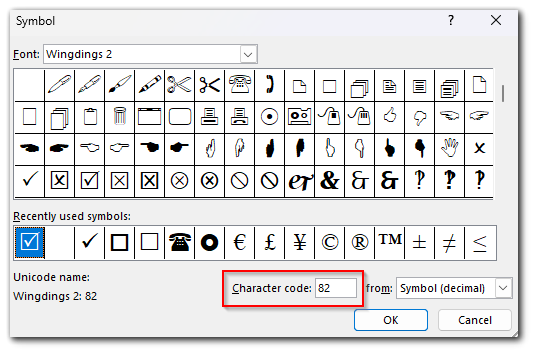
- The check box sign would now be a checkmark, not the X. You can choose any character among available symbols.
How to add checkmarks in Word Online
There’s no way to add digital (editable) checkmarks in Word Online, but you can create a checklist for printing almost the same way as in the Word app. Here’s what to do:
- Create a default bullet checklist.
- Click the small arrow near the bullet list icon and click on Define New Bulletpoint.
- Change the font to Wingdings 2 and choose the empty checkmark symbol (there’s also a default checkmark in quick pics, but it contains drop shadow).
- Now, you can create a checklist with empty checkmarks.
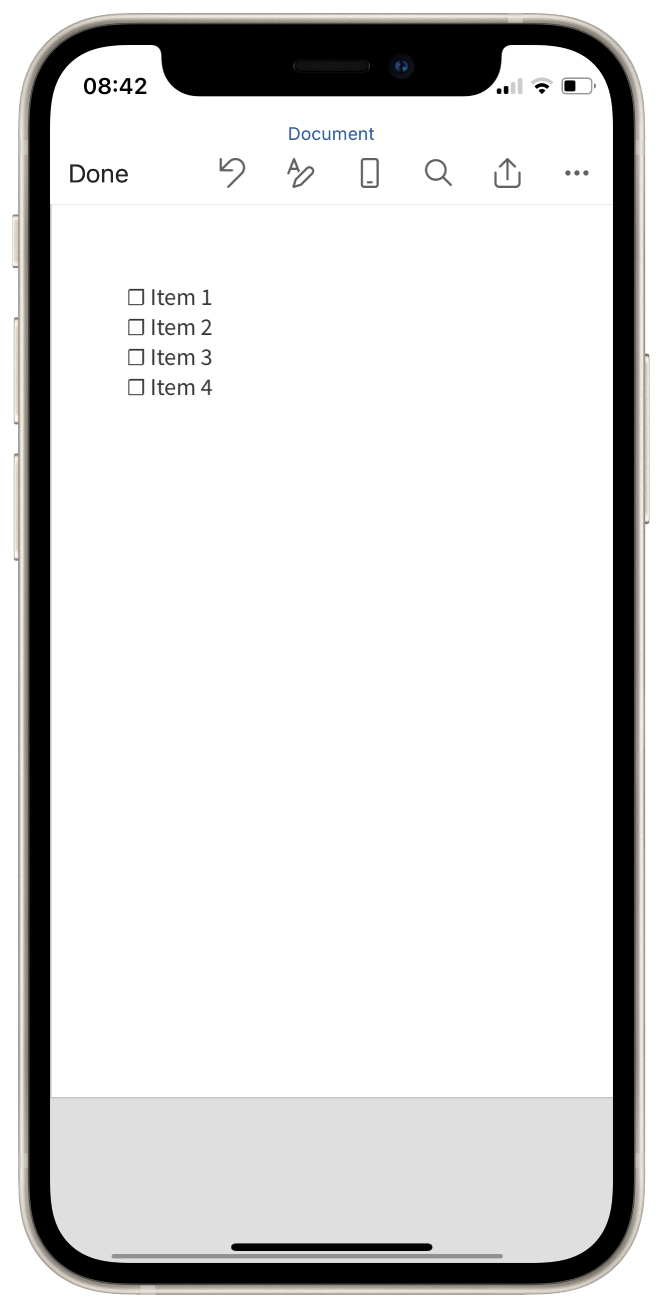
How to create a checklist on iPhone/Android
You can create a checklist on iPhone/Android. There are 2 ways to do so:
- Use Google Docs.
- Manually insert empty check boxes.
Just copy this symbol and paste it each time you need a check box. Here’s the symbol: ☐
Here’s how it looks:
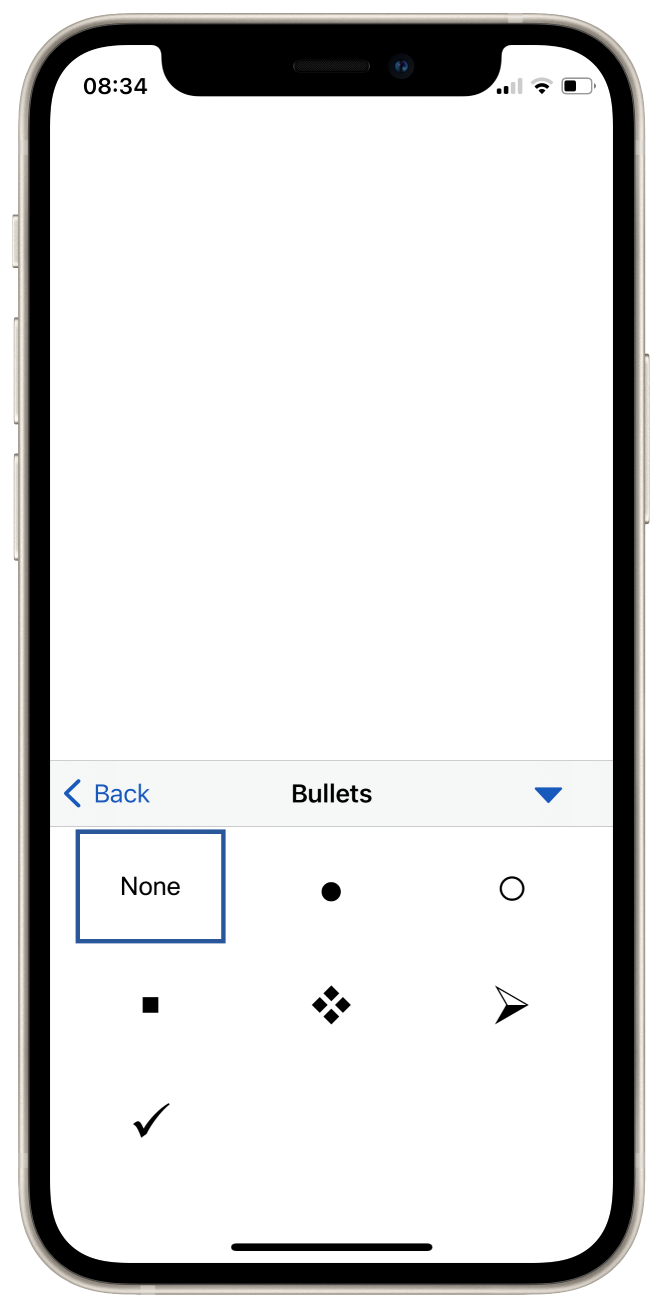
There’s no way to do so using lists as in Word or Word mobile. Thanks, Microsoft. The list of available bullet symbols contains only these ones:
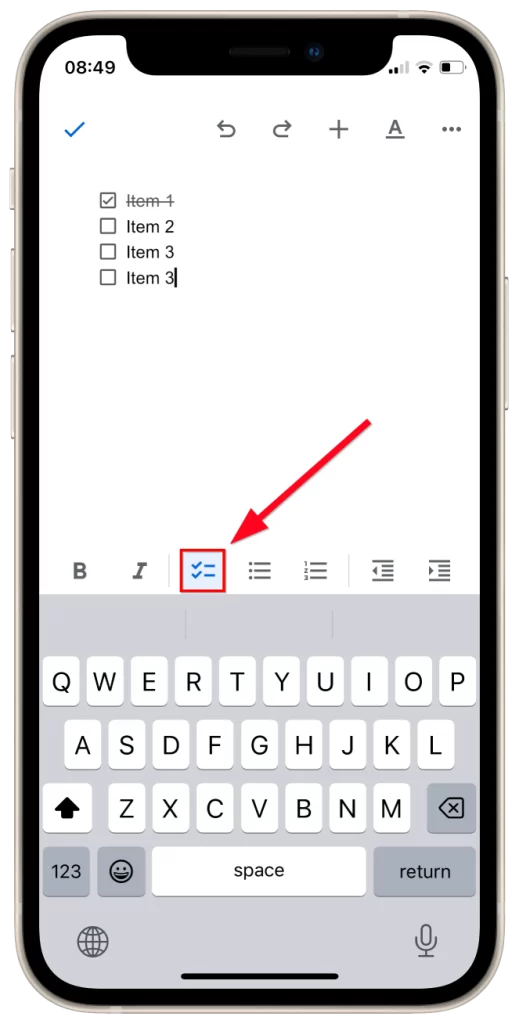
You can also use Google Docs to create a checklist on iPhone/Android; there’s an empty checkbox among the list bullets. Thanks, Google. And these checkboxes are editable so that you can check and uncheck them! However, when you check them, they will also be crossed out.
Just type some list, highlight it, and choose the list from the options. Here’s how it looks:
Which way to choose is on your behalf; if you need to create a shortlist, I advise you to copy and paste a checkbox symbol. But if you need to create a longer list, you better use Google Docs.


