Roku TVs are popular smart TVs that provide access to various streaming services, including Netflix, Hulu, Amazon Prime Video, and more. However, you may sometimes lose or misplace the remote for your Roku TV, making it difficult to connect it to Wi-Fi. Connecting your Roku TV to Wi-Fi without a remote may be necessary to enjoy your favorite streaming services without interruption.
Fortunately, you can use the Roku app on your smartphone or tablet to connect your TV to Wi-Fi. The Roku app is a virtual remote, allowing you to navigate the Roku TV’s settings and menu options without a physical remote. This article will explore various methods to connect your Roku TV to Wi-Fi without a remote, including using the Roku app.
If your Roku TV doesn’t have physical buttons or you can’t locate the remote, you can use the Roku app to connect it to Wi-Fi. Download the app on your smartphone or tablet, and use the virtual remote to navigate the Wi-Fi settings. You can follow the on-screen instructions to connect your Roku TV to Wi-Fi. The Roku app is available for iOS and Android devices and can be downloaded from the App Store or Google Play Store.
How to connect Roku TV to Wi-Fi with the Roku app
Connecting your Roku TV to Wi-Fi with the Roku app is a convenient way to access your favorite streaming services without a physical remote. The Roku app acts as a virtual remote, allowing you to navigate the Roku TV’s menu and settings on your smartphone or tablet. Here’s how to connect your Roku TV to Wi-Fi with the Roku app:
- Download the Roku app on your smartphone or tablet from the App Store or Google Play Store.
- Once you open the app, log into your Roku account or tap on Continue as a guest.
- Then select Devices from the bottom navigation menu.
- Select your Roku TV from the list of available devices and choose Connect now.
- If prompted, enter the code displayed on your TV screen to confirm the connection.
- Once connected, select Remote from the bottom navigation menu to access the virtual remote. After that, you may need to press Home or OK to wake up your Roku device.
- Use the virtual remote to navigate to Settings and Network.
- Select Set up connection and then Wireless network.
- Select your Wi-Fi network from the list of available networks.
- Enter the Wi-Fi password and follow the on-screen instructions to complete the setup process.
That’s it! Your Roku TV is now connected to Wi-Fi, and you can start streaming your favorite shows and movies. Keep in mind that the app may display a list of devices if you have multiple Roku devices. Be sure to select the correct Roku TV to connect it to Wi-Fi. If you encounter any issues during the setup process, try restarting your Roku TV or smartphone/tablet and ensuring they are connected to the same Wi-Fi network.
What problems can you face while using Roku app as a virtual remote
While the Roku app can be a convenient way to connect your Roku TV to Wi-Fi and serve as a virtual remote, it’s not without its potential issues. Here are some problems you may face while using the Roku app as a virtual remote:
- Connection issues: The Roku app requires a stable Wi-Fi connection to function correctly. If your phone or tablet isn’t connected to the same Wi-Fi network as your Roku TV, or if there are network connectivity issues, the app may not be able to connect with your TV.
- App crashes: Like any app, the Roku app may experience crashes or other glitches that could affect its functionality. If the app crashes or freezes while you’re using it as a virtual remote, try closing and reopening the app.
- Limited features: The virtual remote on the Roku app may not have all the features and buttons available on a physical remote. Some buttons may be hidden behind sub-menus or may not be available at all. This can make navigating some menus or accessing specific settings more difficult.
- Battery drain: If you’re using the Roku app on your smartphone or tablet, you may experience battery drain more quickly than usual, especially if you’re using the app as a virtual remote for an extended period. To conserve battery life, you can lower the screen brightness or connect your device to a charger.
- Compatibility issues: The Roku app may not be compatible with all devices. Check the app’s compatibility requirements before downloading it to your smartphone or tablet.
Overall, the Roku app can be a helpful tool for connecting your Roku TV to Wi-Fi and using it as a virtual remote. However, it’s essential to be aware of these potential issues and troubleshoot any problems you may encounter while using the app.
How to connect Roku TV to WiFi without a remote by using Browser Extension
If you lost or misplaced your Roku TV remote and don’t want to use the Roku app, you can still connect your Roku TV to Wi-Fi using a web browser extension. Here’s how to connect your Roku TV to Wi-Fi without a remote using a browser extension:
- Ensure that your Roku TV is turned on and connected to a power source.
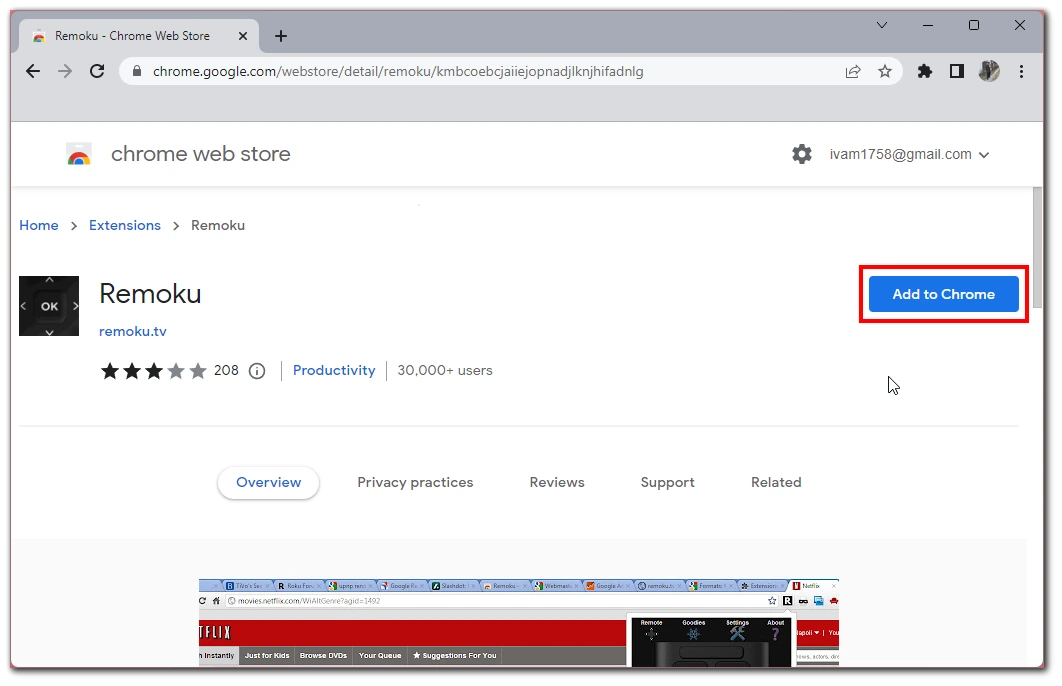
- Open your web browser and install the “Remoku” browser extension. You can search for “Remoku” in your browser’s extension store, such as the Chrome Web Store.

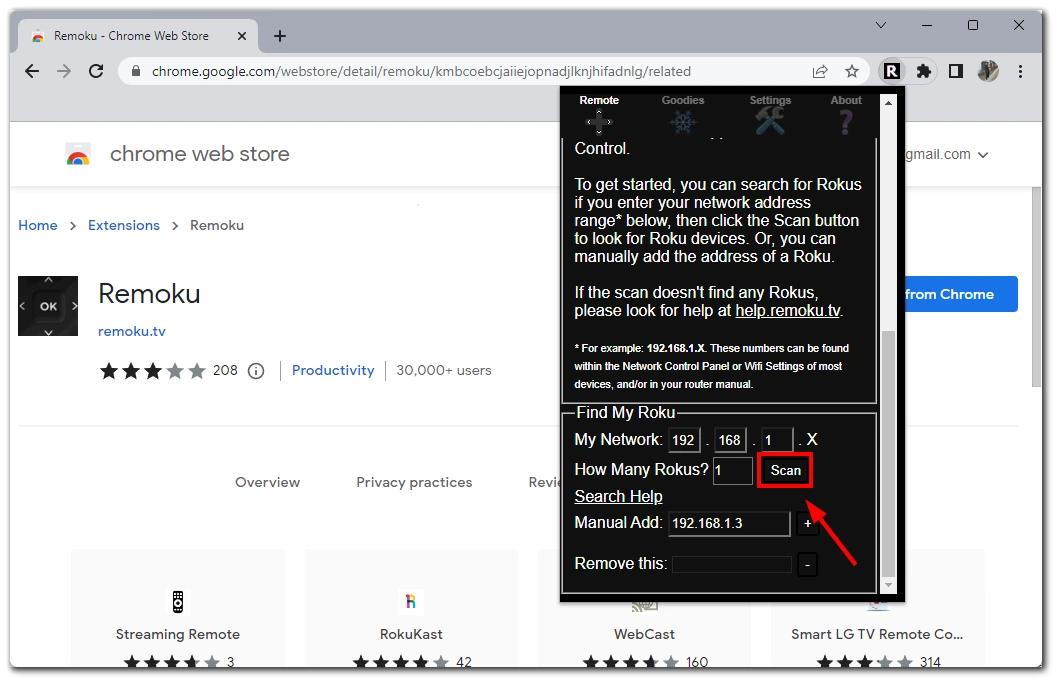
- Once installed, click on the extension icon in your browser’s toolbar and select Scan.

- The extension will scan for available Roku devices on your network. Once it locates your Roku TV, click on it to connect.
- Follow the on-screen instructions to complete the connection process. This may include entering your Wi-Fi network information and password.
- Once the connection is established, you can use the extension as a virtual remote to navigate the Wi-Fi settings and connect to your network.
It’s important to note that this method may not work for all Roku TV models, and you may need to consult your TV’s user manual or contact Roku support for assistance if you encounter any issues. Additionally, it’s recommended to use a secure Wi-Fi network to avoid potential security risks.
Can you connect Roku TV to the internet by cable?
You can connect your Roku TV to the internet using a wired Ethernet connection, also known as a cable connection. This method can offer a more stable and consistent internet connection than a wireless Wi-Fi connection, which may be affected by distance, interference, and network congestion. Here’s how to connect your Roku TV to the internet using a cable:
- Locate the Ethernet port on your Roku TV. This is typically located on the back or side of the TV and looks like a wide phone jack.
- Connect one end of an Ethernet cable to the Ethernet port on your Roku TV.
- Connect the other end of the Ethernet cable to an available Ethernet port on your modem or router. Make sure to use a cable long enough to reach your Roku TV to your modem or router.
- Turn on your Roku TV and navigate to the Settings menu using the Roku app.
- Select “Network” from the menu and then select Wired as the network type.
- Follow the on-screen instructions to complete the setup process. Your Roku TV will automatically detect the Ethernet connection and establish a connection to your network.
Not all Roku TV models may have an Ethernet port. Additionally, make sure to use a high-quality Ethernet cable for the best performance, and keep the cable away from sources of electromagnetic interference such as power cables or other electronic devices.


