Setting up a new microphone is always a headache, as each has a unique basic sensitivity. By default, some may be too loud to use; others may be too quiet. Or your mic can be too sensitive, capturing ambient sounds and combining your voice with surrounding noise.
To fix this and make your mic sound better, you need to adjust the volume and pay some time to master mic sensitivity.
Here’s the difference between volume and sensitivity:
- Microphone volume refers to the loudness of the audio output from a sound system after a microphone picks up a sound.
- Microphone sensitivity measures how well a microphone converts acoustic pressure into an electrical signal.
In other words, while volume determines how loud the sound will be in the output, sensitivity determines the microphone’s ability to detect quieter sounds and its accuracy in converting them to an electrical signal.
If you have a lot of surrounding sounds (like other people in your room), I recommend to lower mic sensitivity, so it would “catch” less noise.
Microphones in computers and laptops, types and connection
Modern computer systems use various microphones, which can be either built-in or external. The variety of microphones used is determined by the specifics of their application and the characteristics of the devices into which they are integrated.
Built-in microphones: Laptops come with built-in microphones because they are standalone devices that require minimal additional hardware to perform everyday tasks. Advanced laptop models may have multiple microphones to improve sound quality, allowing the user’s voice to be better picked up and background noise to be reduced.
External microphones: External microphones provide higher-quality sound than built-in microphones and can be used on desktop computers and laptops. They are ideal for professional audio recording, streaming, podcasting, or situations that require high-quality audio (sound quality varies by microphone). Free-standing microphones can have different connections, such as USB, 3.5mm audio jack, or Bluetooth. Microphones built into headphones provide a compromise between convenience and sound quality.
Connection and setup:
- USB microphones are generally easy to install and are automatically recognized by the operating system. The driver or specialized software offers a wide range of settings.
- Microphones with a 3.5mm audio jack are typically standard headphone microphones.
- Bluetooth microphones provide the convenience of wireless communication but may cause delays in audio transmission.
Depending on the type of microphone, you may need to adjust your audio settings more precisely than what Windows offers by default. In most cases, the system offers a setting of almost maximum sensitivity. This setting is intended for average-quality microphones, but if you are using a high-end microphone, then this setting may be excessive and cause distortion of the transmitted sound.
Below is a detailed guide on how to change your mic sensitivity: turn it down or up, adjust your mic volume, and test your mic before you use it.
How to adjust mic sensitivity in Windows 11 and 10
Sensitivity isn’t about how loud your mic is; it’s about the power it catches surrounding sound. Yes, that can impact mic volume, as if the sensitivity is too low, your mic would catch the insufficient sound. However, if your mic is too quiet, I adjust it to turn up its volume first.
But mic sensitivity impacts what surrounding sounds would be caught, and if there are too much third-party noises, you can lower mic sensitivity.
To do so, you have to follow these steps:
- Open Settings by pressing Win + I on your keyboard.
- Then go to the System section and select Sound.
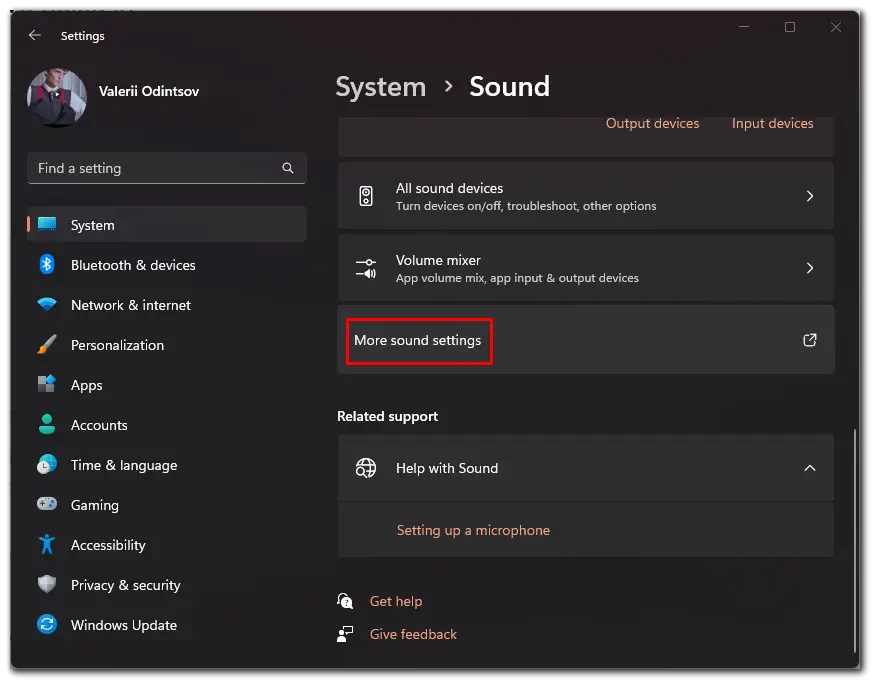
- Scroll down and click More sound settings.

- In the new window, go to the Recording tab and select the microphone with one click.

- After that, click Properties.
- Go to the Levels tab and change the dB value, making the microphone sensitivity even higher or lower.

- Finally, click Apply, if needed, and OK.
You can switch to other tabs and adjust the microphone according to your preferences: remove sound effects, select the sampling rate, and turn noise reduction off or on.
How to adjust mic volume on Windows 11 and 10
If your mic is too quiet (or loud), you need to adjust its volume. Here’s how:
- First, open Settings by pressing Win + I on your keyboard.
- Then go to the System section and select Sound.

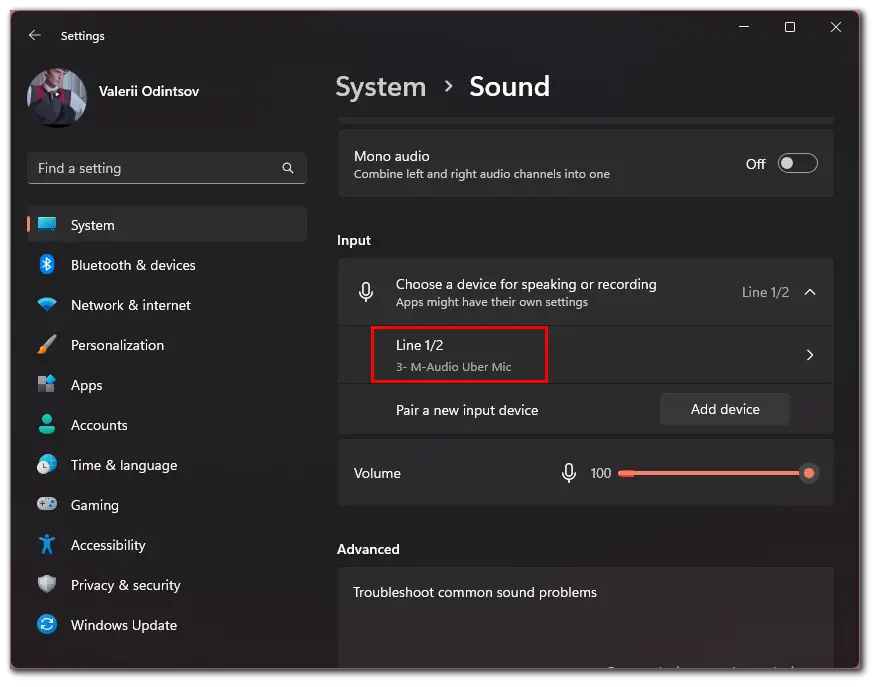
- After that, under the Input section, select your microphone.

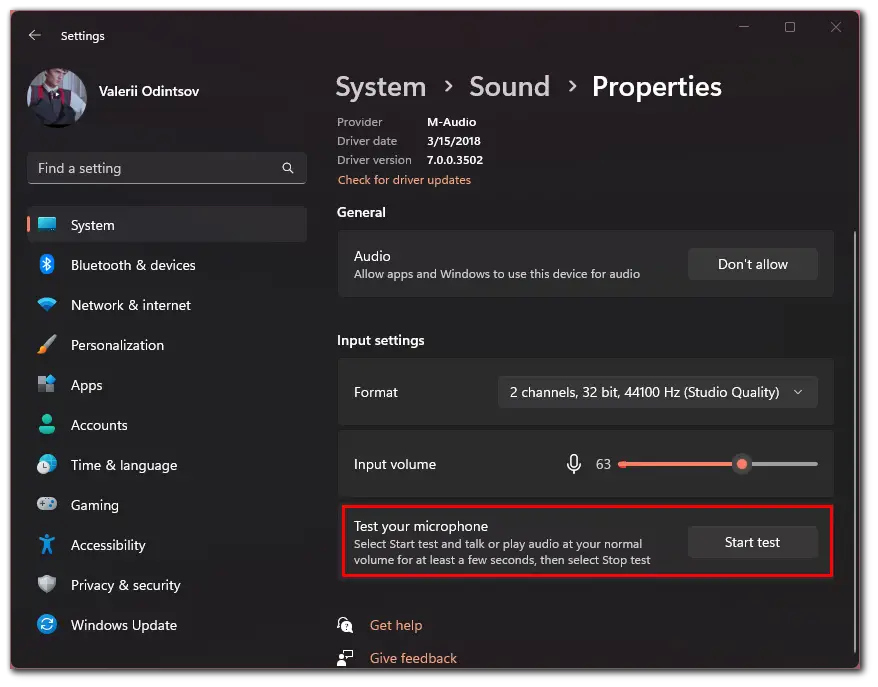
- You will see the Input volume slider which you can use to increase or decrease the microphone volume.

How to test your mic on Windows
Before you use your mic, you can test it. Your speakers or headphones would play the sound as other people hear it. I recommend using headphones for this test so the mic wouldn’t catch its sound.
- Click Start test if you don’t know what microphone sensitivity to set.

- Say a few sentences in a normal voice into the microphone and click the Stop test.
- Finally, you will see a number for the maximum value of the voice level, which you can use as a starting point.

Once you have completed these steps, you will set up your microphone volume on your Windows PC or laptop.
Why is it important to set the microphone sensitivity and volume correctly?
Improperly adjusted microphone sensitivity settings can result in unwanted background noise or buzzing when using the microphone. This can be annoying when trying to record high-quality sound.
Problems with microphone sensitivity or volume in Windows are not uncommon. Typically, the default settings provided by Windows aren’t yet optimized to reduce background noise and make the microphone work properly. Although this also almost always depends on the microphone model.
That’s certainly not what you’d expect to get back when you’re using a mic, so before you use it, pay some time to conduct a test and if you don’t satisfied with the sound quality, change the sensitivity and volume of your mic to make it sound better.


