

Like most modern web browsers, Chrome monitors and protects against unwanted or malicious sites. However, sometimes Google’s browser may erroneously suggest that a site you trust and want to visit is unsafe. This is where the option to add a trusted site comes in handy.
The easiest and fastest way to visit your trusted site involves disabling Chrome protection altogether. Obviously, Google doesn’t recommend doing this. But if you need to visit only one site you trust, this method may suit you. After it, you can turn the protection back on.
If you’re afraid to disable Chrome’s protection, you can add your trusted site to the long list of permissions. In other words, you will allow the site to use location, camera, notifications, and other permissions necessary for this site to work smoothly.
Well, let’s look at each method in more detail.
How to disable Chrome’s protection
As I mentioned above, Google doesn’t recommend this. The fact is that once you disable the protection, the browser won’t be able to protect you against dangerous websites, downloads, and extensions. But if you need to visit one trusted site quickly, then follow these steps:
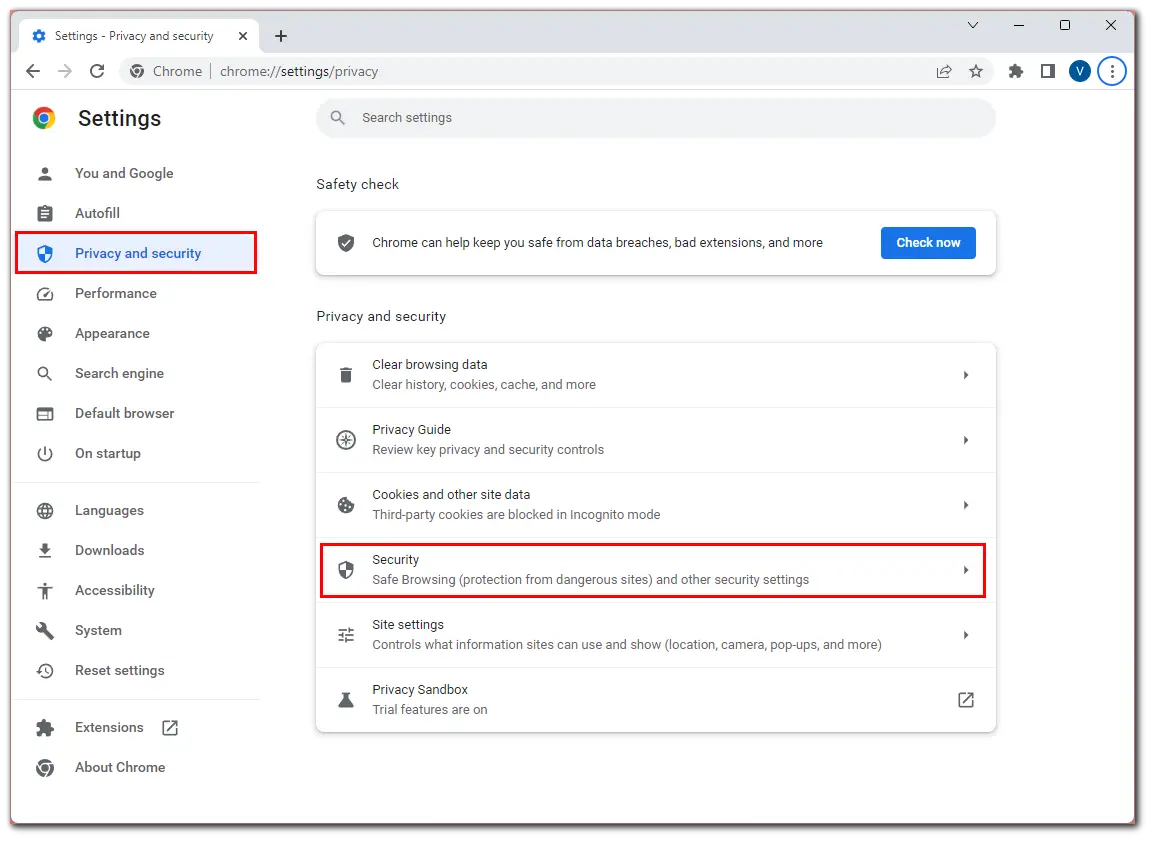
For PC
- Launch Chrome.
- Click the three dots button at the top right corner and select Settings.
- After that, go to the Privacy and security tab and select Security.
- Then scroll down and enable No protection.
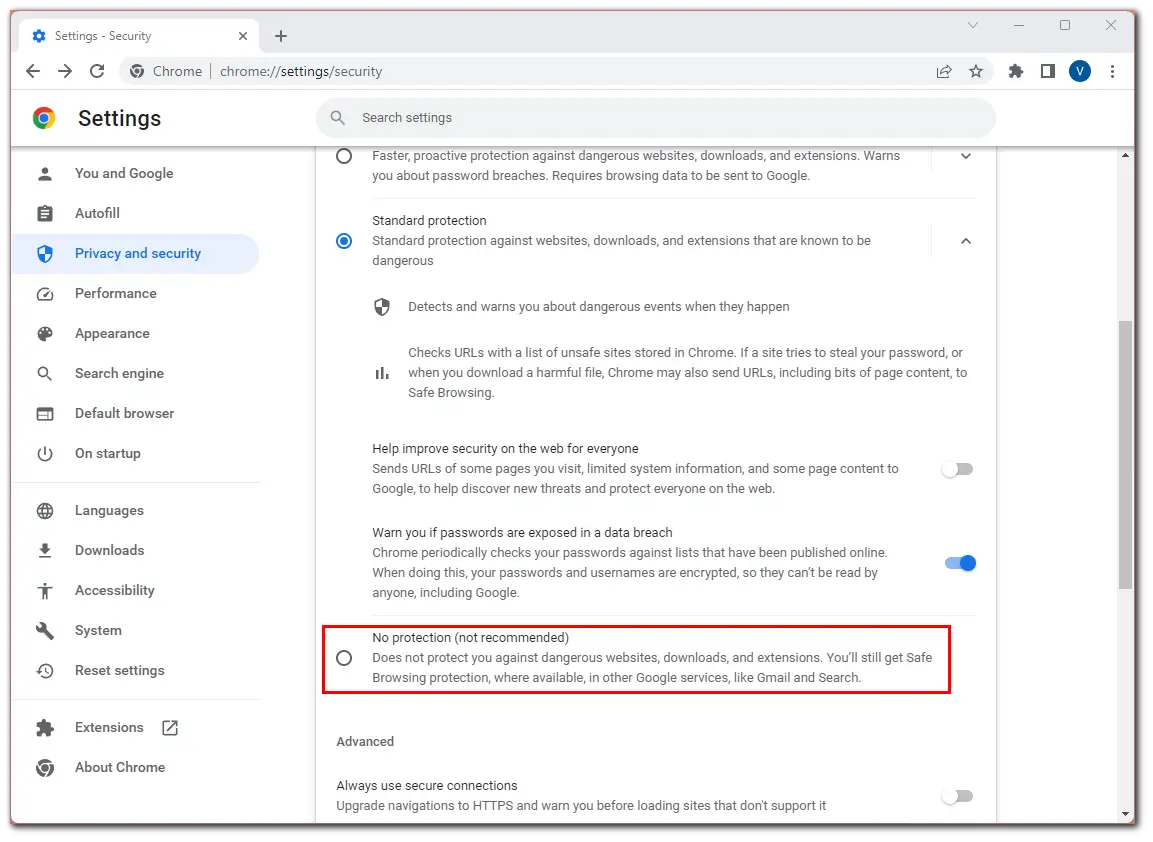
- Finally, a message will pop up with a warning from Google, where you need to click Turn off to confirm.
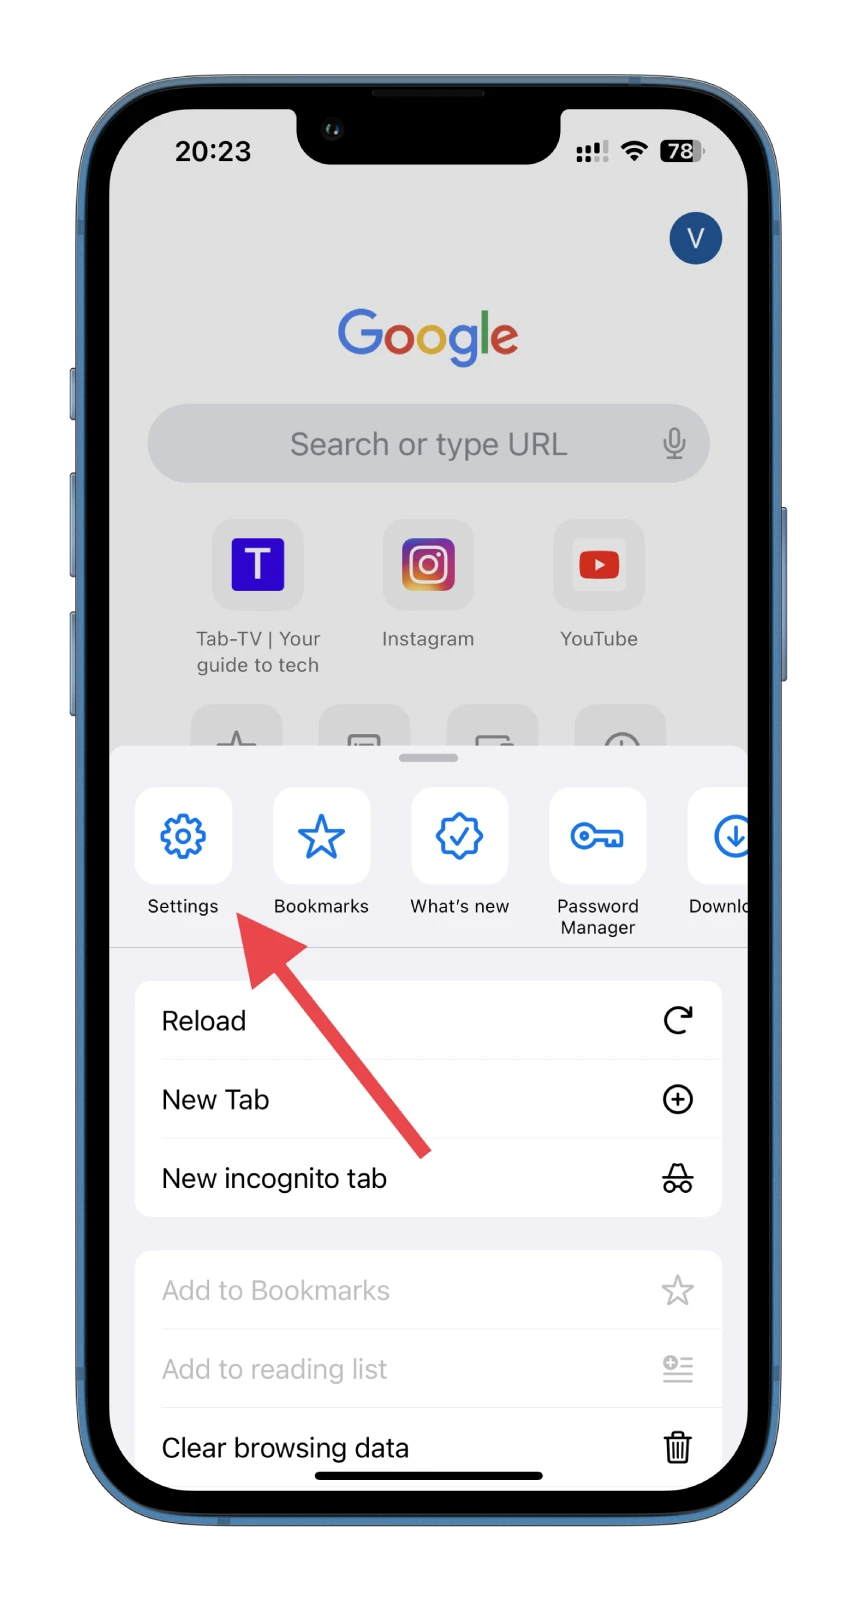
For iPhone
- Open Chrome.
- Tap on the More icon (three dots) at the bottom right corner.

- Go to Settings.
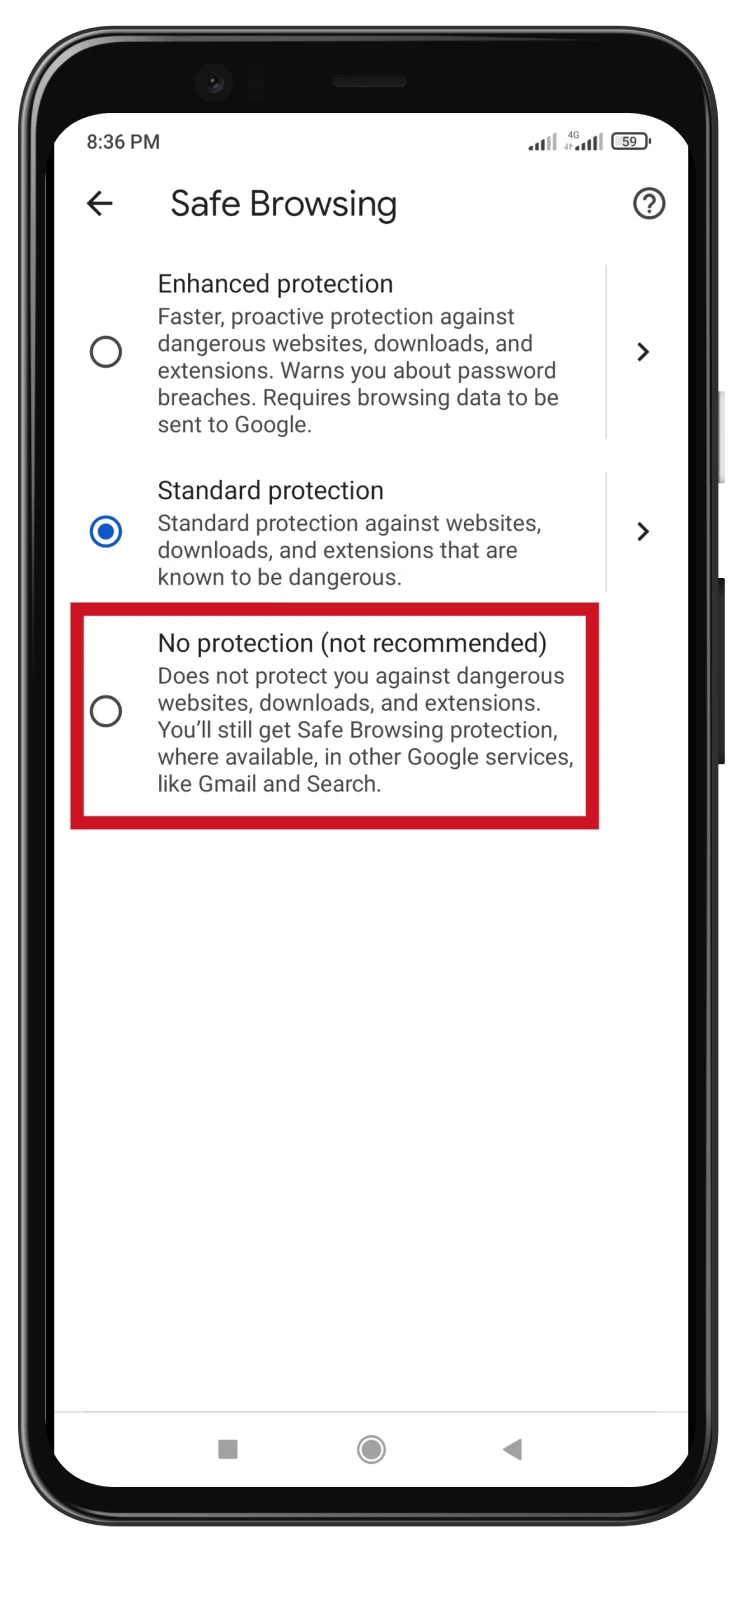
- Then scroll down and select Privacy and security.
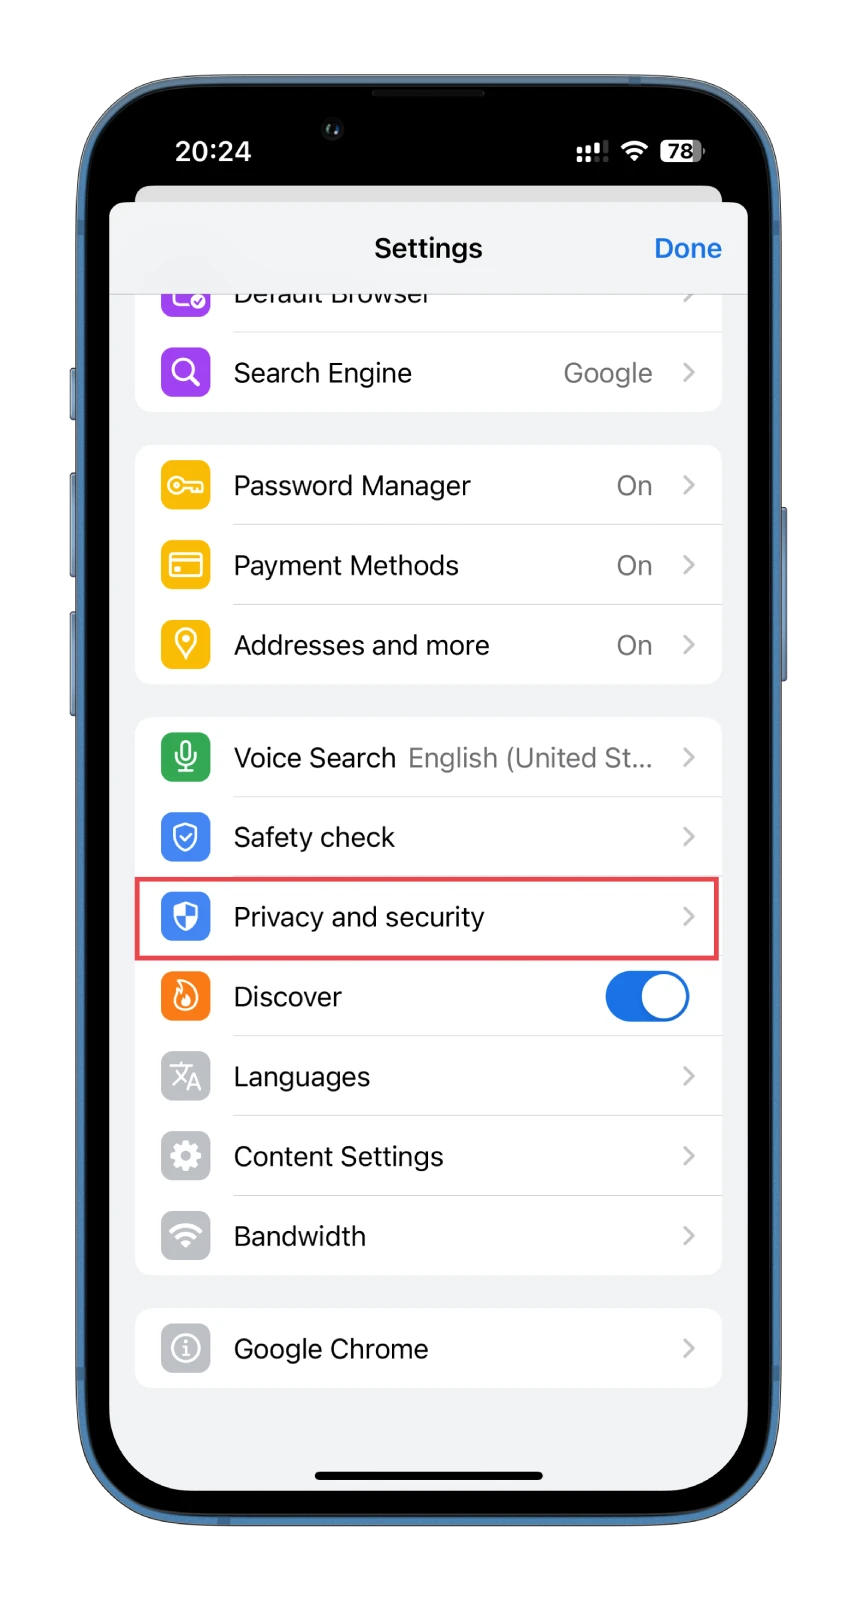
- Next, tap Safe Browsing.
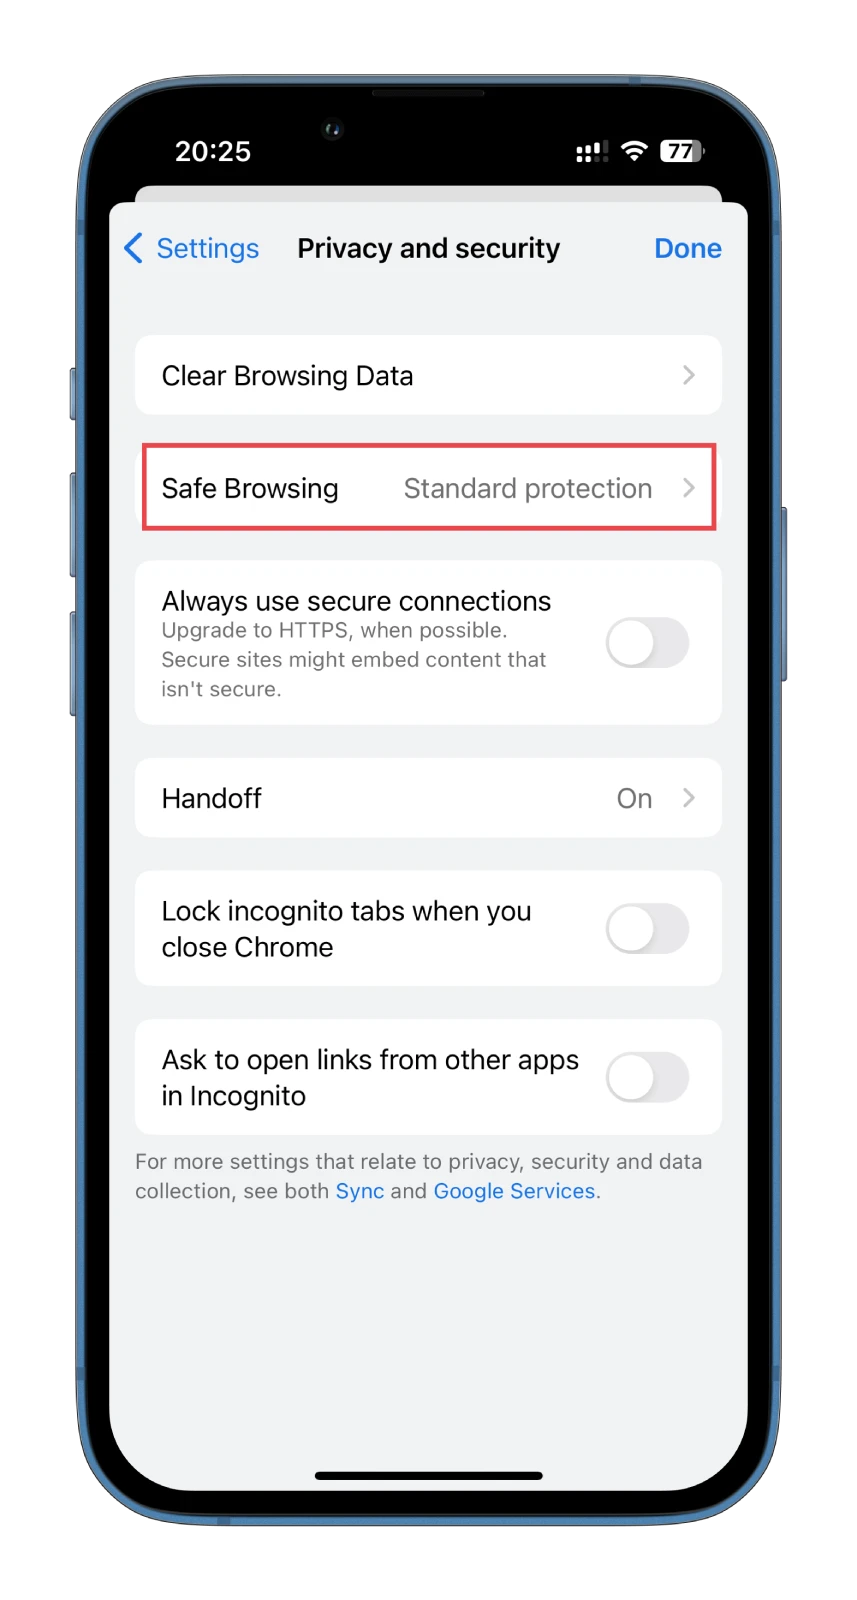
- Finally, enable No protection.
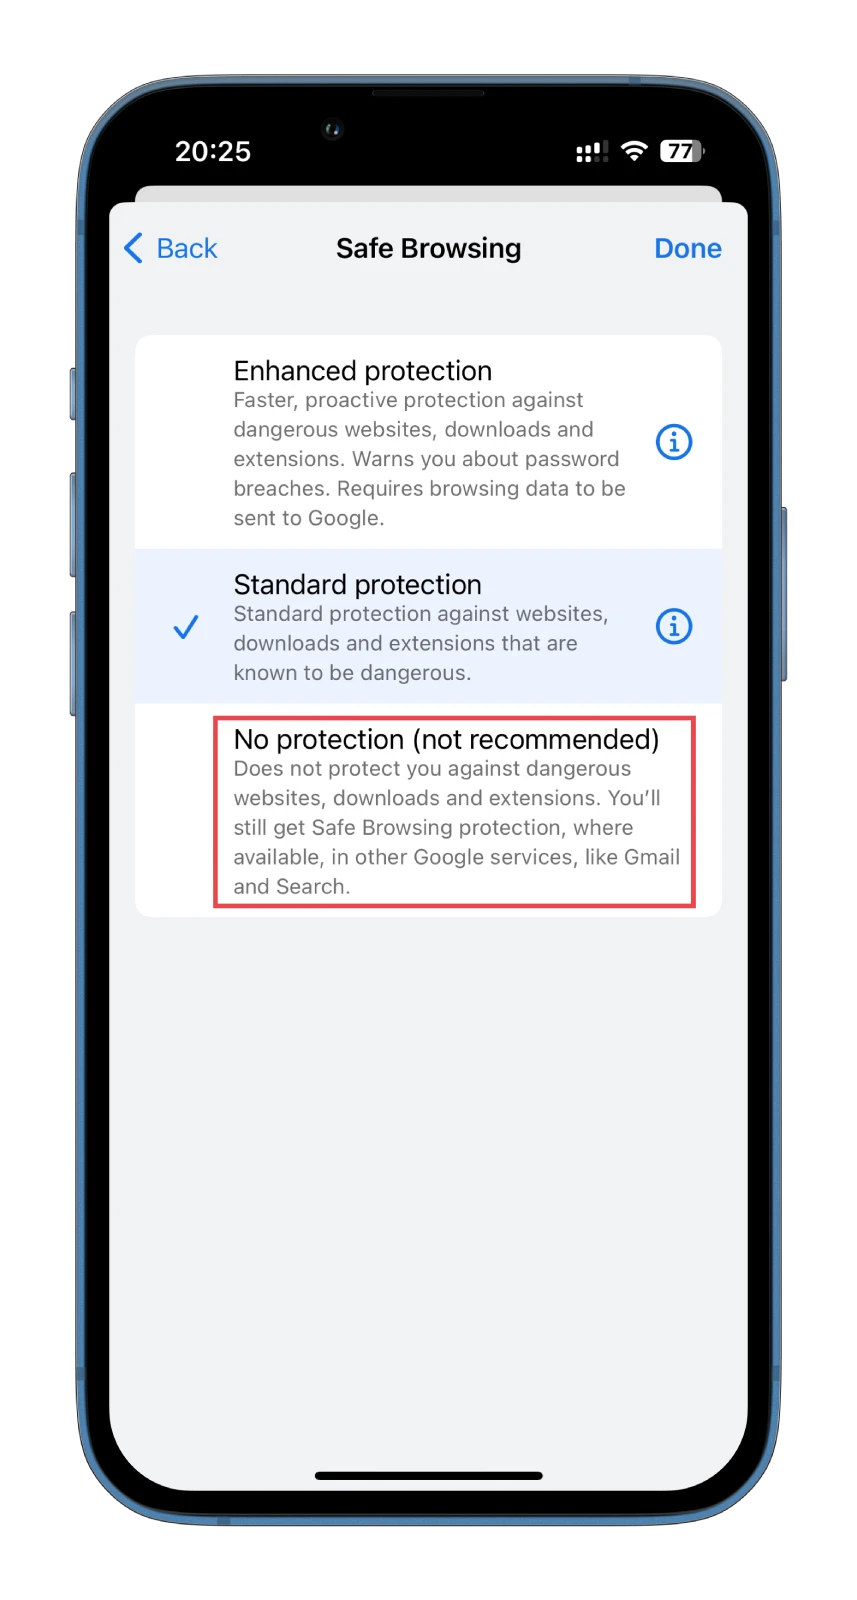
Here you also need to confirm this action.
For Android
- Open Chrome.
- Tap on the More icon (three dots) at the top right corner and select Settings.
- Then scroll down and tap Privacy and security.
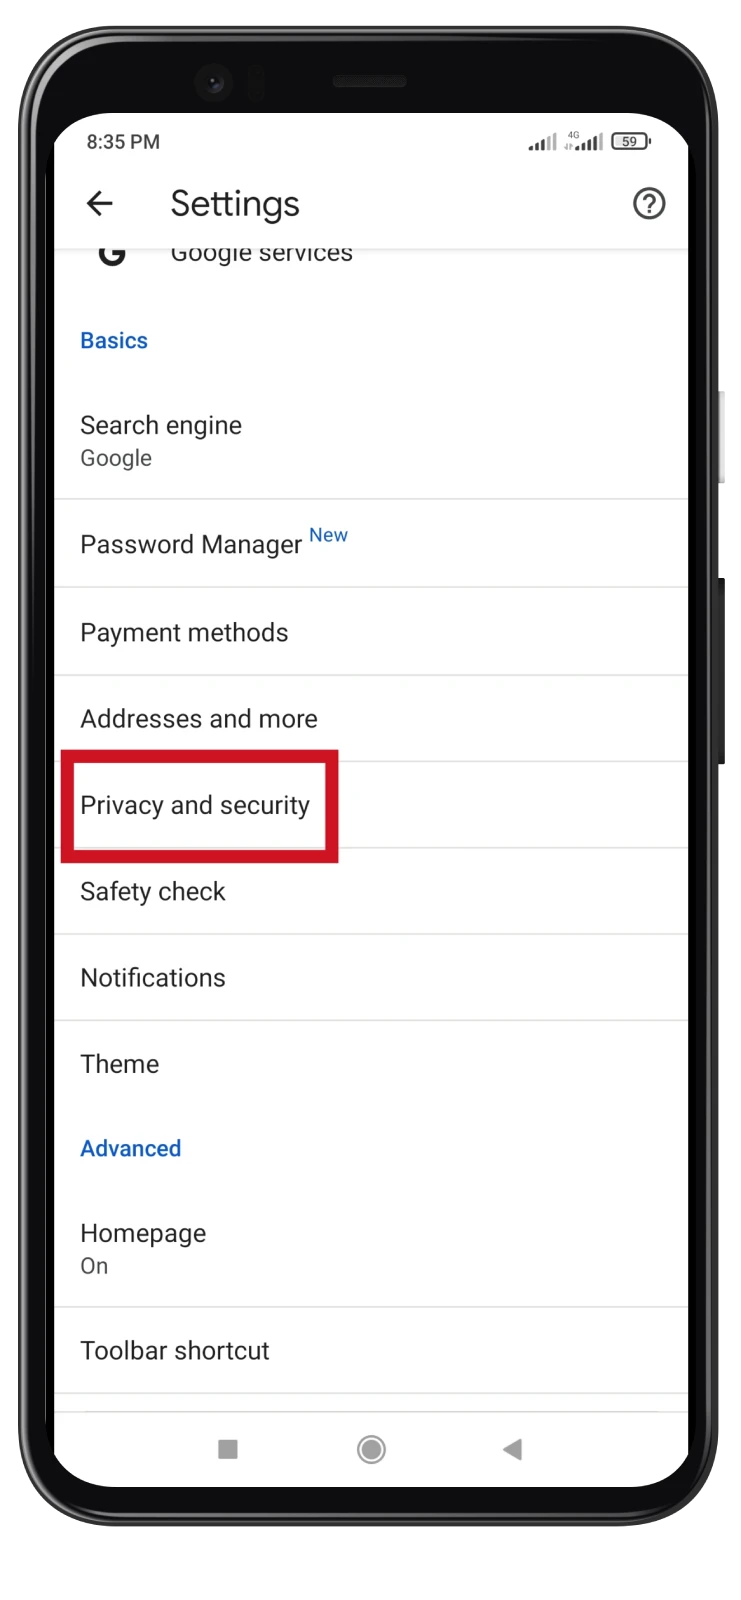
- After that, go to Safe Browsing.
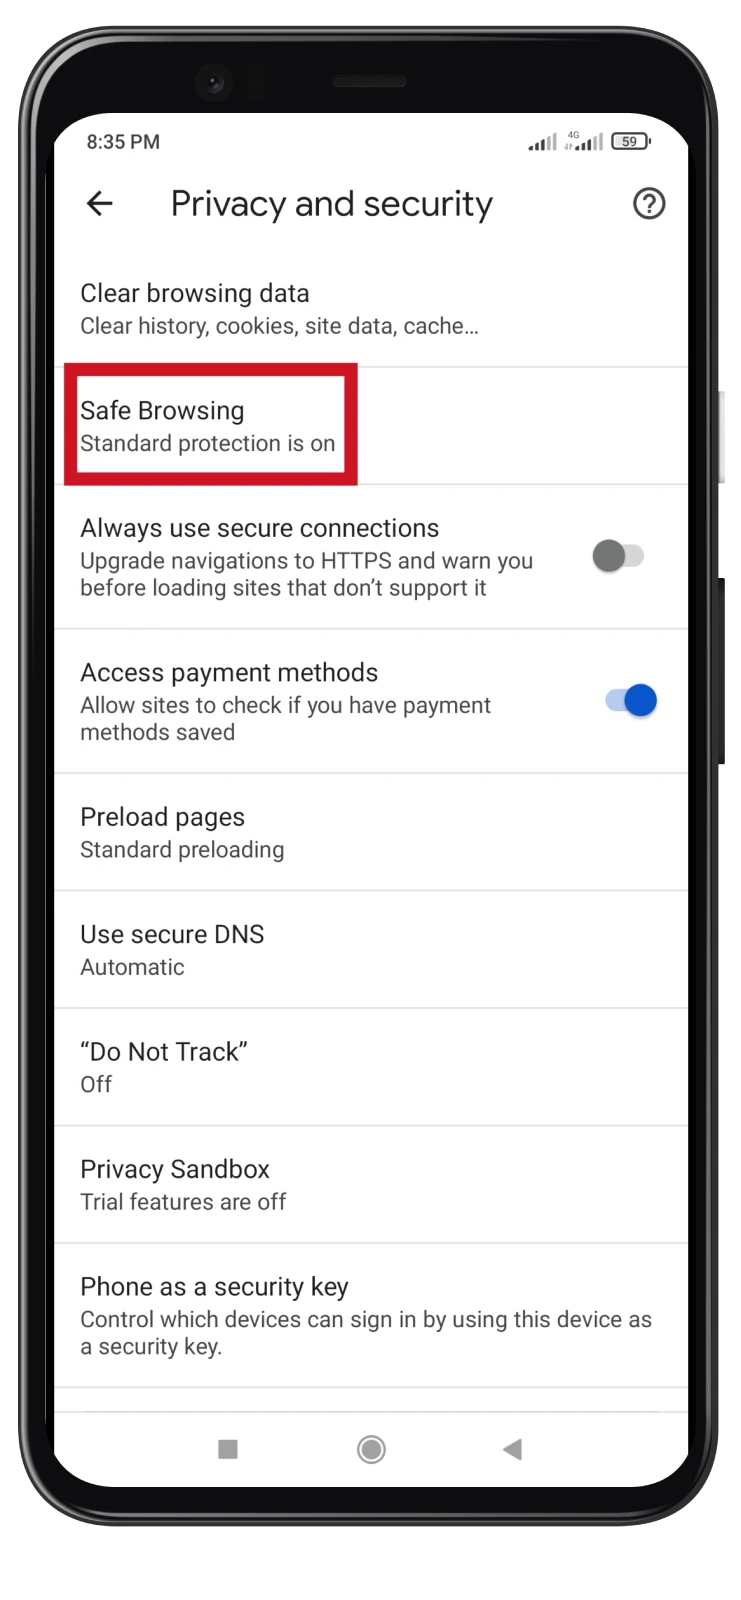
- Enable No protection.
- Confirm by tapping Turn off.
Now you can freely use the site you need. Once you’re done, I recommend turning the protection back on using the same steps. That way, you don’t accidentally harm your device by going to a malicious site.
How to add trusted sites in Chrome
This method involves adding the site as an exception to all the permissions you need for it to work correctly. Let’s say that this is the safest and most practical way.
So here’s what you need to do:
- In Chrome, go to the site you want to add more permissions to.
- Then click the Lock icon on the left from the address bar and select Site settings.
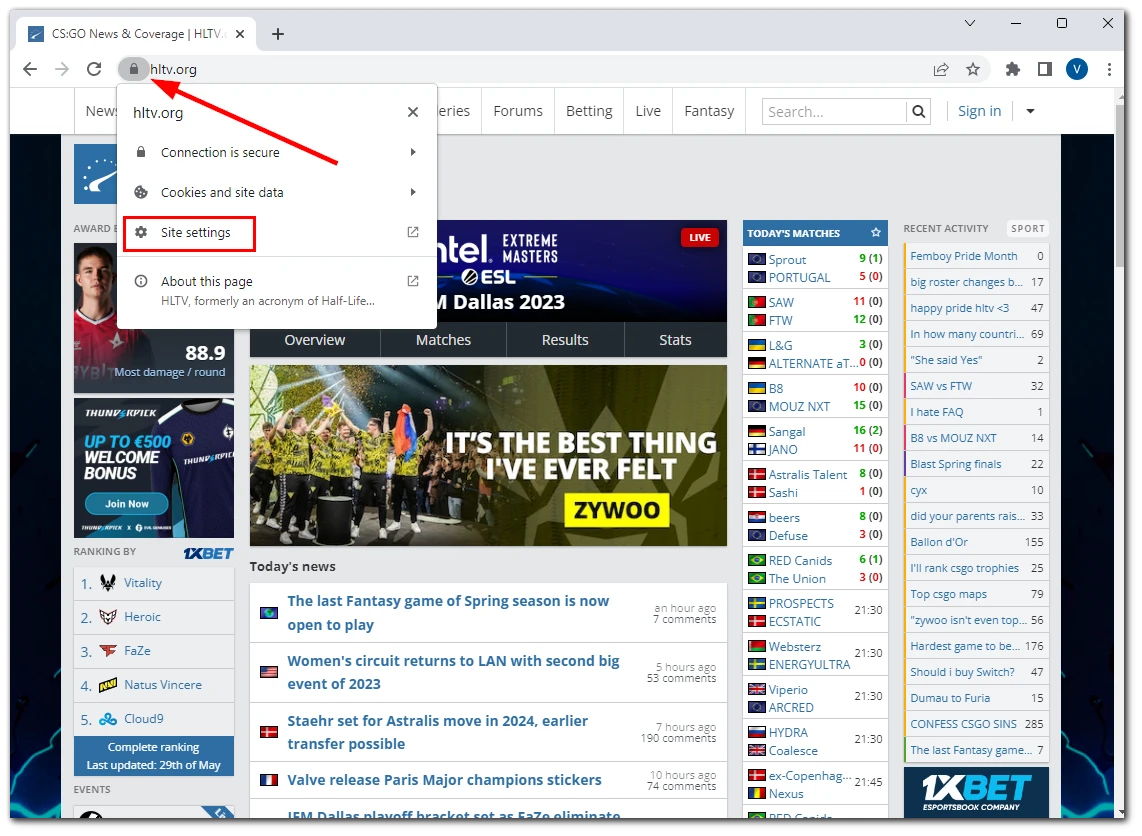
- You will see the list of permissions for this site. Click the drop-down lists next to each permission to allow access according to your preferences.
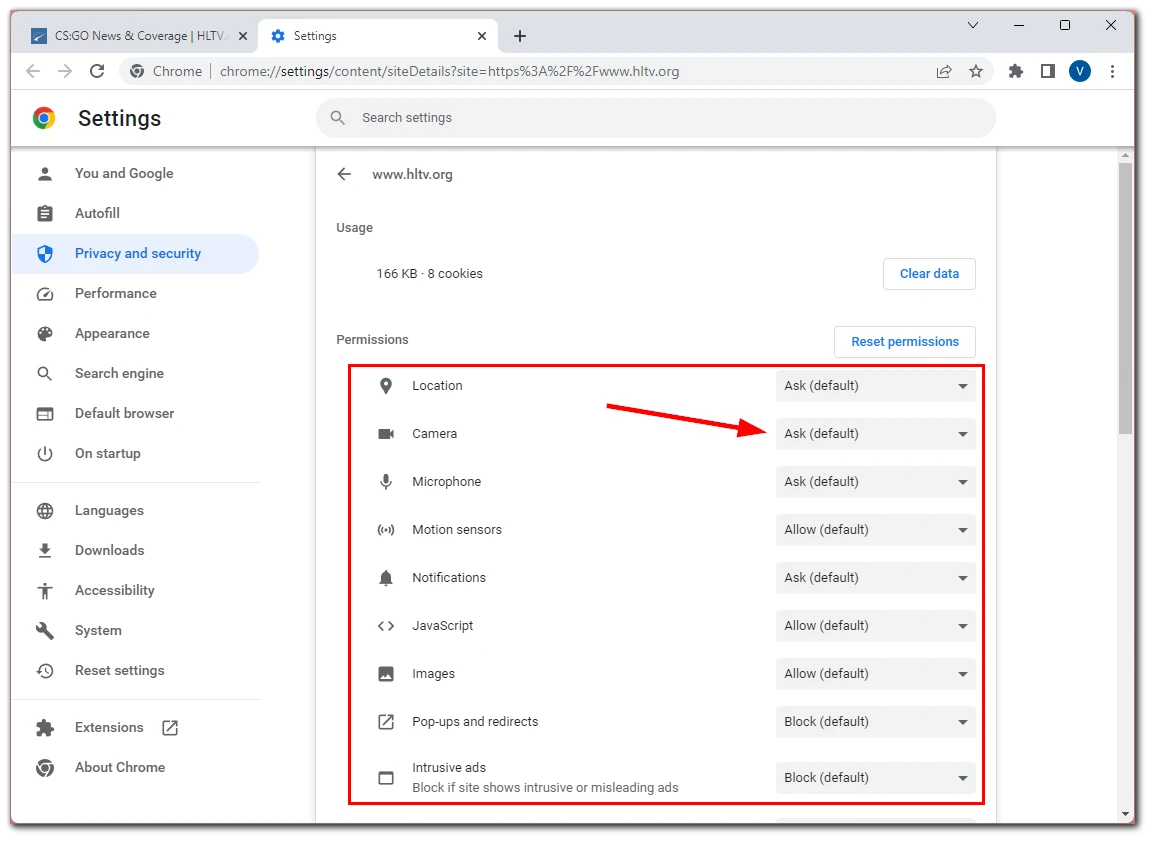
These settings are applied automatically. Just reload the website page. Unfortunately, there is no such option in the Chrome app on Android and iPhone.
Why doesn’t Chrome let me access the site?
There could be several reasons Chrome does not let you access a specific website. Here are some common possibilities:
- Malicious or Unsafe Content: Chrome has built-in security features that identify and block websites known to contain malware, phishing attempts, or other harmful content. This helps protect users from potential threats to their devices and personal information.
- Invalid SSL Certificates: A website using HTTPS (secure protocol) requires a valid SSL certificate to establish a secure connection. If a website has an expired, self-signed, or improperly configured SSL certificate, Chrome may block access to protect users from potential security risks.
- Deceptive Practices: Chrome employs technology to detect and block websites that use deceptive practices, such as phishing or distributing misleading information. This helps prevent users from falling victim to scams or fraud.
- Unwanted Software: Chrome may block sites associated with unwanted software or malicious downloads. This includes sites that attempt to automatically install software without the user’s consent or use deceptive tactics to trick users into downloading harmful applications.
- Violation of Google’s Safe Browsing Policies: Google maintains a Safe Browsing program that helps protect users across various browsers, including Chrome. Websites that violate Google’s Safe Browsing policies, which include factors like malware, phishing, and unwanted software, may be blocked to ensure user safety.
It’s important to note that while Chrome tries to block potentially harmful sites, there might be instances where legitimate websites are mistakenly flagged. In such cases, website owners can request a review to have their sites reevaluated and unblocked if appropriate. Alternatively, as a visitor, you can set up permissions or disable Chrome’s protection, as shown above.
How to check whether a site is trusted
It is pretty easy to check the website. First of all, this check starts with the URL. Ensure that it corresponds to the legitimate site you will visit. Be careful of typos, extra characters, or domains that differ from the official site.
The fact is that malicious people and scammers often send links with URLs very similar to legitimate sites (e.g., instagrann.com). In turmoil, you might not notice the typo in the address and go to a fake site, where you can accidentally download a virus or, even worse, enter your sensitive data.
So always check the URL!
Next, look for HTTPS in the URL. Trusted websites use HTTPS (Hypertext Transfer Protocol Secure) to encrypt the communication between your browser and the website. Look for a padlock icon in the browser’s address bar and ensure the URL starts with https:// rather than just http://.
While HTTPS indicates a secure connection, it doesn’t guarantee that the website is entirely trustworthy or free from other issues.
Additionally, you can verify whether the site has an SSL certificate. SSL (Secure Sockets Layer) is a technology that provides a secure and encrypted connection between a web browser and a website’s server. It ensures that the data transmitted between the browser and the website remains confidential and protected from unauthorized access.
In simpler terms, SSL is a protective shield that keeps your information safe when browsing the internet. It works like an encrypted tunnel between your web browser and the website you’re visiting. Web browsers display a padlock icon in the address bar to indicate that the website uses SSL.
You can also check the site on Whois. Simply enter the domain in the box and click the search icon.
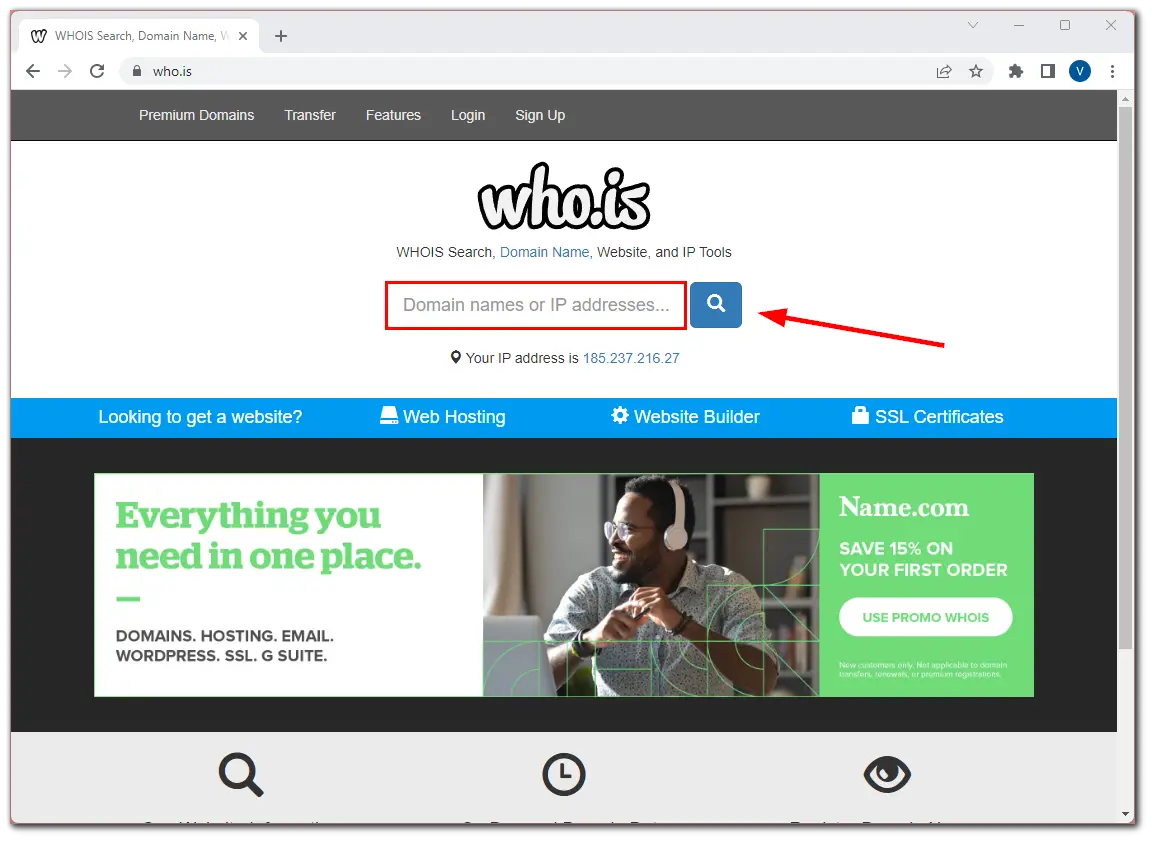
The service will show you all the available data about the website, and you will be able to understand whether it is safe and worth trusting.


