

Google Docs offers many features and functionalities to help you bring your ideas to life. One such feature is the ability to add borders to your text, which can help to highlight important information and make your document look more professional. To do this, you have several tools, including built-in borders for individual paragraphs, line separators, or the ability to create borders around images. Let’s take a closer look at this.
How to add a border around paragraphs in Google Docs
Adding a border around paragraphs in Google Docs can help to draw attention to important information, create visual interest, and make your document look more professional. To do this, you need the following:
- Open Google Docs and create a new document or open an existing one.
- Highlight the paragraph you want to add a border by clicking and dragging your cursor. If you want to add a border to multiple paragraphs, select all of them.
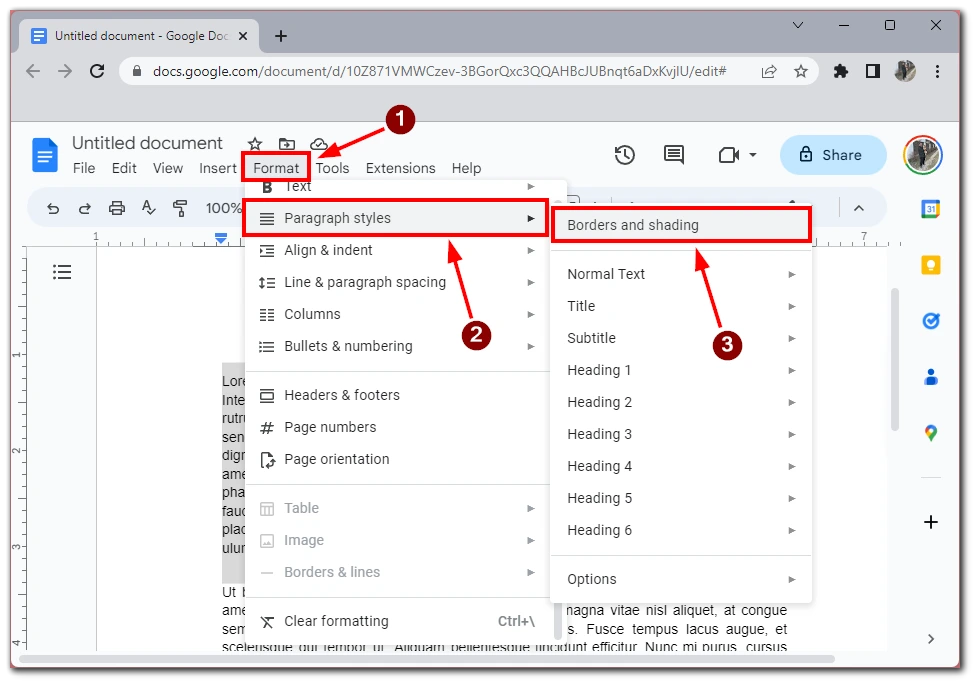
- Click on the Format button in the toolbar.
- In the drop-down menu, hover over Paragraph Styles.
- Then choose Borders and Shadings.
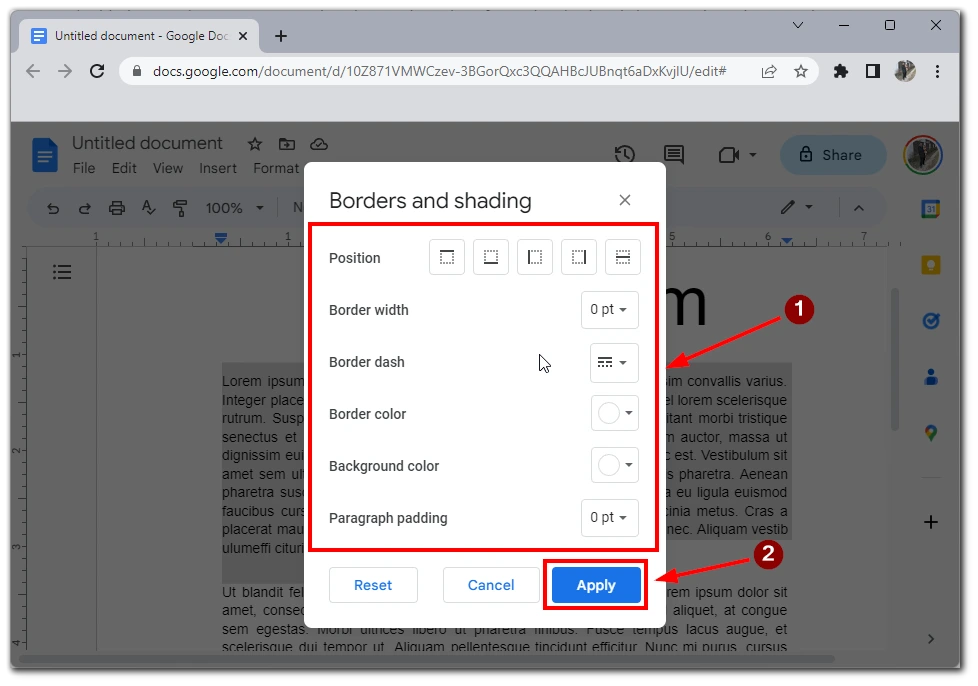
- Choose the type of border you want to add. Several options include a solid line, a dotted line, a double line, and more. You can also choose the color of your border by clicking on the color swatch next to the border style.
- Customize your border settings. Once you’ve chosen the type and color of your border, you can customize your border settings even further. For example, you can change the thickness of your border by clicking on the drop-down menu next to Weight. Adjusting the Margin settings allows you to change the distance between your text and the border. And you can choose the position of a border.
- Finally, click the Apply button to apply your border to your selected paragraphs.
After you add these borders, you can edit them using the steps above. You need to go to the border settings menu and, select the new settings, then click Apply. Note that in this way, you can add borders, for example, only on the sides or between paragraphs; don’t be afraid to experiment with the appearance of your text.
How to add borders around images in Google Docs
Adding a border around images in Google Docs can help to draw attention to them and make them stand out in your document. Here’s a step-by-step guide on how to add a border around images in Google Docs.
- Open Google Docs and create a new document or open an existing one.
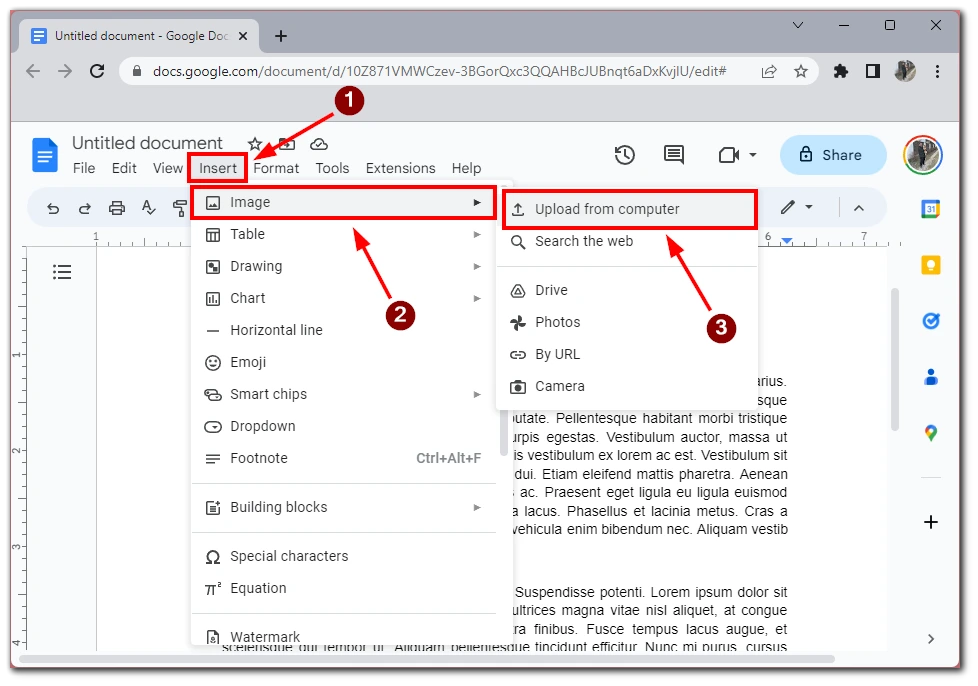
- Insert the image you want to add a border to by clicking Insert in the toolbar, selecting Image, and then choosing the image you want to use. You can also drag and drop the image directly into your document.
- Click on the image to select it.
- Click on the pencil button in the toolbar and choose the color of your border.
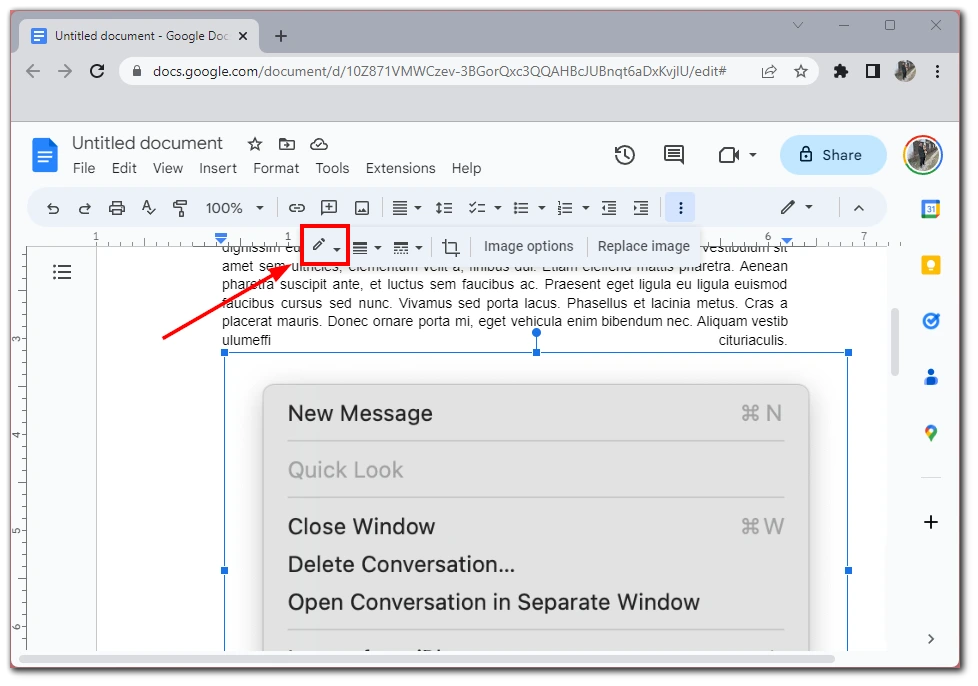
When you select the color you want, the borders around your picture will appear in that color. You can also edit the borders with dedicated buttons in the tool menu. With a bit of creativity and experimentation, you can use borders to enhance the overall look of your document and make your images pop. You can also apply this method to charts or other elements in your Google Document.
How to add a line between paragraphs in Google Docs
If creating borders around paragraphs is not your task, and you want to visually separate paragraphs from each other, adding a separator to your text can help. In Google Docs, it is called a Horizontal line. You can add it between the desired paragraphs using the Insert menu. To do this, you need to:
- Open Google Docs and create a new document or open an existing one.
- Type out the text to which you want to add a line between paragraphs.
- Place your cursor where you want to add the line between paragraphs.
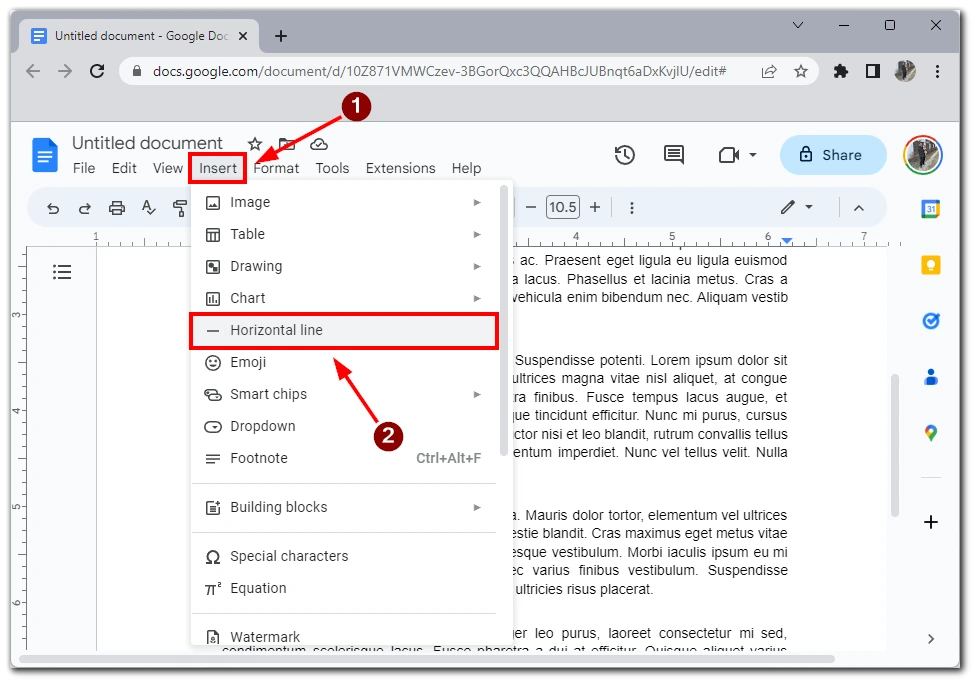
- Click on the Insert button in the toolbar.
- Choose the Horizontal line from the drop-down menu.
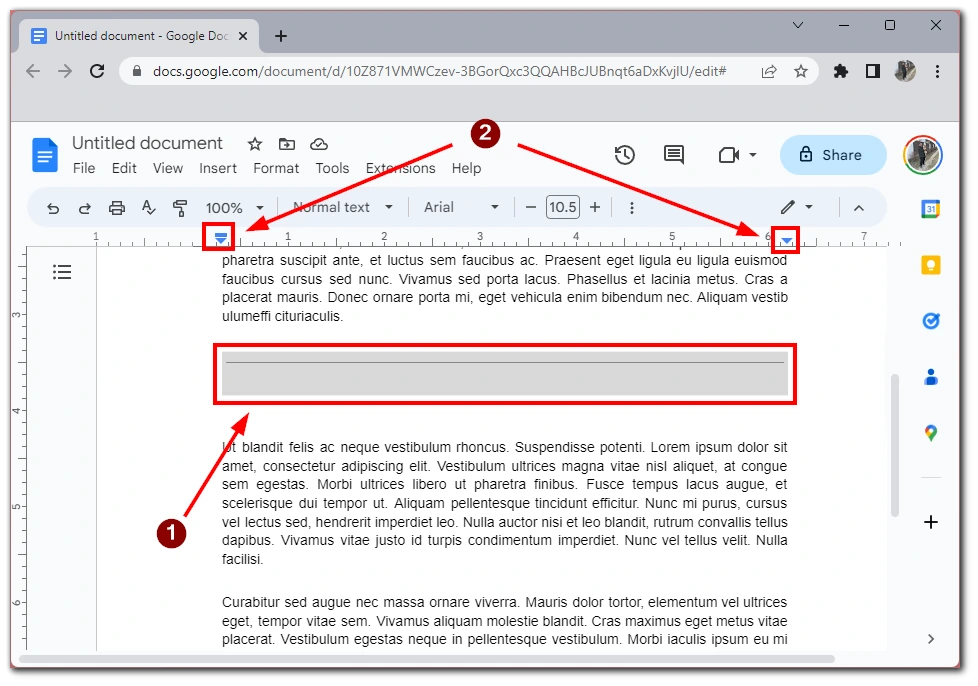
- A line will be added to your document where your cursor was placed. You can adjust the line’s length by dragging its endpoints left or right.
If you want more custom variations of the line between paragraphs, you can use the Drawings tool. It allows you to manually draw custom lines and shapes to insert into your document between paragraphs.
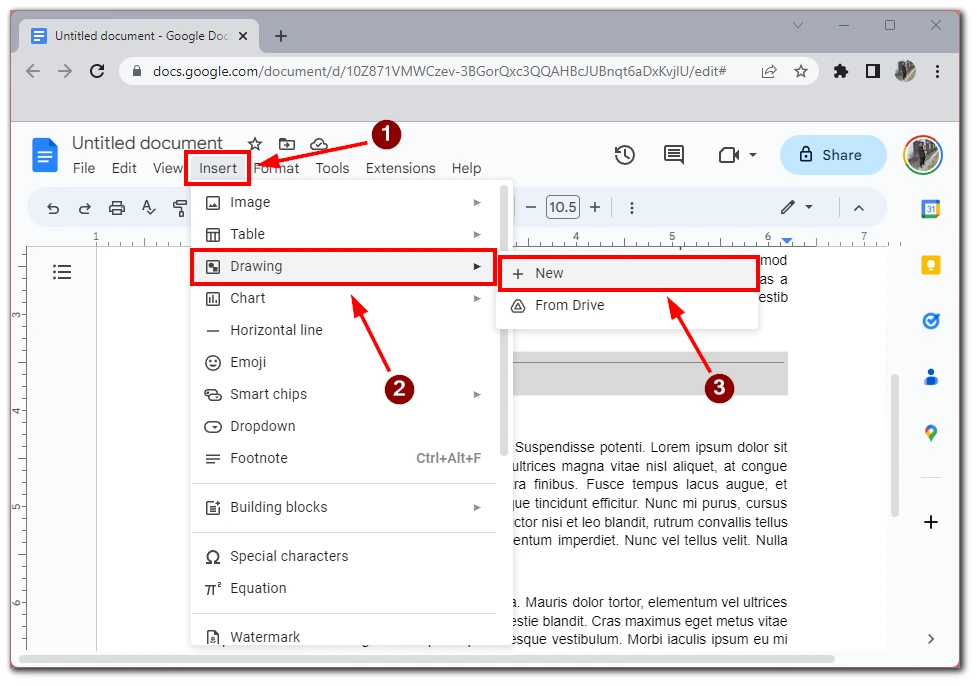
To use it, you need to press Insert and then select Drawings.
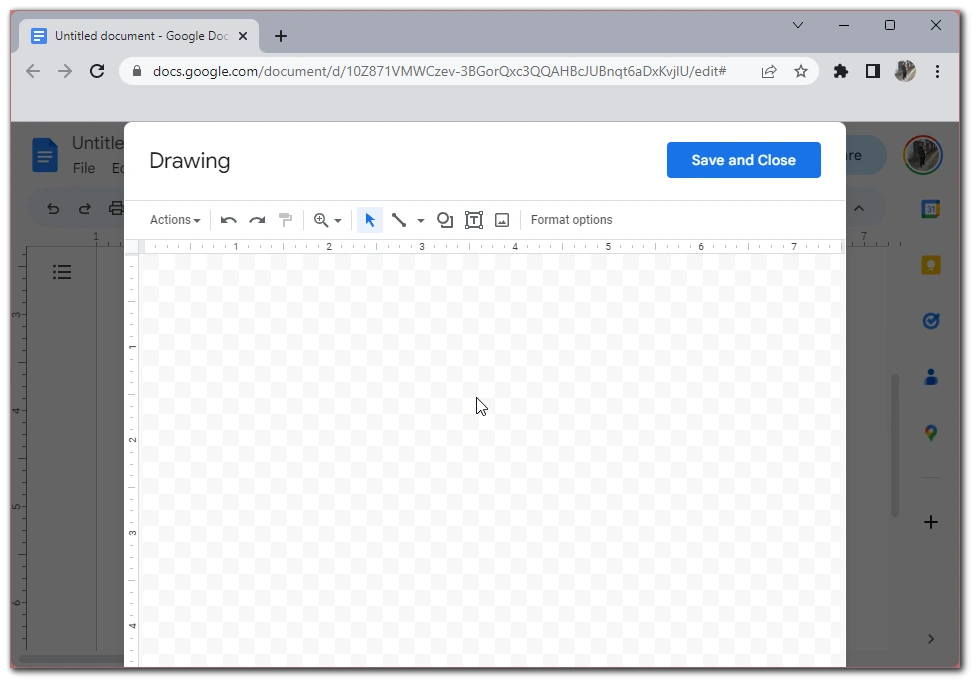
An editor will open where you can choose from the available shapes and elements or upload a custom image to create your own unique separator between paragraphs.
Why do you need to add borders in Google Docs?
Adding borders to your Google Docs document can serve several purposes, depending on the context and the type of document you’re creating. Here are some reasons why you might need to add borders in Google Docs:
- Visual appeal: One of the most apparent reasons to add borders to your document is to make it look more visually appealing. Borders can help break up large blocks of text or images, create a visual hierarchy, and add structure to your document. Using different borders and styles, you can create a unique look and feel that reflects your brand, personal style, or document’s purpose.
- Emphasis: Borders can also emphasize specific elements in your document. For example, you might add a border around a quote, a testimonial, or a call to action to make it stand out from the rest of the text. Similarly, you might add a border around an image or a chart to draw attention to it and make it more memorable.
- Organization: Borders can also help to organize your content and make it more readable. For example, you might use a border to create a sidebar or text column separate from your document’s main body. This can help to break up the text and make it easier to scan and read.
- Branding: If you’re creating a document for a business or an organization, adding borders can be a way to reinforce your branding. You can create a consistent look and feel that reflects your brand identity using your colors, fonts, and styles. This can help to build brand recognition and reinforce your brand messaging.
- Professionalism: Finally, adding borders to your document can help to give it a more professional look and feel. Whether you’re creating a report, a proposal, or a presentation, adding borders can help to signal to your audience that you’ve put time and effort into the design of your document. This can help to build trust and credibility with your audience and make your document more persuasive.
In summary, adding borders to your Google Docs document can serve several purposes, from the visual appeal and emphasis to organization, branding, and professionalism. Using the various border options in Google Docs, you can create a document that looks polished, readable, and visually engaging.


