

The primary synchronization between Apple devices, such as iPhones and Macs, is achieved through an Apple ID. This ID links devices within a secure ecosystem, facilitating automatic data and update exchange. Logging out of the Apple ID on any device halts this synchronization, a helpful step when transferring device ownership.
Beyond this, individual sync settings can be adjusted for more granular control. Options include disabling specific services and apps, iMessage, iPhone’s Hotspot, AirDrop, disconnecting from Finder on Mac, and deactivating Handoff and iCloud. The following sections provide detailed guidance on managing these settings to control iPhone-to-Mac synchronization effectively.
iPhone and Mac synchronization options
- iCloud Integration: This feature automatically synchronizes essential data (contacts, calendars, notes, Safari bookmarks, photos) across Apple devices linked to the same Apple ID. Changes made on one device are promptly reflected on others, maintaining consistency and up-to-dateness in the user’s ecosystem. The synchronization occurs via Apple’s servers, requiring an internet connection.
- AirDrop Functionality: AirDrop offers a straightforward, wireless solution for file sharing between Apple devices nearby. It enables the transfer of various file types (photos, videos, documents) without cables or external software, making it ideal for quick, local file sharing, independent of internet availability.
- Handoff: Handoff creates a seamless transition between Apple devices, allowing a task initiated on one (e.g., composing an email on an iPhone) to be continued on another (e.g., completing the email on a Mac). This feature enhances workflow continuity and user experience across devices, typically operating through Apple’s servers.
- Bluetooth Connectivity: Bluetooth allows for a wireless connection between an iPhone and a Mac. This connectivity can be used for file transfer, or sharing the iPhone’s internet connection. However, its usage has evolved towards connecting peripherals like headphones, with other methods becoming preferable for device-to-device interactions.
- Internet and Apple’s Ecosystem: The Internet serves as a universal connector within Apple’s ecosystem, enabling access and interaction with devices regardless of their physical location. This overarching connectivity is critical to the functionality of iCloud, AirDrop, and other Apple services, ensuring comprehensive integration and accessibility across the range of Apple products.
Remove your device from Apple ID
Unlinking an iPhone or Mac from an Apple ID involves disassociating the device from your Apple ID account. This action revokes the device’s access to iCloud services linked to your account, including iCloud Drive, iCloud Photos, and iCloud backups. Additionally, the device will lose access to Apple ID-dependent services like iMessage, FaceTime, and App Store purchases.
This process is essential for managing the devices connected to your Apple ID. It lets you dictate which devices can access your data and use Apple ID services. Typical scenarios for removing a device from your Apple ID include:
- Preparing a device for sale or as a gift.
- Resolving issues related to Apple ID.
- Manage the array of devices linked to your account.
How to remove iPhone from Apple ID?
To remove an iPhone from your Apple ID, you can follow these steps:
- On the iPhone, open the “Settings” app.
- Tap on your name at the top of the Settings menu.
- Scroll down and select “Sign Out.”
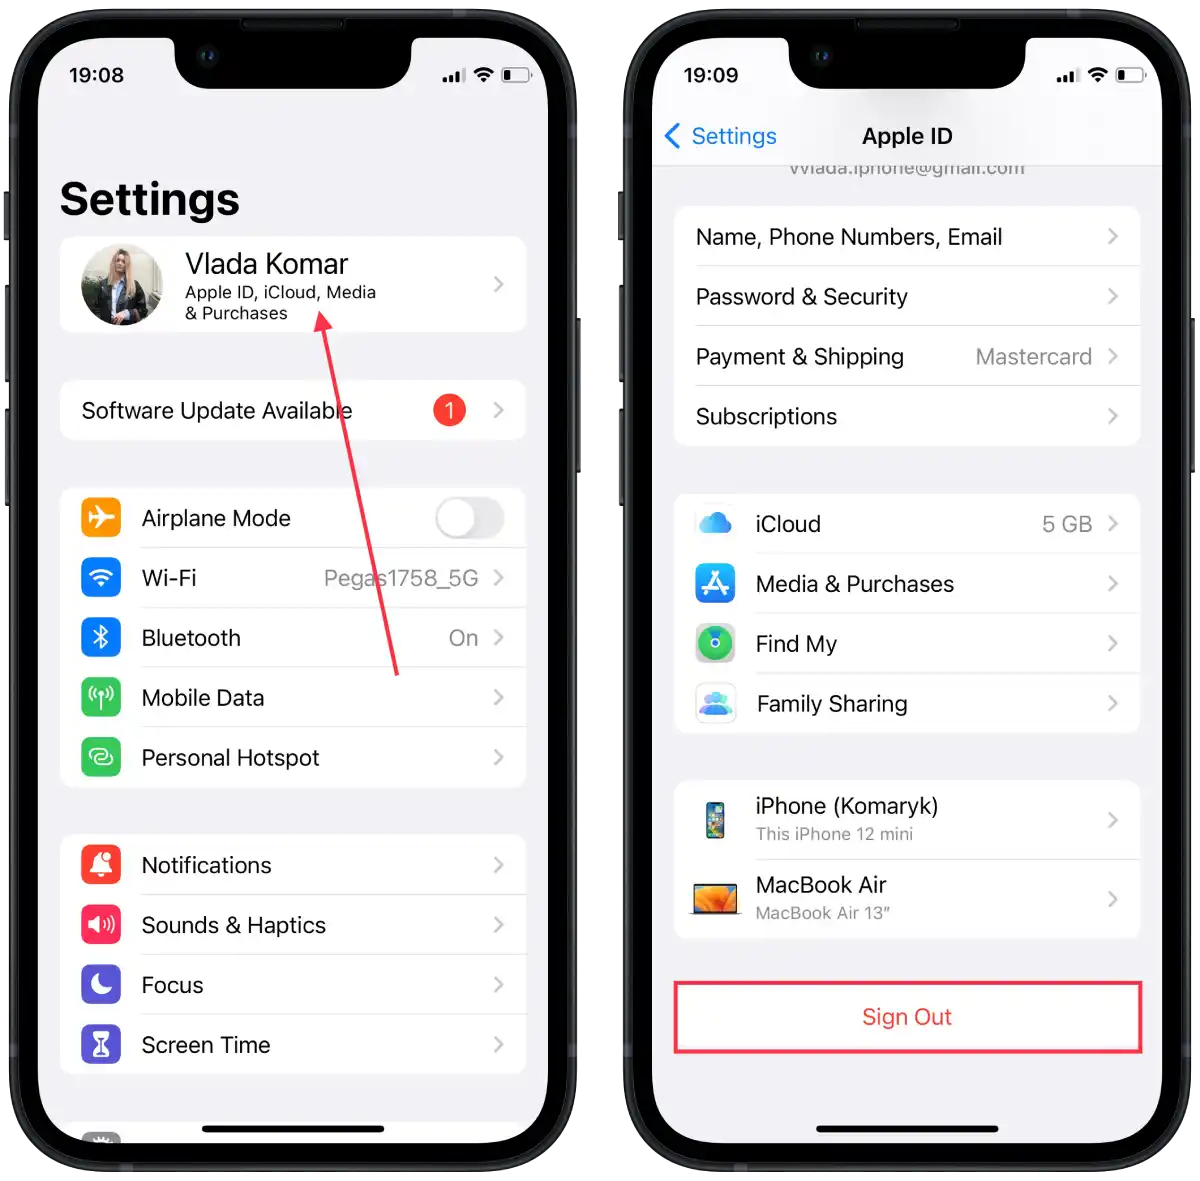
- Enter your Apple ID password when prompted.
- Tap on “Turn Off” to disable Find My iPhone and iCloud features on the device.
- You’ll be presented with options to keep a copy of your data on the iPhone or delete it. Choose the option that suits your preference.
- Tap on “Sign Out” to confirm and remove the iPhone from your Apple ID.
Following these steps will remove your iPhone from your Apple ID, which means the device will no longer be associated with your Apple ID account.
How to remove Mac from Apple ID?
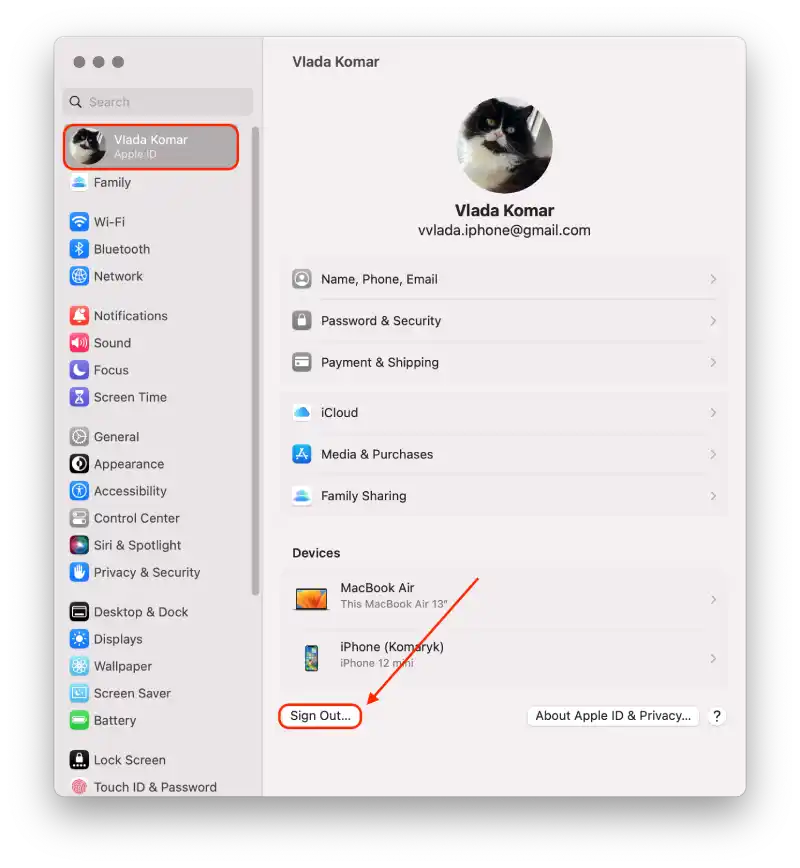
To remove a Mac from your Apple ID, you can follow these steps:
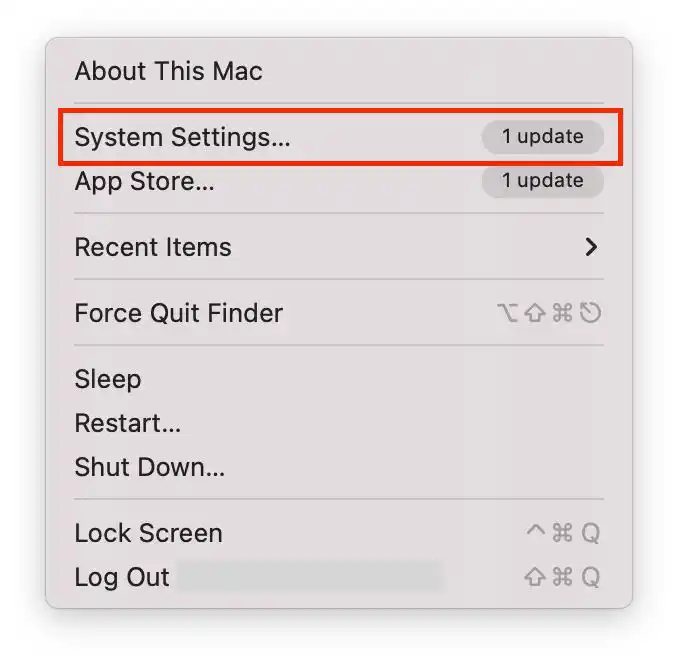
- On your Mac, click on the Apple menu located in the top-left corner of the screen.
- Select “System Setting” from the drop-down menu.

- In the System Settings window, click on “Apple ID“.
- Click on “Sign Out“.
How to remove iPhone from Apple ID on Mac?
To remove an iPhone from an Apple ID on a Mac, you need to follow these steps:
- The first step is to click on the Apple icon and open System Settings on your Mac.

- After that, click on the Apple ID button.
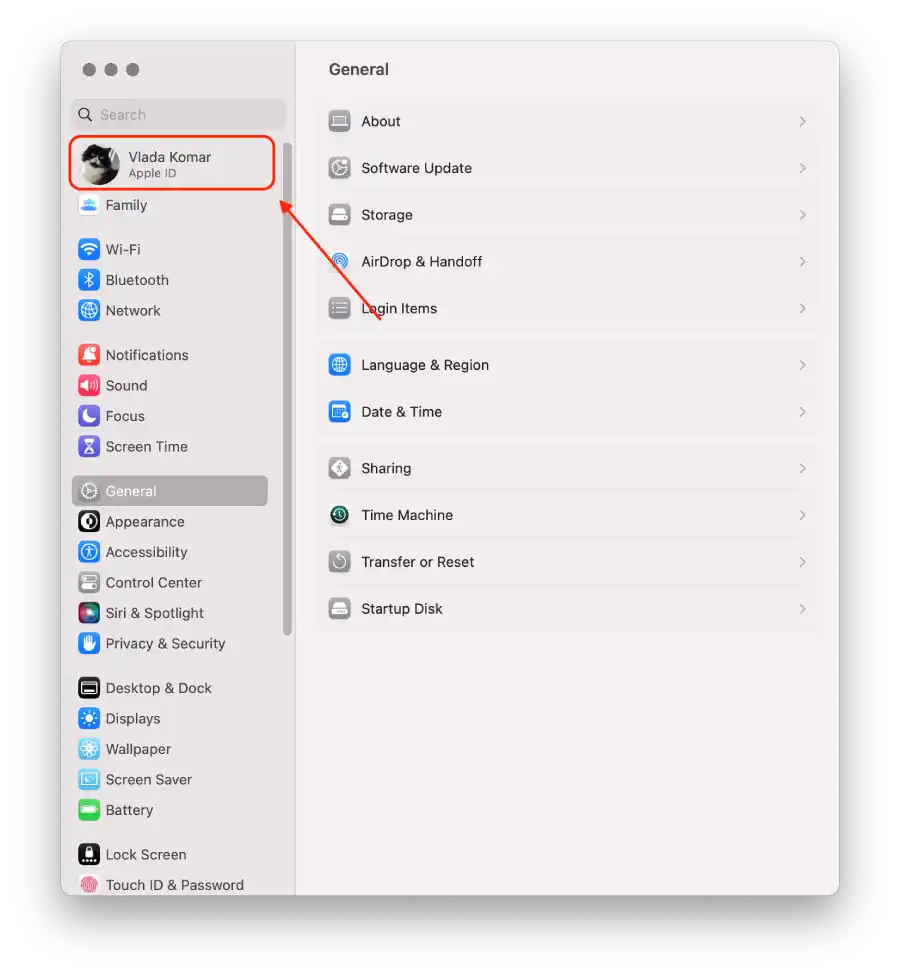
- Then in the list of devices, select the iPhone.

- And click on Remove from the account.
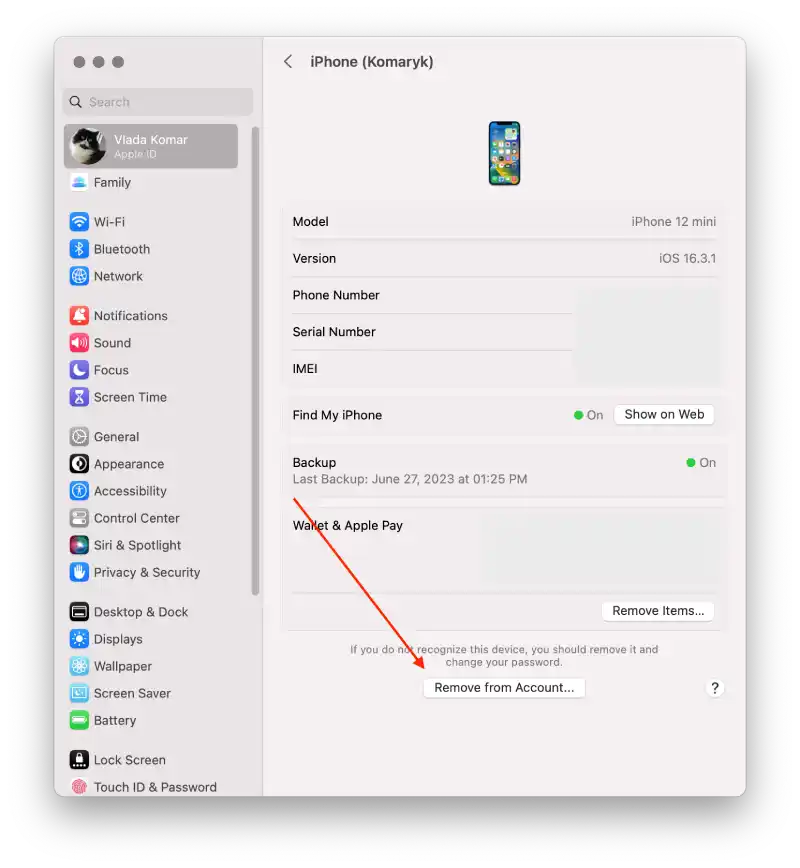
With these steps, you can remove the iPhone from your Apple ID account. You can delete any device using the same steps, but you must enter your password to confirm it.
How to remove Mac from Apple ID on iPhone?
To remove Mac from an Apple ID on an iPhone, you need to follow these steps:
- The first step is to open the settings on your iPhone.
- After that, tap on the Apple ID at the top.
- Next, select the device.
- Then tap on Remove from the account.
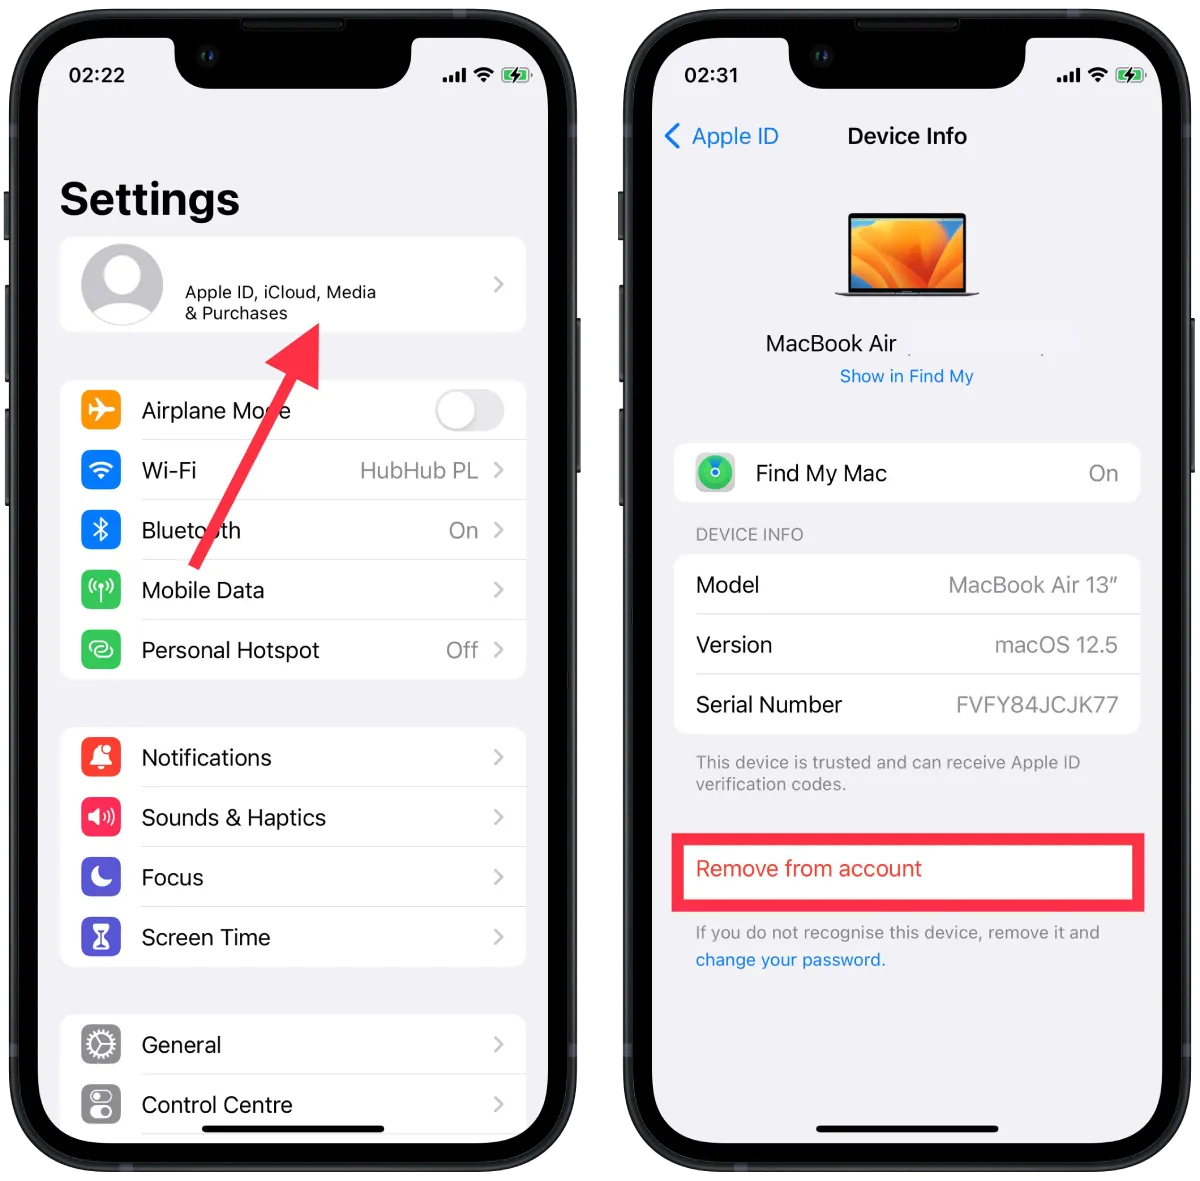
After these steps, the Mac will no longer sync.
How to disable AirDrop between iPhone and Mac?
One way to sync Mac from an iPhone is via AirDrop. This way, you won’t unlink the devices permanently from each other. You will only limit some of the actions.
To disable AirDrop between iPhone and Mac, follow these steps:
- The first step is to open the Finder on your Mac.
- The next step is to open the AirDrop section.
- Then select Allow me to be discovered by: to No One.
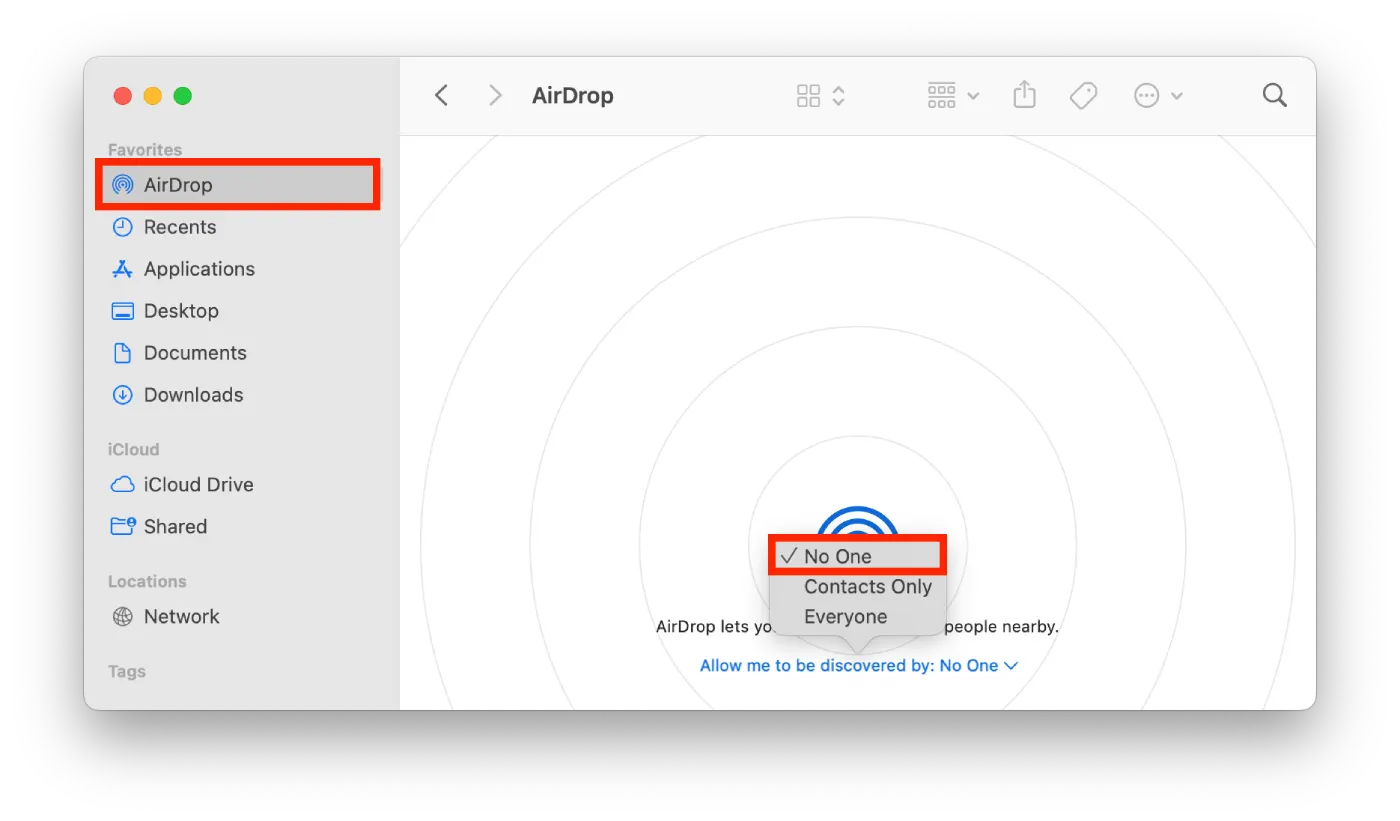
These actions will allow you not to take away the location of the iPhone using AirDrop on your Mac.
To disable AirDrop between your iPhone and Mac on your iPhone, follow these steps:
- The first step is to open the settings on your iPhone.
- After that, select the General section.
- Then tap on AirDrop.
- The next step is to select Receiving Off.
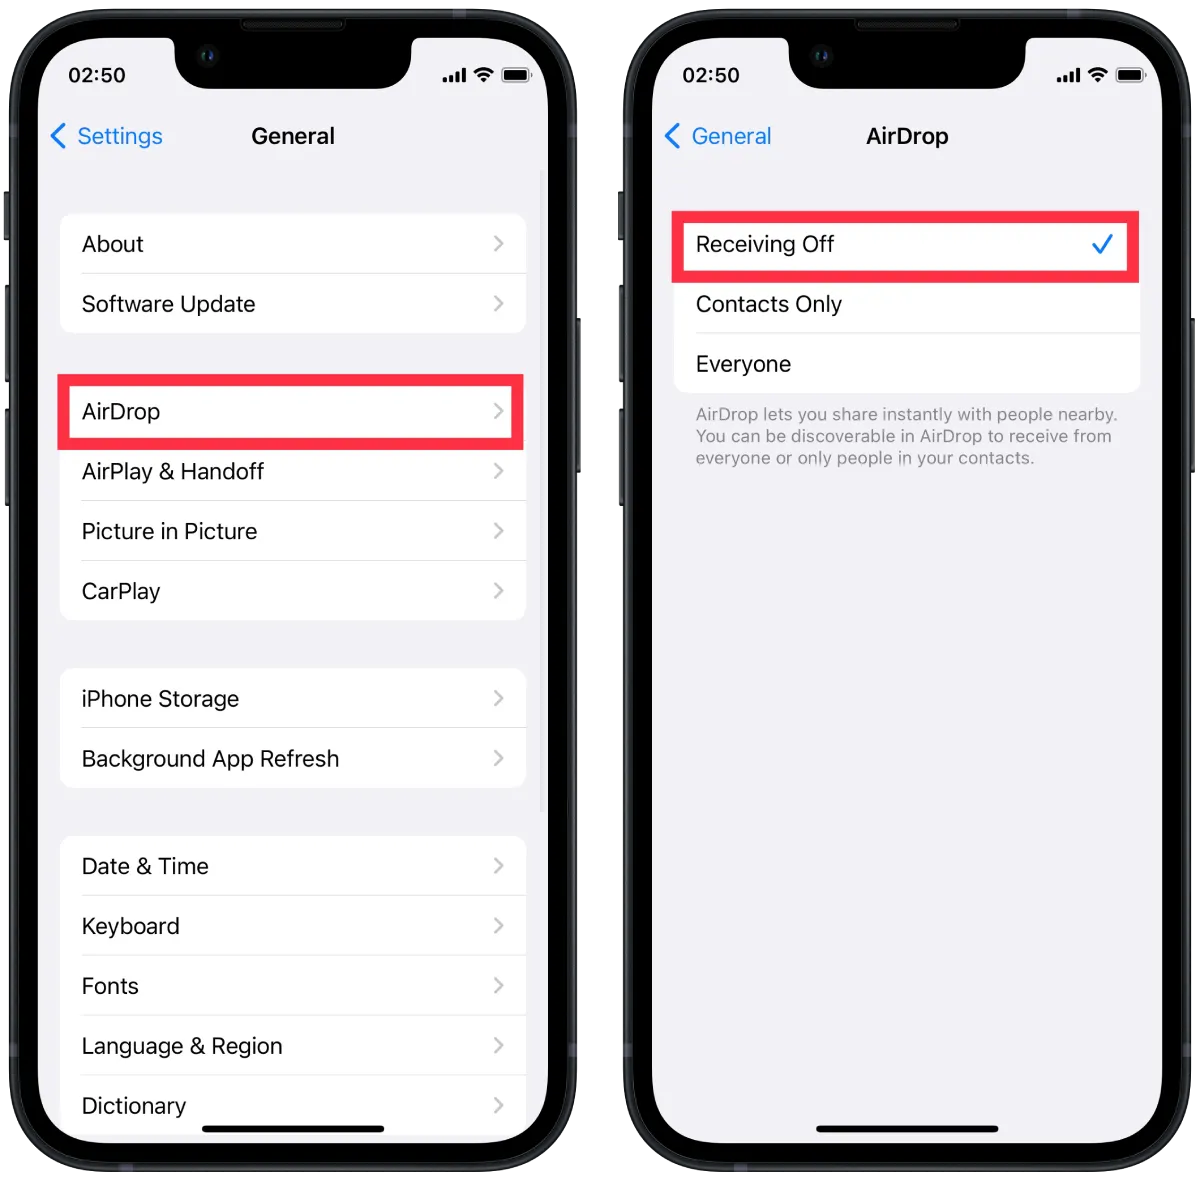
After these steps, you will no longer be able to easily send files, photos, and other things from your Mac to your iPhone and back.
How to disconnect your iPhone from the Finder on a Mac?
If you have configured the Finder to detect your iOS device over Wi-Fi, you will need to use your Mac’s settings to disconnect your iPhone from the Finder. If you haven’t done so, disconnect it from the USB cable. To disconnect your iPhone from the Finder on a Mac, follow these steps:
- The first step is to open the Finder on your Mac.
- After that, under Locations, select your iPhone.
- Then as soon as the new window opens, you need to uncheck the Show this iPhone when on Wi-Fi.
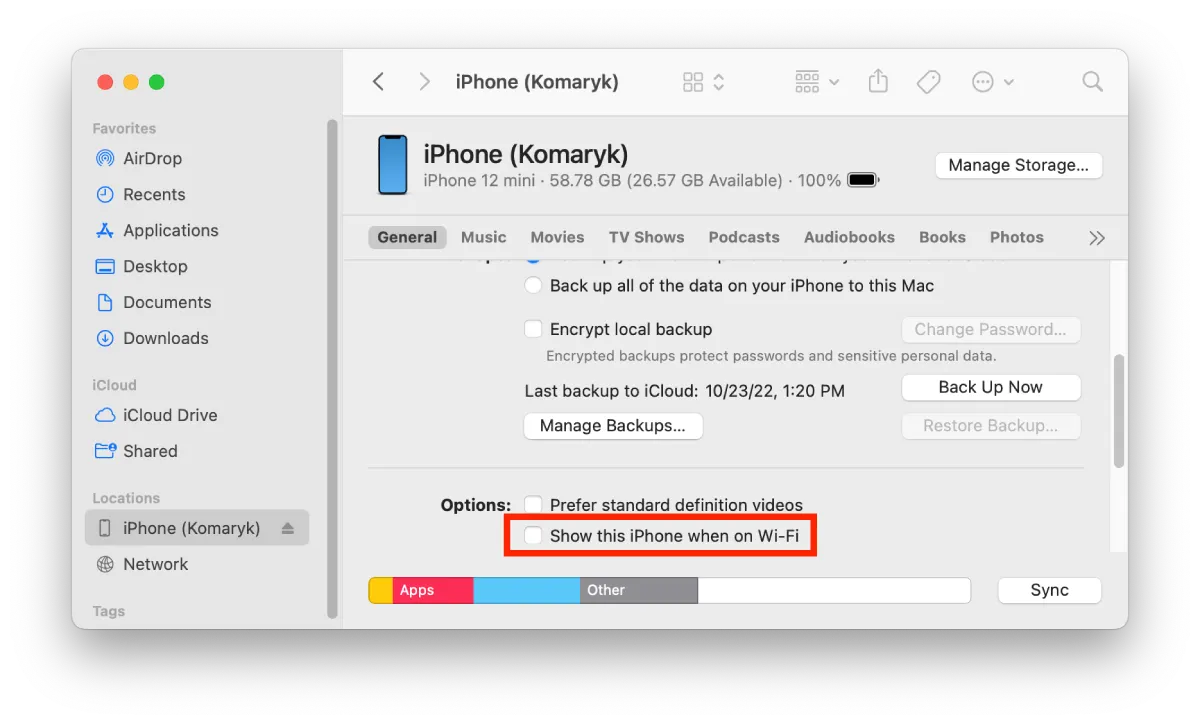
After these steps, you won’t be able to use the Finder to transfer files between your Mac and iPhone devices.
How to disable Handoff between iPhone and Mac?
Handoff opens up a lot of possibilities on your Apple devices. It works so that you can start doing something on your iPhone and continue on your Mac. All you have to do is click on the icon of the program you are using in the Dock.
This function supports a large number of apps, both standard and third-party. So if you need to unsync your iPhone from Mac, you also need to disable this function so that all your actions on one device won’t be broadcast to the other.
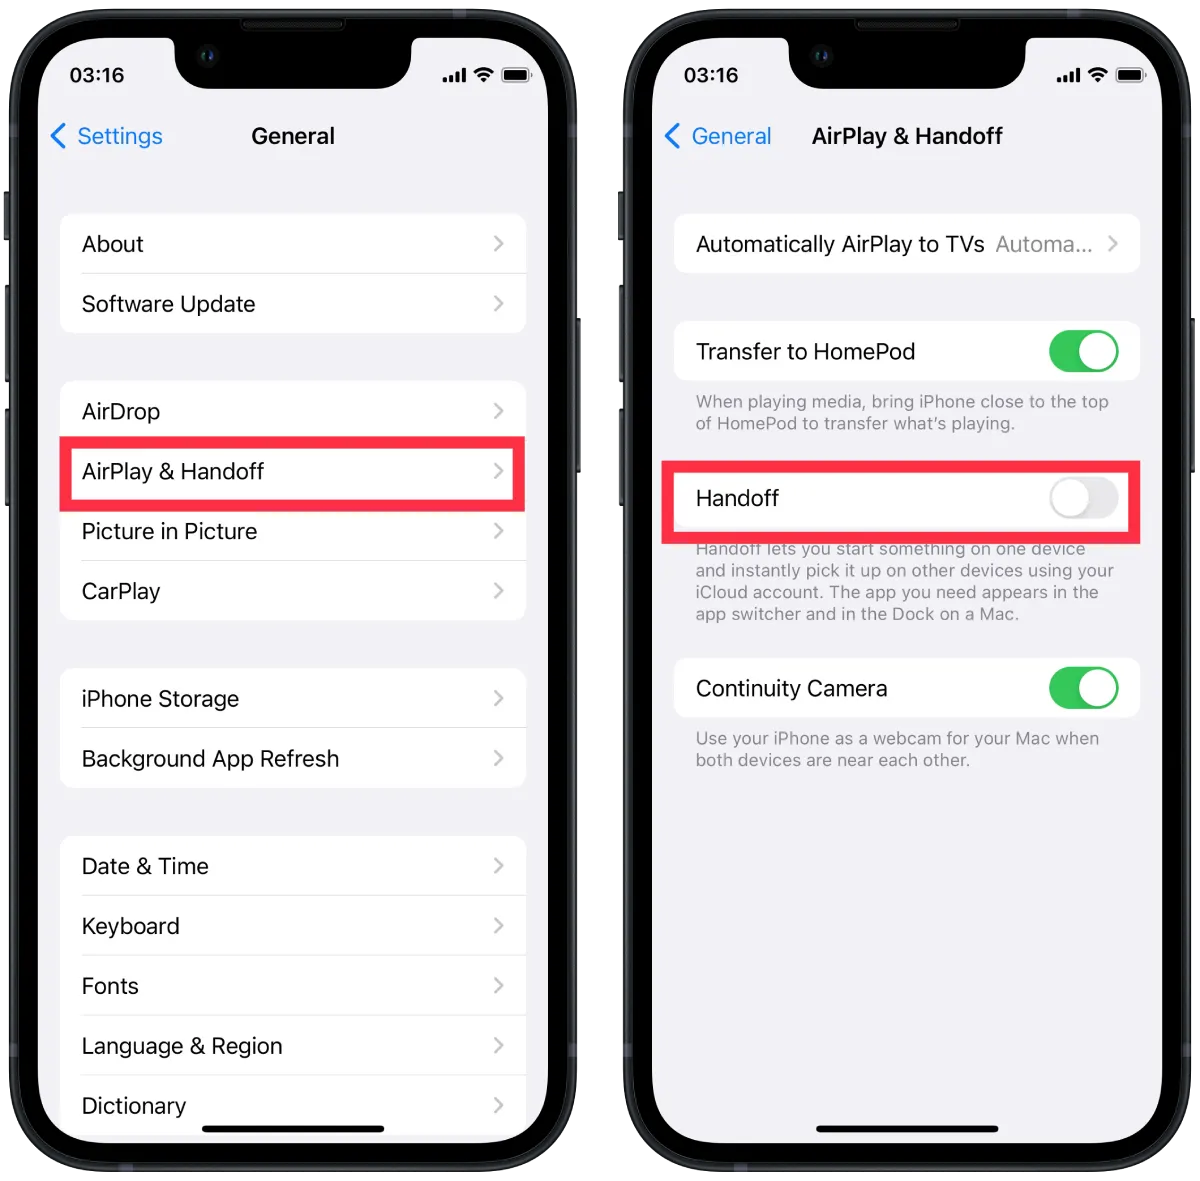
To disable Handoff between iPhone and Mac, you need to follow these steps:
- The first step is to open the settings on your iPhone.
- After that, select the General section.
- After that, you need to tap on the AirPlay & Handoff section.
- Then it would be best if you dragged the slider on the Handoff section.
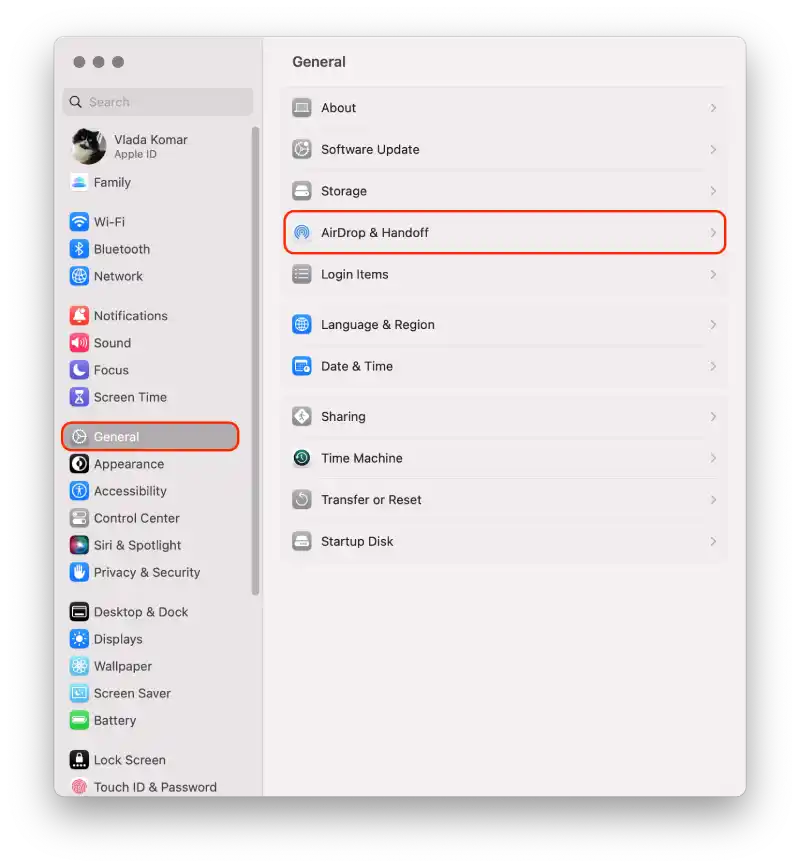
To disable Handoff, follow these steps on the Mac:
- The first step is to click on the Apple icon at the top and select System Settings.
- After that, select the General section and click on “Handoff and Airdrop“.
- Then a new window will open, and you need to scroll down and uncheck the Allow Handoff between this Mac and your iCloud devices.
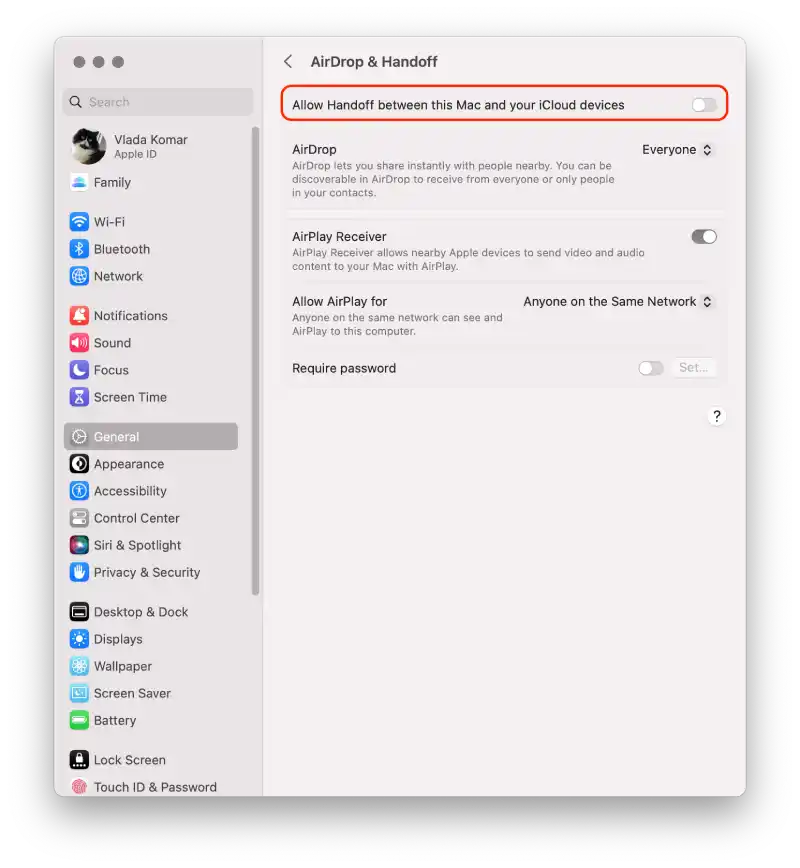
After these steps, your actions will no longer be synchronized. If you need to bring this feature back, you will need to check the checkboxes on both devices. Because it’s enough to turn off one, but you need both the Mac and the iPhone to turn it on.
How to disable iCloud syncing between iPhone and Mac?
iCloud is Apple’s cloud-based service that lets you store and synchronize data (such as contacts, calendars, notes, photos, and other files) between different Apple devices, including your iPhone and Mac. When syncing is enabled, changes made to your data on your iPhone or Mac are automatically reflected on the other device via the iCloud cloud. If you want to keep some data on only one device, you can disable iCloud syncing between iPhone and Mac.
To disable iCloud syncing between iPhone and Mac using iPhone, you need to follow these steps:
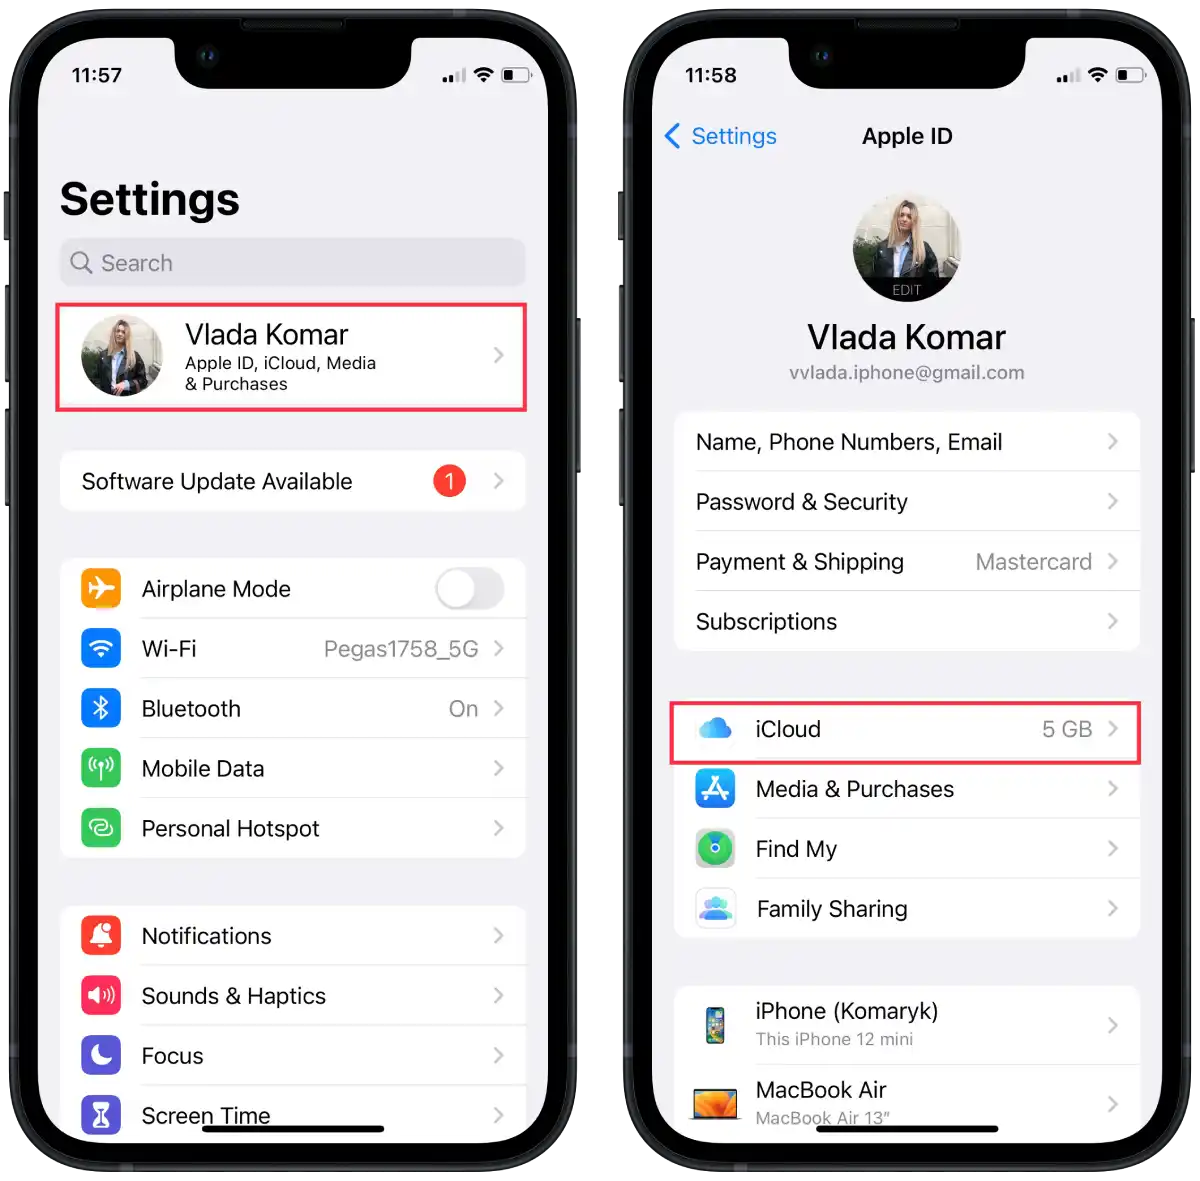
- On your iPhone, go to “Settings.”
- Tap on your name at the top of the screen.
- Scroll down and find the “iCloud” section.
- In the “Apps Using iCloud” section tap on “Show all”.
- In new window toggle off the switches next to the apps you want to disable syncing for.
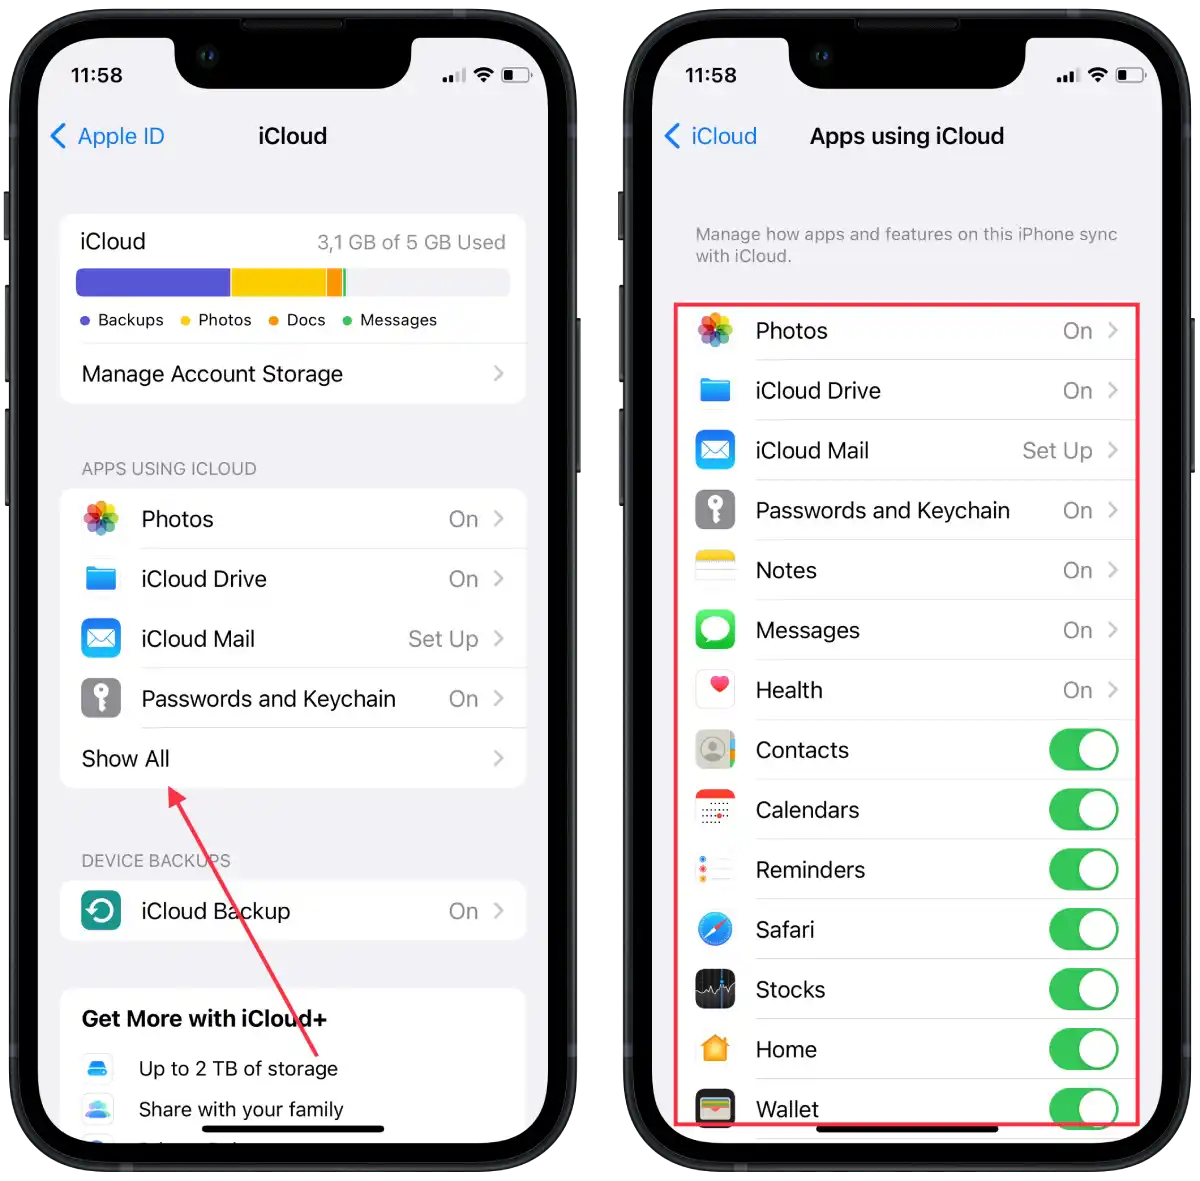
If desired, also toggle off the switch next to “Photos” to prevent photo syncing. After completing these steps, iCloud syncing will be disabled for the selected apps and data on your iPhone.
To disable iCloud syncing between iPhone and Mac using mac, you need to follow these steps:
- On your Mac, click on the Apple menu in the screen’s top-left corner.
- Select “System Settings” from the drop-down menu.

- Then click on “Apple ID“.

- Select “iCloud“.

- You’ll see a list of apps and services that can sync with iCloud, drag the sliders next to the apps and services for which you want to disable sync.
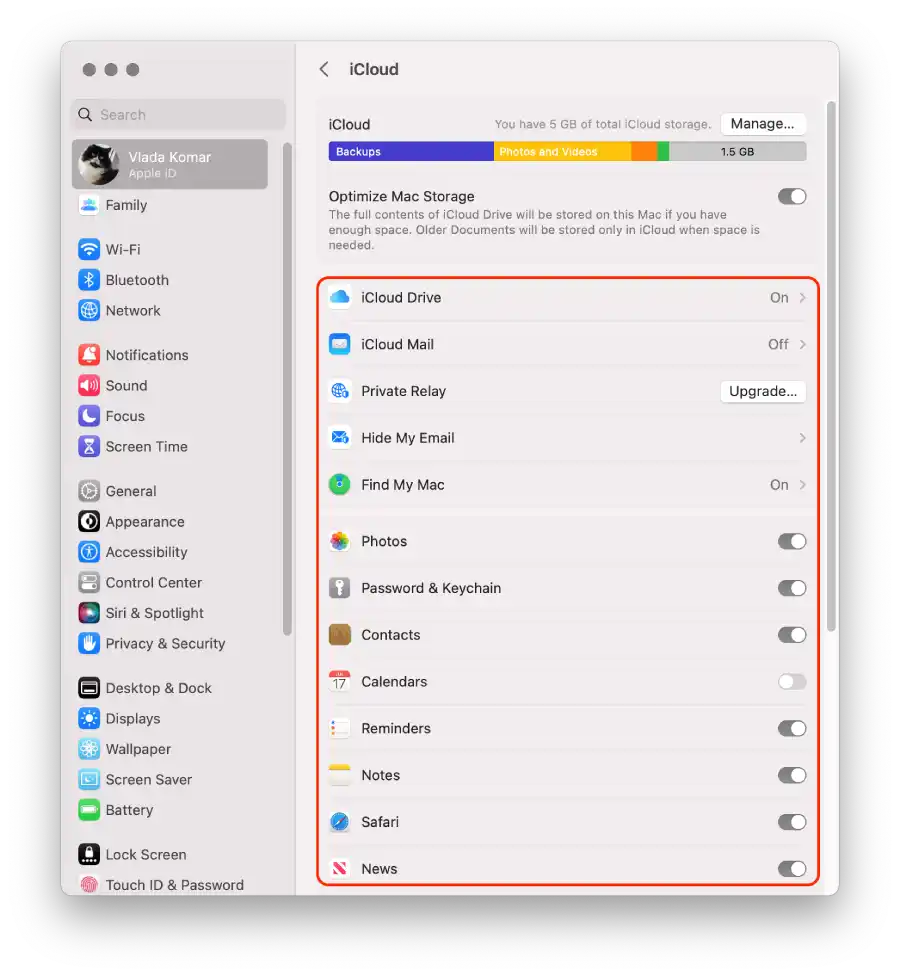
After these steps, iCloud syncing will be disabled for selected apps and data on your iPhone and Mac.
How to turn off iMessage syncing between iPhone and Mac?
iMessage syncing allows you to send and receive messages seamlessly across your iPhone, iPad, and Mac devices. When enabled, messages sent or received on one device are automatically synchronized and appear on all your other devices using the same Apple ID. This feature ensures that you can stay up to date with your conversations and continue them seamlessly from any device. However, disabling iMessage syncing means that messages will only be delivered to and accessible from the device on which you receive them, and they won’t be synchronized across your other devices.
To turn off iMessage syncing between iPhone and Mac using iPhone, you need to follow these steps:
- Open the “Settings” app on your iPhone.
- Scroll down and tap on “Messages.”
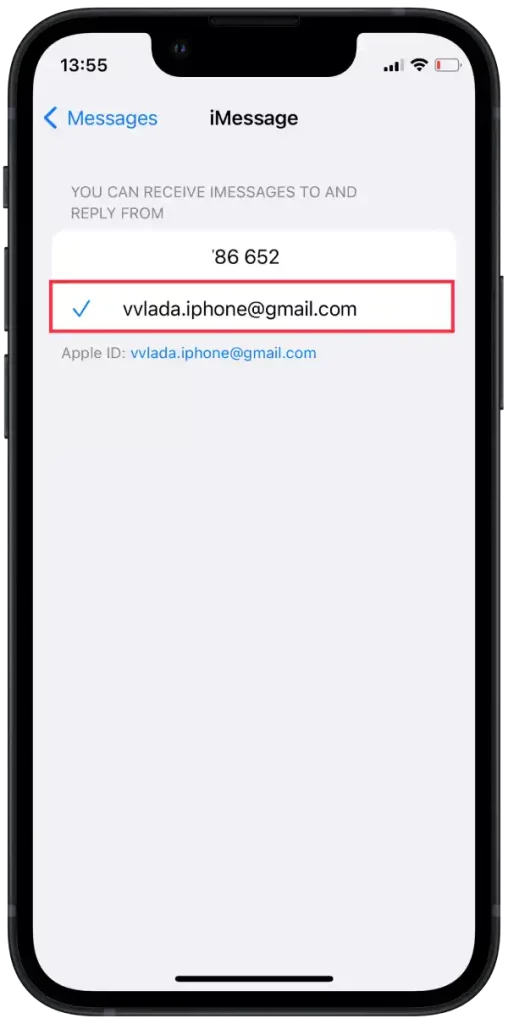
- In the Messages settings, tap on “Send & Receive.”
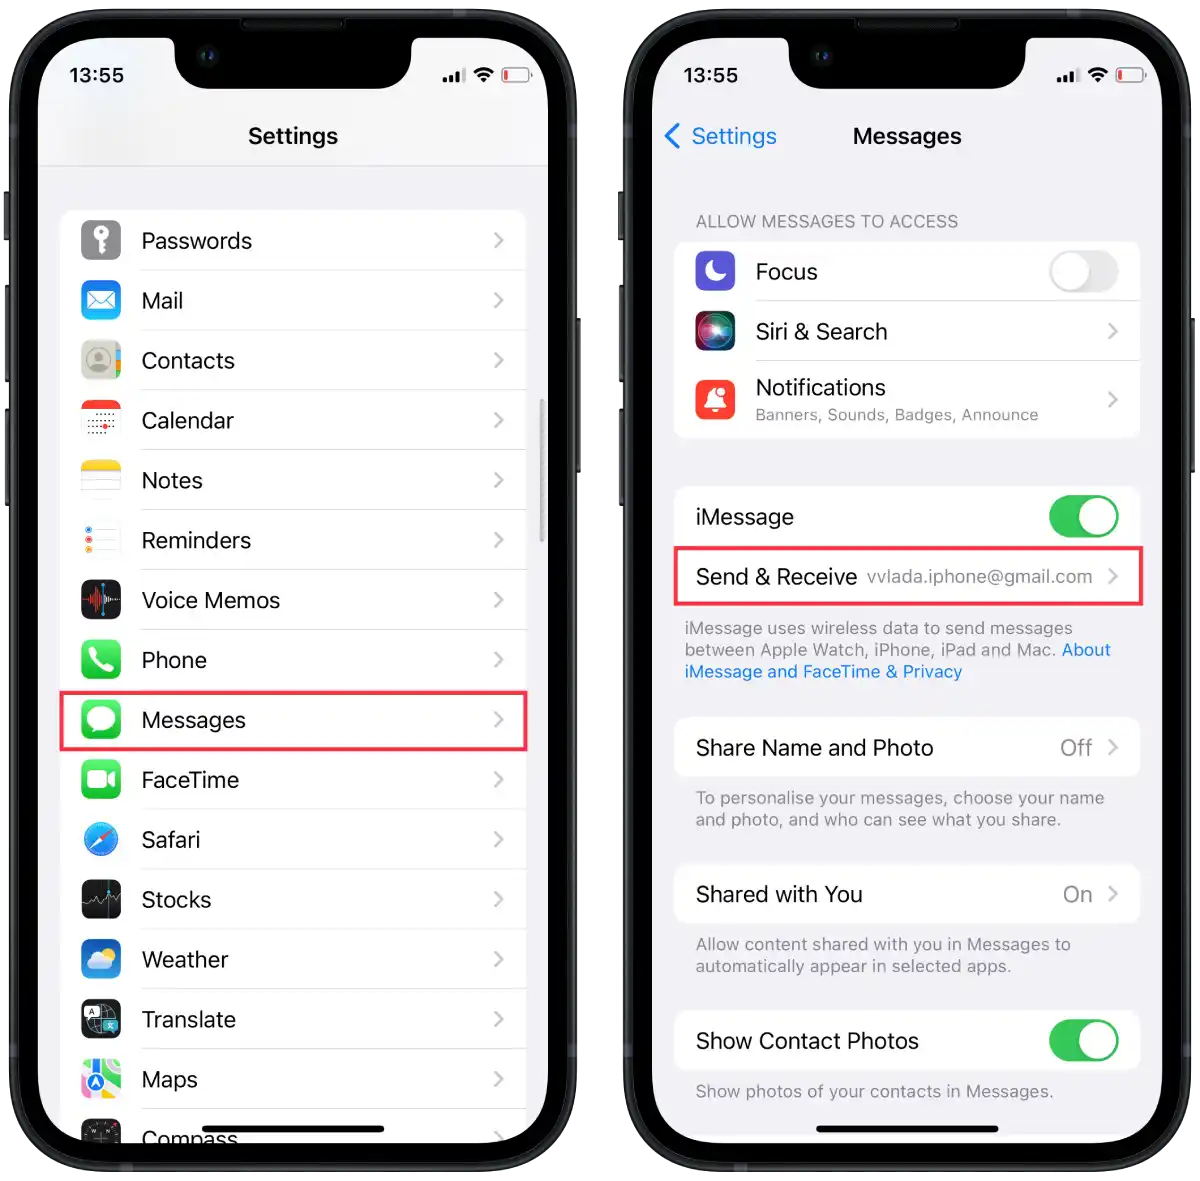
- Under this section, you’ll find a list of phone numbers and email addresses associated with your Apple ID.
- To disable iMessage synchronization, simply uncheck the box next to the email address whose synchronization you want to disable.
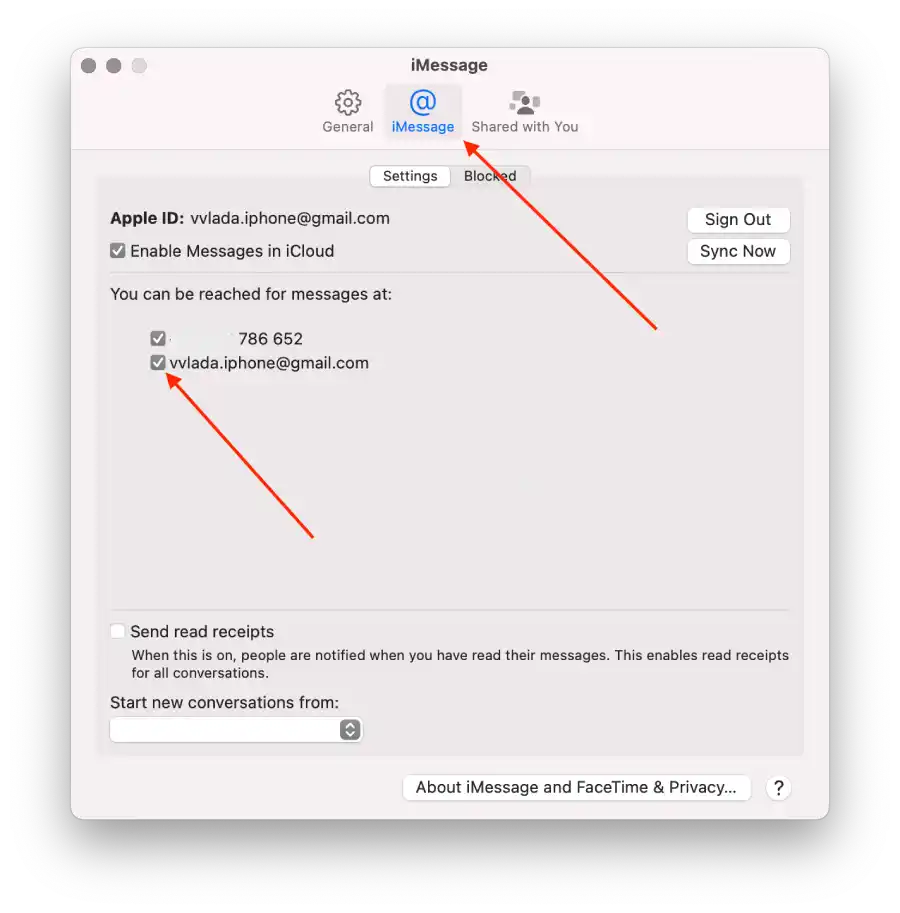
To turn off iMessage syncing between iPhone and Mac using Mac you need to follow these steps:
- On your Mac, click on the “Messages” app in the Dock or launch it from the Applications folder.
- In the menu bar at the top, click on “Messages” and then select “Settings.”
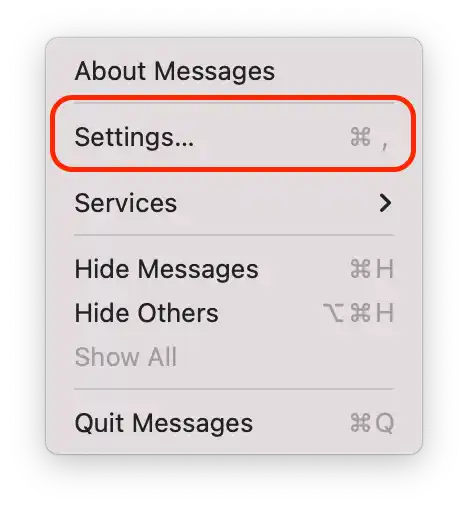
- In the Settings window, go to the “iMessage” tab.
- Uncheck the box next to your email address under the “You can be reached for messages at” section to disable iMessage syncing.
This disables iMessage syncing between your iPhone and Mac. This means that when you receive a message on your iPhone, it will no longer automatically sync and display on your Mac, and the other way around.
How to disconnect Mac from iPhone’s Hotspot?
Using an iPhone’s hotspot allows you to share your iPhone’s cellular data connection with other devices, such as your Mac, so that they can access the internet. When you enable the hotspot feature on your iPhone, it turns your iPhone into a Wi-Fi network, and your Mac can connect to it as if it were a regular Wi-Fi network.
Disconnecting your Mac from your iPhone’s hotspot means that your Mac will no longer be connected to your iPhone’s cellular data network. This prevents your Mac from using your iPhone’s data connection to access the internet or perform network-related activities. It’s useful when you no longer need to use your iPhone’s hotspot network or want to conserve your iPhone’s cellular data usage.
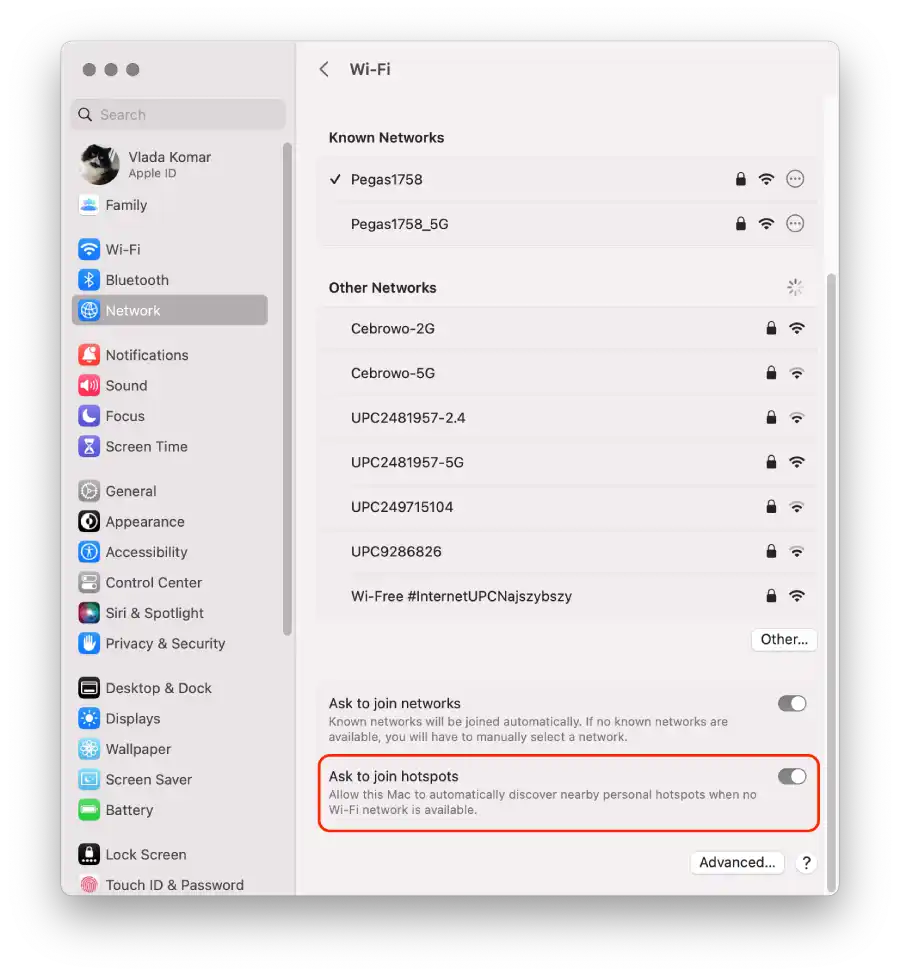
To disconnect your Mac from your iPhone’s hotspot, using Mac, you can follow these steps:
- On your Mac, click on the Apple menu in the screen’s top-left corner.
- Select “System Settings” from the drop-down menu.

- Select the ‘Network‘ section and click on the ‘Wi-Fi‘ section.
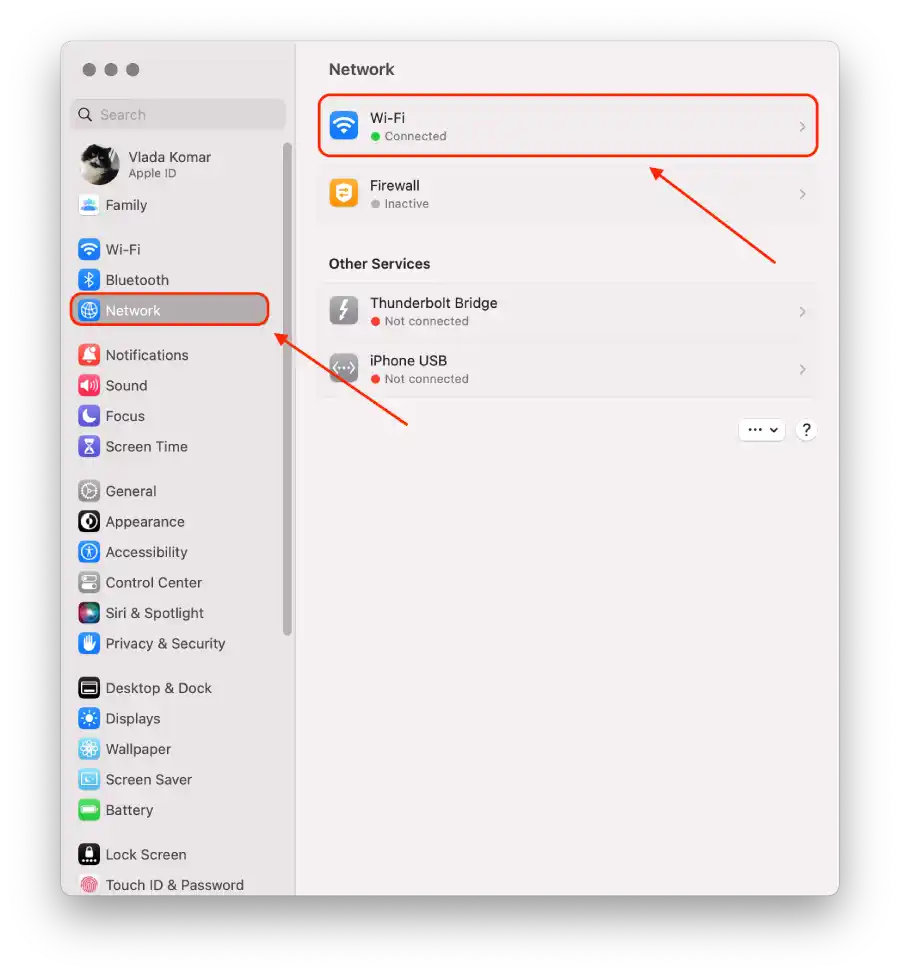
- Uncheck the box next to ‘Ask to join hotspots‘.
The only option on the iPhone is to turn off the “Allow others to Join” option. If you drag the switch to this option, no one will be able to connect to your hotspot.
How to turn off calls syncing between iPhone and Mac?
Calls syncing is a feature that allows you to make and receive phone calls on your Mac using your iPhone’s cellular network. When enabled, incoming calls to your iPhone will also ring on your Mac, and you can answer or decline the call from your Mac, using its microphone and speakers for communication. However, disabling calls syncing means that phone calls will only be accessible on the device on which you receive them, and they won’t be synchronized or available on your other devices.
To turn off calls syncing between your iPhone and Mac, using iPhone you can follow these steps:
- Open the “Settings” app on your iPhone.
- Scroll down and tap on “Phone.”
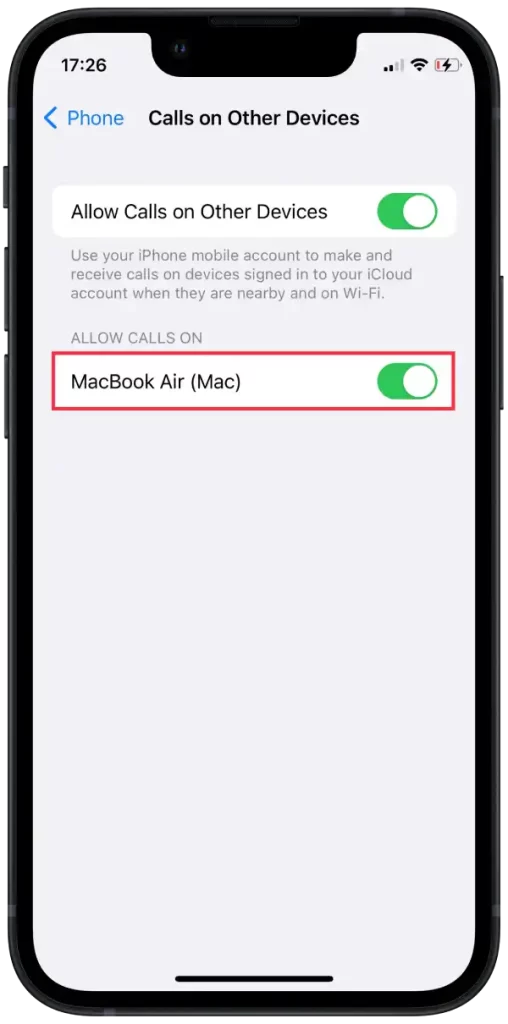
- In the Phone settings, tap on “Calls on Other Devices.”
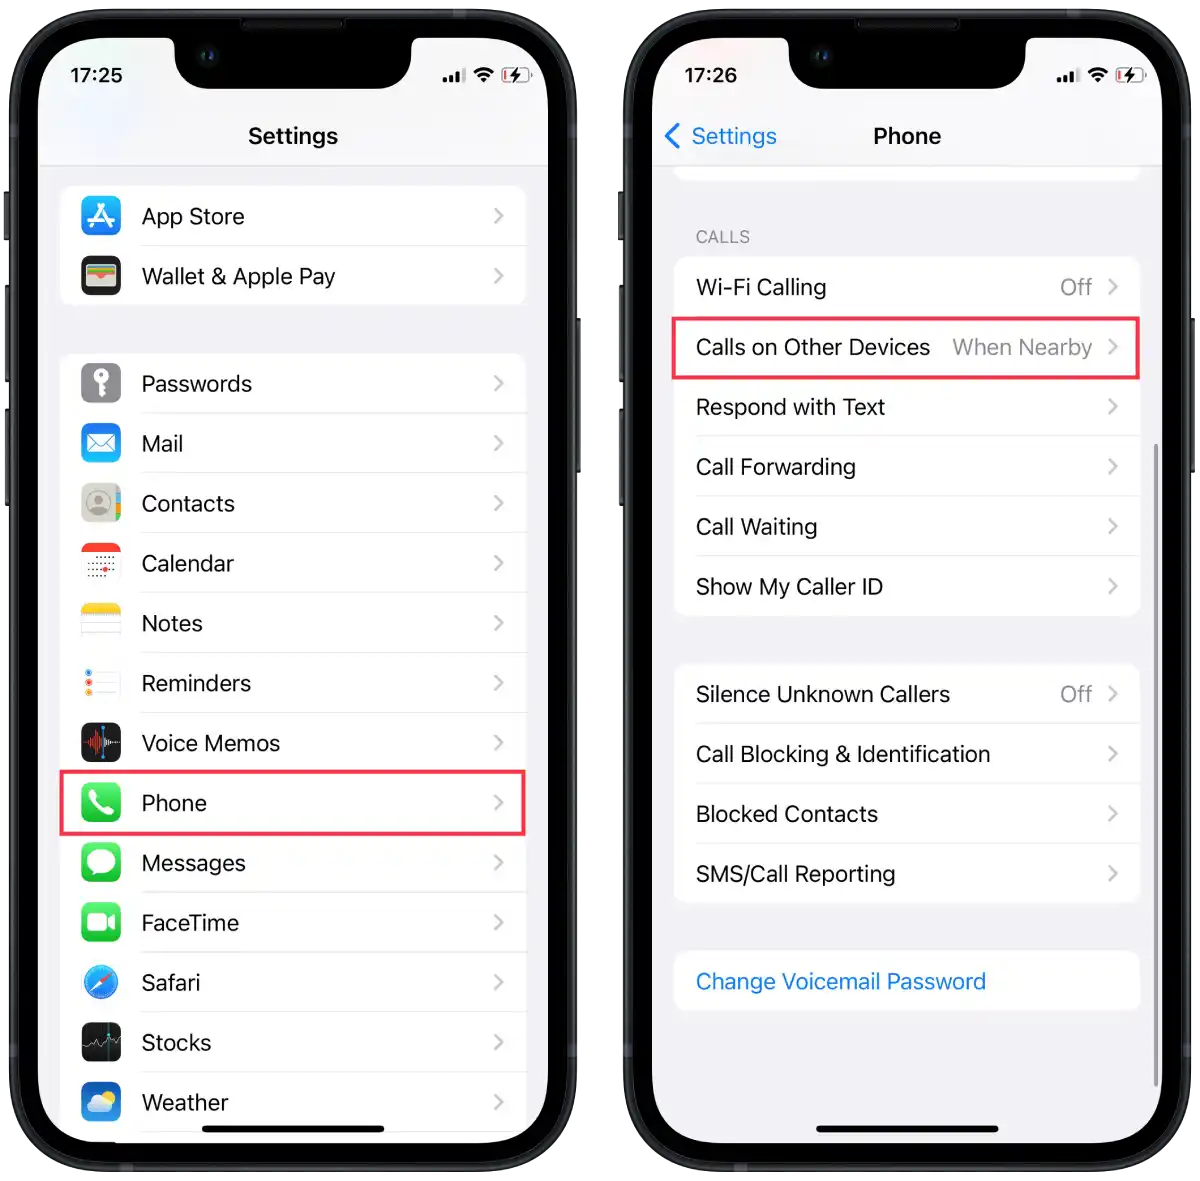
- You’ll see a section titled “Allow Calls On.” Under this section, you’ll find a list of your devices that are signed in with the same Apple ID.
- To disable calls syncing, toggle off the switch next to your Mac device.
To turn off calls syncing between your iPhone and Mac, using Mac you can follow these steps:
- On your Mac, open the FaceTime app.
- At the top of the screen, click FaceTime and select “Settings“.

- Then uncheck “Calls From iPhone“.
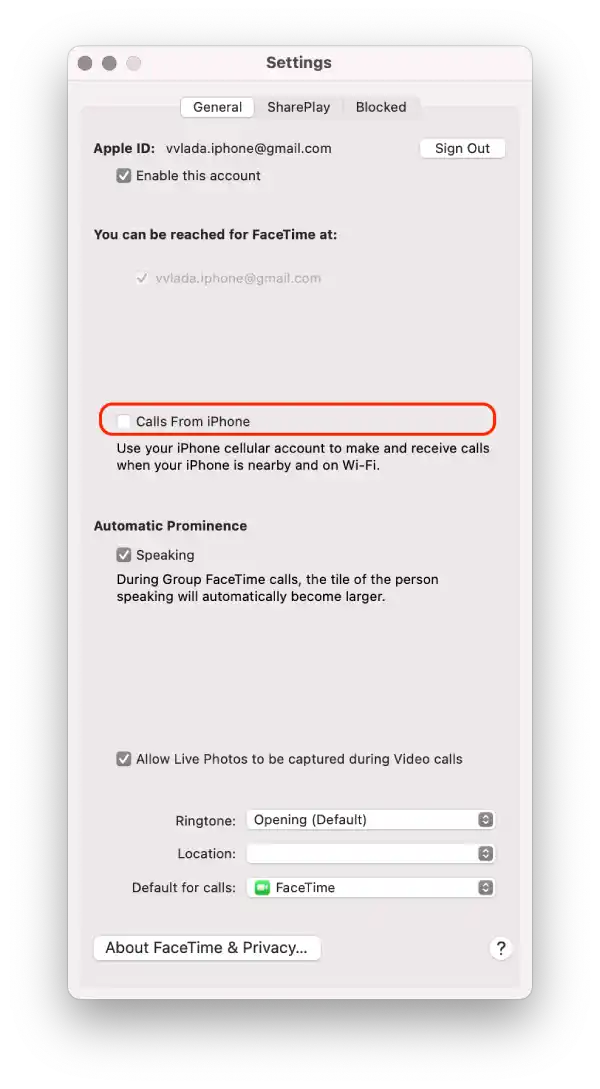
After these steps, you will disable calls syncing between your iPhone and Mac. This means that when you receive a phone call on your iPhone, it will no longer be automatically synchronized and show up on your Mac.
How to stop syncing photos between iPhone and Mac?
Syncing photos between your iPhone and Mac refers to the process of automatically sharing and updating your photo library across both devices using iCloud. When iCloud Photos is enabled, any photos taken or saved on your iPhone will be uploaded to iCloud and then downloaded and stored on your Mac. Similarly, photos added or edited on your Mac will be uploaded to iCloud and downloaded to your iPhone. This synchronization ensures that your entire photo library stays consistent and accessible across both devices.
Stopping the syncing of photos between your iPhone and Mac means that new photos taken or saved on your iPhone will no longer be automatically uploaded and downloaded to your Mac, and vice versa. The existing photos in your photo library will remain on each device separately, and any future changes or additions to your photo library will not be reflected on the other device. Disabling photo syncing can be useful if you prefer to manage and store your photos separately on each device or if you want to save storage space on either your iPhone or Mac.
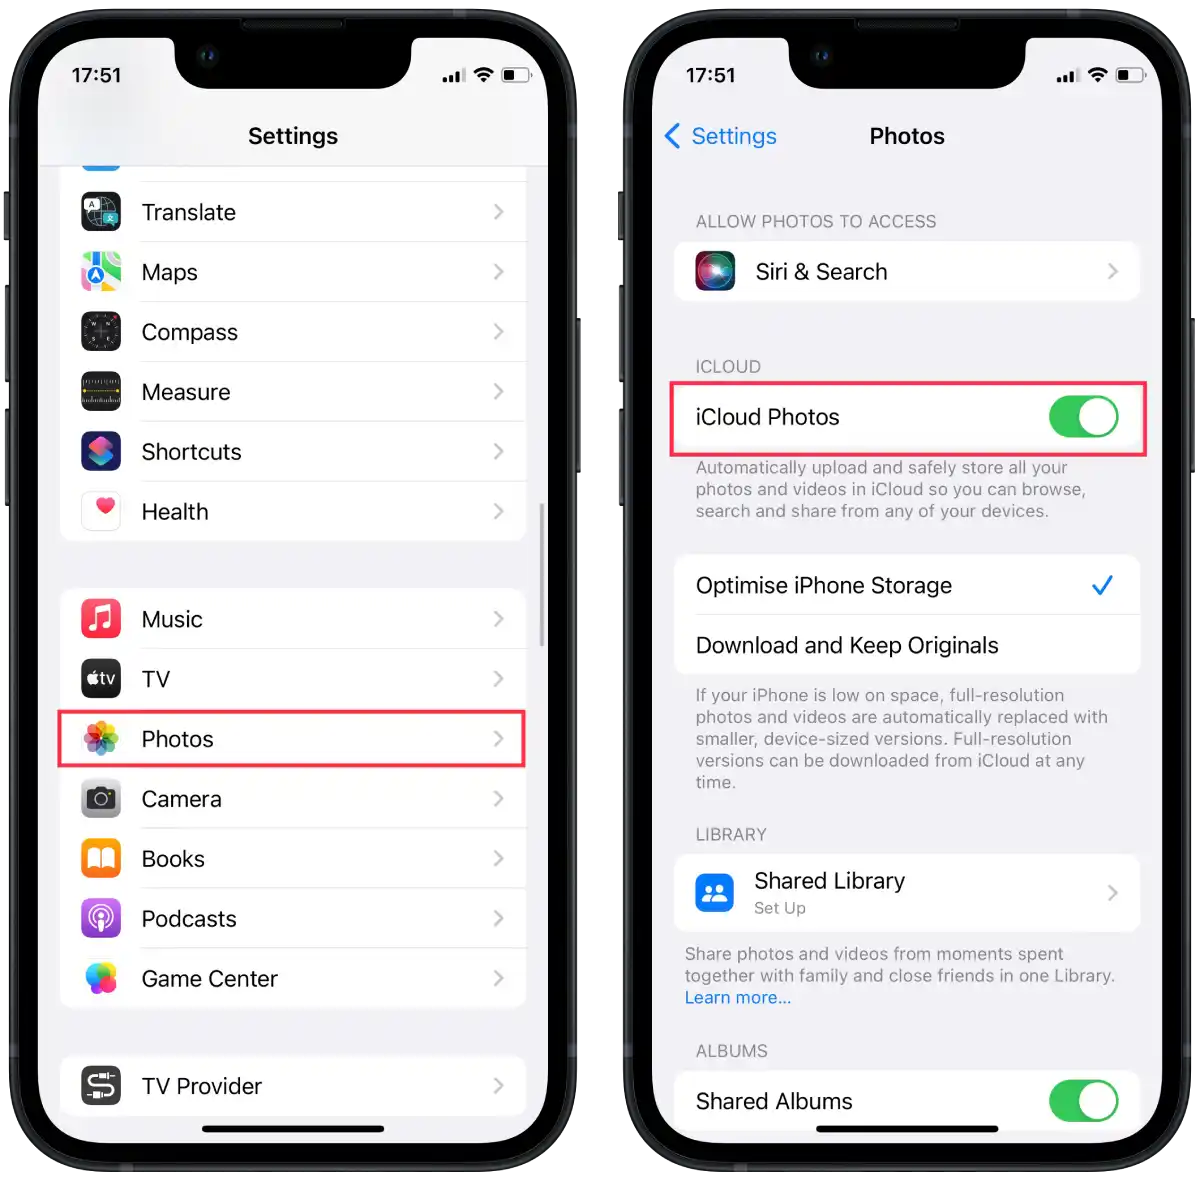
To stop syncing photos between your iPhone and Mac, using iPhone you can follow these steps:
- Open the “Settings” app on your iPhone.
- Scroll down and tap on “Photos.”
- In the Photos settings, toggle off the switch next to “iCloud Photos“.
To stop syncing photos between your iPhone and Mac, using Mac you can follow these steps:
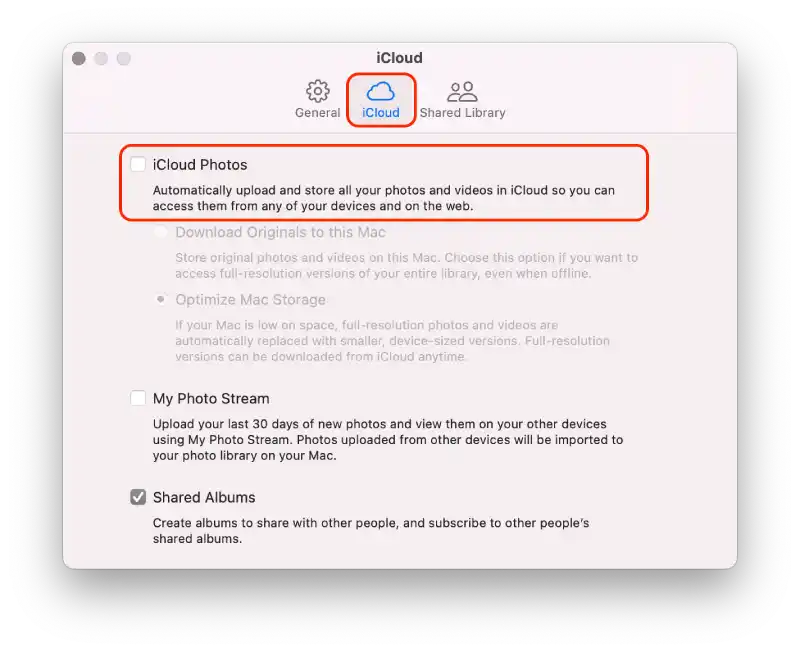
- Open the Photos app on your Mac.
- In the menu bar at the top of the screen, click on “Photos” and then select “Settings.”
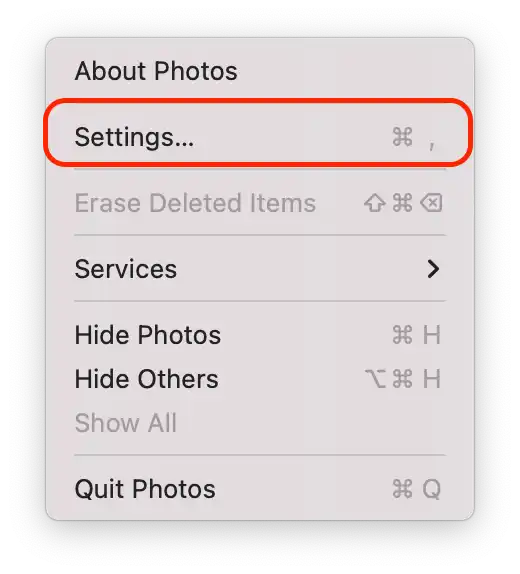
- In the Settings window, go to the “iCloud” tab.
- Uncheck the box next to “iCloud Photos“.
After following these steps, the syncing of photos between your iPhone and Mac will be stopped.
How to stop notes from syncing between iPhone and Mac?
Syncing notes between your iPhone and Mac refers to the process of keeping your notes updated and accessible across both devices using iCloud. When notes syncing is enabled, any notes created, edited, or deleted on your iPhone will be synchronized with iCloud and then downloaded to your Mac, ensuring that you can access and manage your notes seamlessly on both devices. Similarly, any changes made to notes on your Mac will be uploaded to iCloud and reflected on your iPhone.
Stopping notes syncing between your iPhone and Mac means that new notes created or modifications made to existing notes on one device will not be synchronized or updated on the other device. Each device will maintain its own separate set of notes, and any changes made to notes will only be reflected locally on the device where the changes were made.
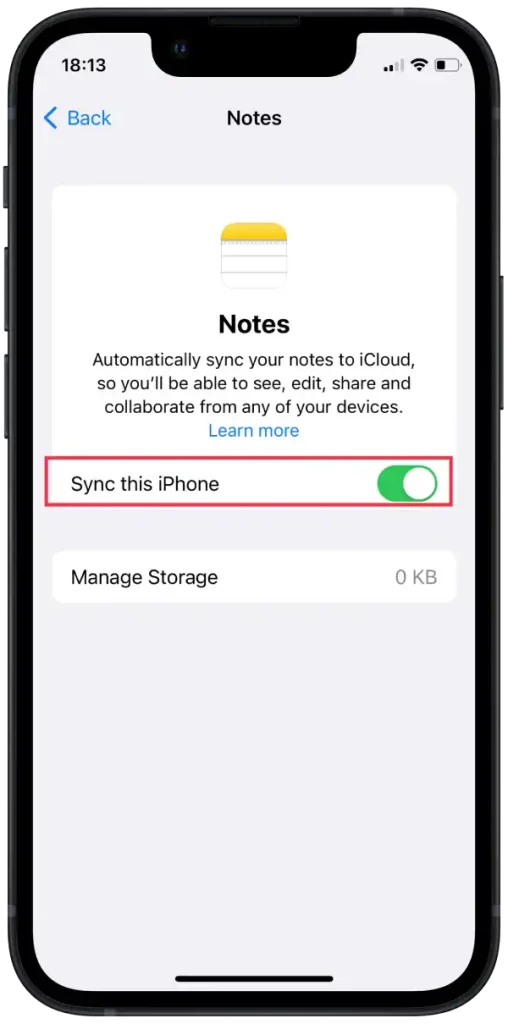
To stop notes from syncing between your iPhone and Mac, using iPhone you can follow these steps:
- On your iPhone, go to “Settings.”
- Tap on your name at the top of the screen.
- Scroll down and find the “iCloud” section.

- In the “Apps Using iCloud” section tap on “Show all“.
- From the list, select “Notes“.
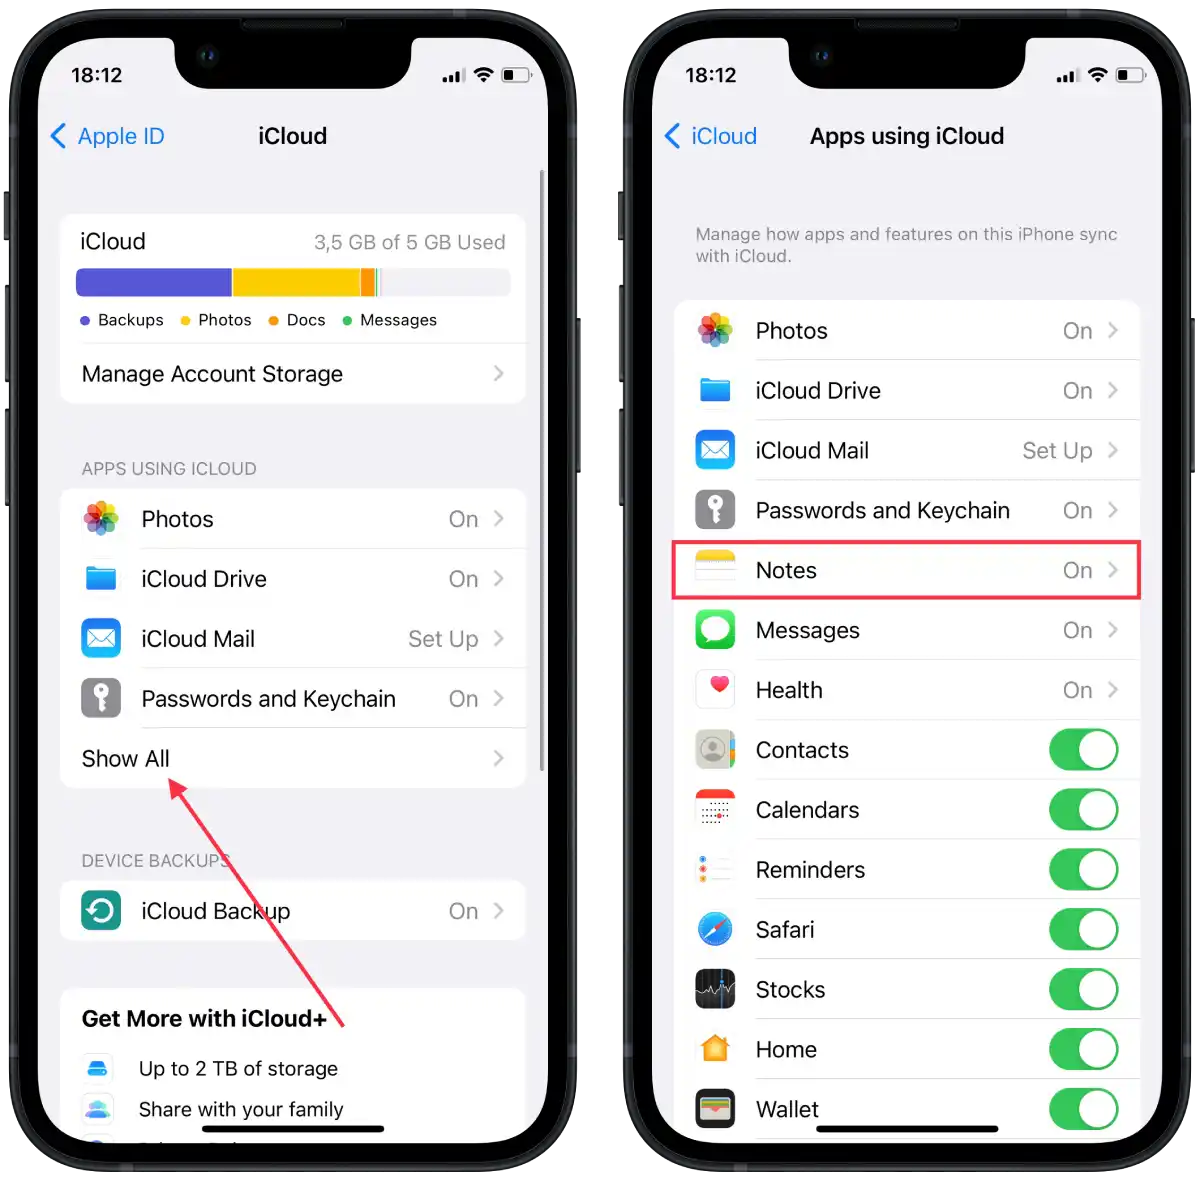
- In the new window, tap “Sync this iPhone“.
To stop notes from syncing between your iPhone and Mac, using Mac you can follow these steps:
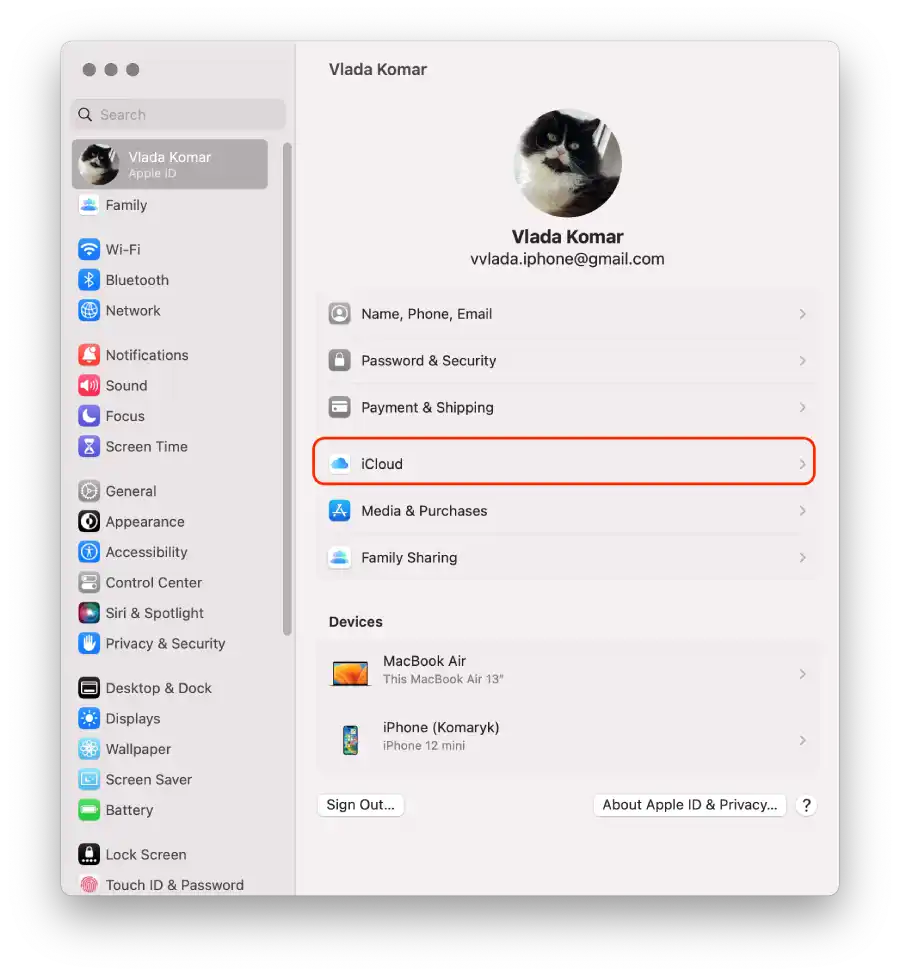
- On your Mac, click on the Apple menu in the screen’s top-left corner.
- Select “System Settings” from the drop-down menu.
- Then click on “Apple ID“.

- Select “iCloud“.
- Drag the slider Notes.
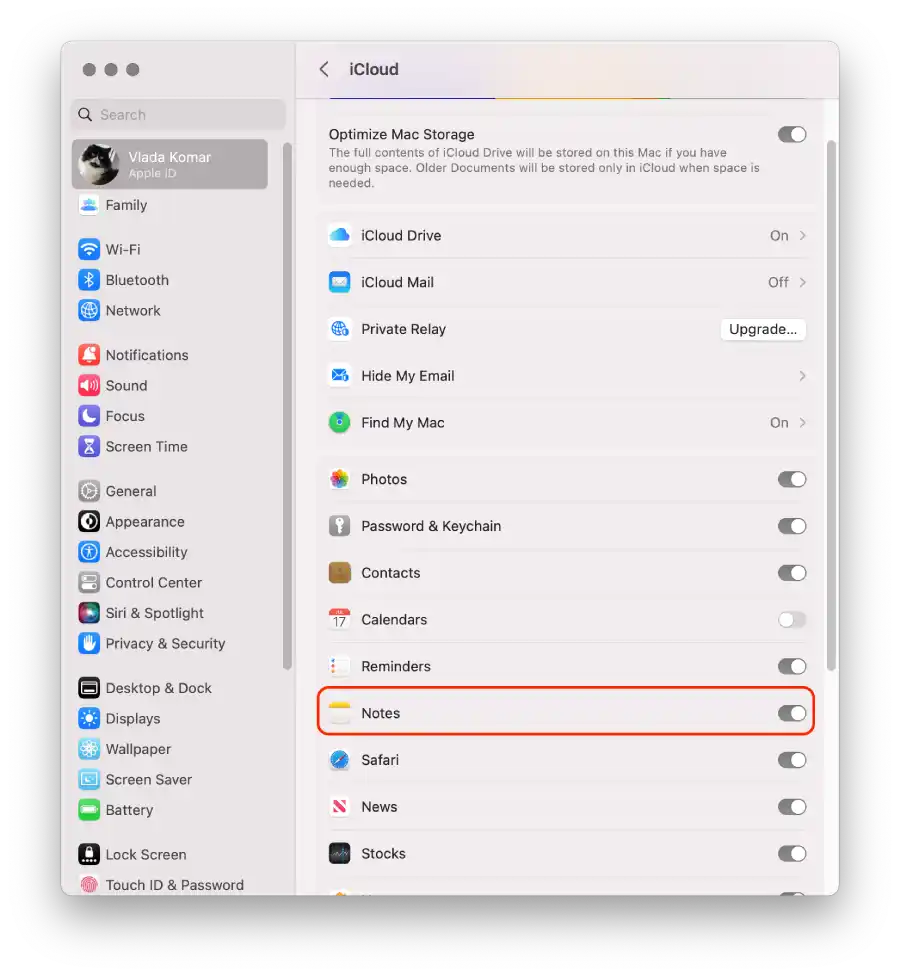
After completing these steps, syncing notes between your iPhone and Mac will be stopped.
How to disconnect Bluetooth pairing between iPhone and Mac?
Bluetooth pairing between your iPhone and Mac allows the two devices to establish a wireless connection. When you pair your iPhone with your Mac via Bluetooth, you enable them to share data, such as transferring files, sharing internet connections, or using your iPhone as a Bluetooth input device for your Mac.
Disabling Bluetooth pairing can be useful in scenarios where you no longer need to use your iPhone as a Bluetooth input device for your Mac or when you want to disconnect the wireless connection between the two devices to conserve battery life or avoid unintended interactions.
To disconnect Bluetooth pairing between your iPhone and Mac, using iPhone you can follow these steps:
- Open the “Settings” app on your iPhone.
- Scroll down and tap on “Bluetooth.”
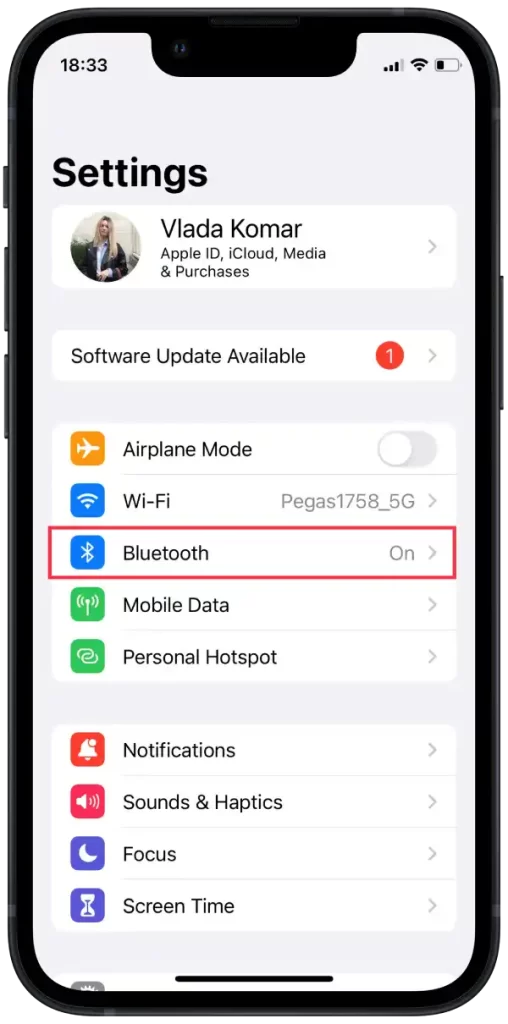
- In the Bluetooth settings, you’ll see a list of paired devices.
- Find your Mac device in the list and tap on the blue “i” icon next to it.
- On the device details page, tap on “Forget This Device” or “Disconnect” to disconnect the Bluetooth pairing.
To disconnect Bluetooth pairing between your iPhone and Mac, using Mac you can follow these steps:
- On your Mac, click on the Bluetooth icon located in the menu bar at the top-right corner of the screen.
- From the drop-down menu, select “Bluetooth Settings.”
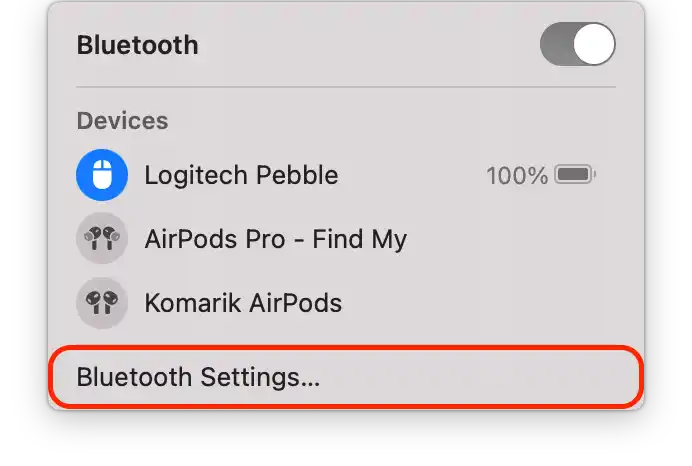
- In the Bluetooth settings, you’ll see a list of paired devices.
- Click on the blue “i” icon next to it.
- Click on “Forget This Device” or “Disconnect” to disconnect the Bluetooth pairing.
After performing these steps, Bluetooth pairing between your iPhone and Mac will be disabled.


