

One important aspect of using a computer is connecting and using a printer. Adding a printer to Windows 11 is a simple process that can be done in a few steps using either automatic mode or manually. However, it may be a little confusing if you’re new to Windows 11 or are unsure of the process.
How to automatically connect the printer to Windows 11
Windows 11 makes it easy to connect a printer to your computer automatically. Once your printer is connected to your Wi-Fi network or directly to your computer with a USB cable, Windows 11 should automatically detect and install the necessary drivers. Here are the steps to automatically connect your printer to Windows 11:
- Press the Windows key + I to open the Settings app.
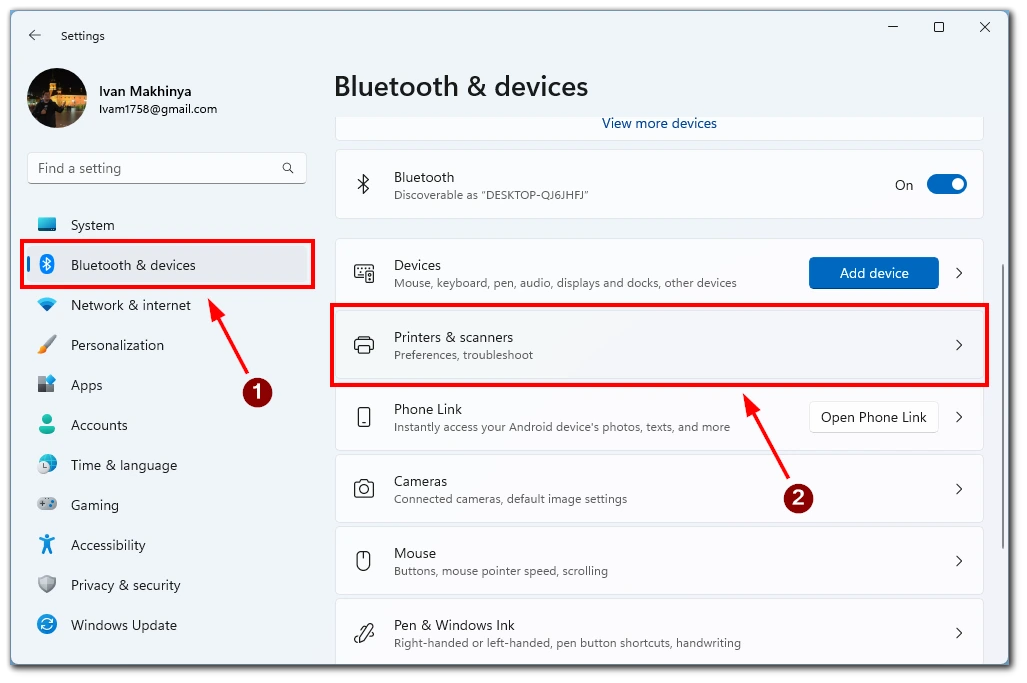
- Click on the “Bluetooth & Devices” option.
- Select the “Printers & scanners” option on the left side of the screen.

- Сlick on the “Add device” button and wait for a moment.
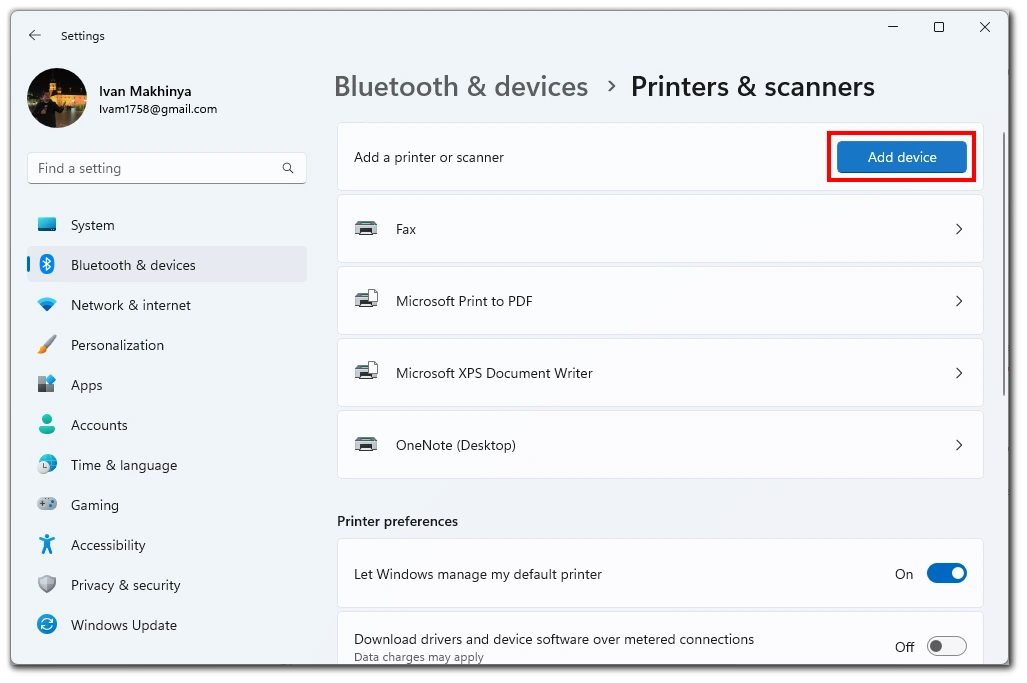
- Your printer should appear under the Add printer or scanner tab. Press Add Device next to your printer.
The printer will then connect to your PC, and you can test it by trying to print the desired document. Note that this only works with printers connected to the same Wi-Fi network or wired to your computer.
How to manually connect the printer to Windows 11
If your printer is not automatically detected by Windows 11, you can manually add it to your computer using the Settings app. Here are the steps to manually connect your printer to Windows 11:
- Make sure the printer is turned on and connected to a power source.
- Press the Windows key + I to open the Settings app.
- Click on the “Bluetooth & Devices” option in the Settings app.
- Select the “Printers & scanners” option on the left side of the screen.
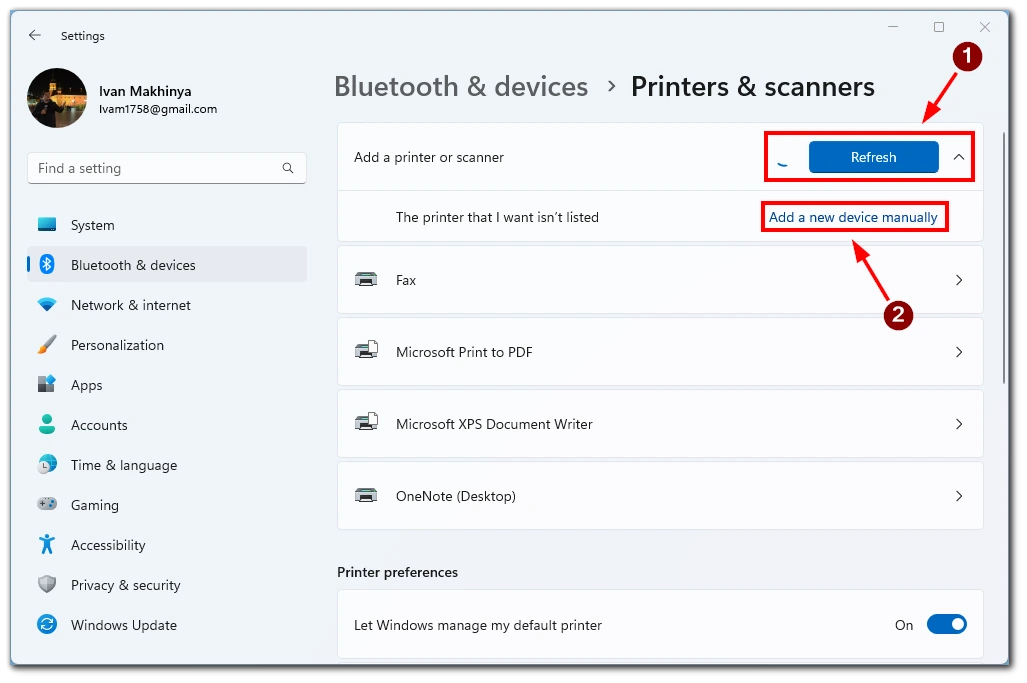
- Click on the “Add device” button.
- Select the “Add a new device manually” option If your printer is not automatically detected.
- Select the connection method for your printer.

- Follow the remaining on-screen instructions to complete the setup process. Once the printer is successfully added, it will be displayed in the “Printers & scanners” section in Settings.
Using this method, you can connect older printers without supported drivers to your computer. This method will also help you if you use a remote or printer that connects via Bluetooth. It can also be useful if you have problems with the automatic printer detection in your Windows 11 system.
Troubleshooting problems with printers in Windows 11
While adding a printer to Windows 11 may seem like a straightforward process, there are times when things can go wrong. Here are some common printer problems you may encounter and how to troubleshoot them:
Printer not detected
If your printer is not detected by Windows 11, first ensure that the printer is turned on and connected to your computer. Try disconnecting and reconnecting the USB cable, or restarting both your computer and printer. If your printer still cannot be detected, try adding it manually using the steps outlined in the previous section.
The printer driver is not available
If your printer driver is not automatically installed by Windows 11, you can download and install it from the manufacturer’s website. Choose the correct driver for your printer model and operating system. Once downloaded, double-click on the driver files to install it.
Printer offline
If your printer appears offline in Windows 11, first check that it is turned on and connected to your computer. Try restarting both your computer and printer. If the issue persists, open the Settings app, go to “Devices” > “Printers & scanners,” and select your printer. Click on the “Open queue” button and check if any print jobs are stuck in the queue. If so, cancel or delete them and try printing again.
Printer jam or error
If your printer encounters a jam or error, consult your printer’s documentation for specific troubleshooting steps. You can try clearing the jam or error and restarting the printer. If the issue persists, try updating the printer driver or contacting the manufacturer’s support for further assistance.
Poor print quality
If your printed documents are poor quality, check that your printer cartridges or toner are not low or empty. You can also try cleaning the print heads or running a print head alignment test from your printer software. If the issue persists, try adjusting the print quality settings in your print dialog box or contacting the manufacturer’s support for further assistance.
Printing is slow or not responding
If your printer is taking a long time to print or not responding, first ensure that your printer is connected to your computer and turned on. Try restarting both your computer and printer. You can also try updating the printer driver or checking if there are any pending updates for Windows 11. If the issue persists, try printing a different document or contacting the manufacturer’s support for further assistance.
In conclusion, troubleshooting printer problems in Windows 11 requires patience and persistence. By following the steps outlined in this guide and consulting your printer’s documentation or the manufacturer’s support, you can easily resolve most printer issues and continue printing your documents.


