

There are many social networks. Each of them is aimed at a different audience and has different goals. Some networks focus on young people who want to communicate and exchange funny videos or messages on social networks. There are networks where people can communicate about their work, and employers can find employees.
In the realm of family-oriented social networking, one notable app is Life360. This application is specifically tailored for family use, offering features such as location tracking of family members. It facilitates not only the ability to monitor the whereabouts of loved ones but also supports calling and general communication. Additionally, the app provides a feature to invite family members to visit, enhancing social interaction within the family network.
What is Life360
Life360 is a mobile application designed for family safety and communication. It offers a range of features aimed at helping family members stay connected and secure. The key functionalities of Life360 include:
- Location Sharing and Tracking: Life360 allows family members to share their real-time locations. This feature helps users see where their family members are at any given time, which is particularly useful for parents wanting to keep an eye on their children’s whereabouts.
- Geofencing and Places: The app enables users to set up virtual boundaries around specific locations, like home, school, or work. Users receive notifications when a family member enters or leaves these designated areas.
- Check-Ins: Members can ‘check in’ at locations to notify others in the circle of their safe arrival at a destination.
- Driver Safety Support: For families with driving teens or members who commute frequently, Life360 provides features like driving reports, crash detection, and roadside assistance.
- SOS Feature: In an emergency, the SOS feature allows users to send an alert to all family members in their circle, along with their current location and the nature of the emergency.
- Private Messaging: The app also includes a private messaging feature for direct communication between family members.
- Customizable Circles: Users can create different ‘circles’ for groups, such as immediate family, extended family, or friends, to manage who can see their location and updates.
Life360 is particularly popular among parents for monitoring their kids for safety reasons, but adults also use it to coordinate with other family members or friends. While the app’s basic functionality is free, Life360 offers premium subscription plans that provide additional features like extended location history, non-smartphone location tracking, and more detailed driving analysis.
How to change home address on life360?
Since the app is designed to put GPS pins in different locations, it allows you to change your home location easily. However, it’s not exactly an intuitive procedure. You may not immediately understand how to do it. All you have to do is :
- First, you need to go to the “Places” menu. It displays the home and all the other pins you have set on your map. It will appear as a building icon.
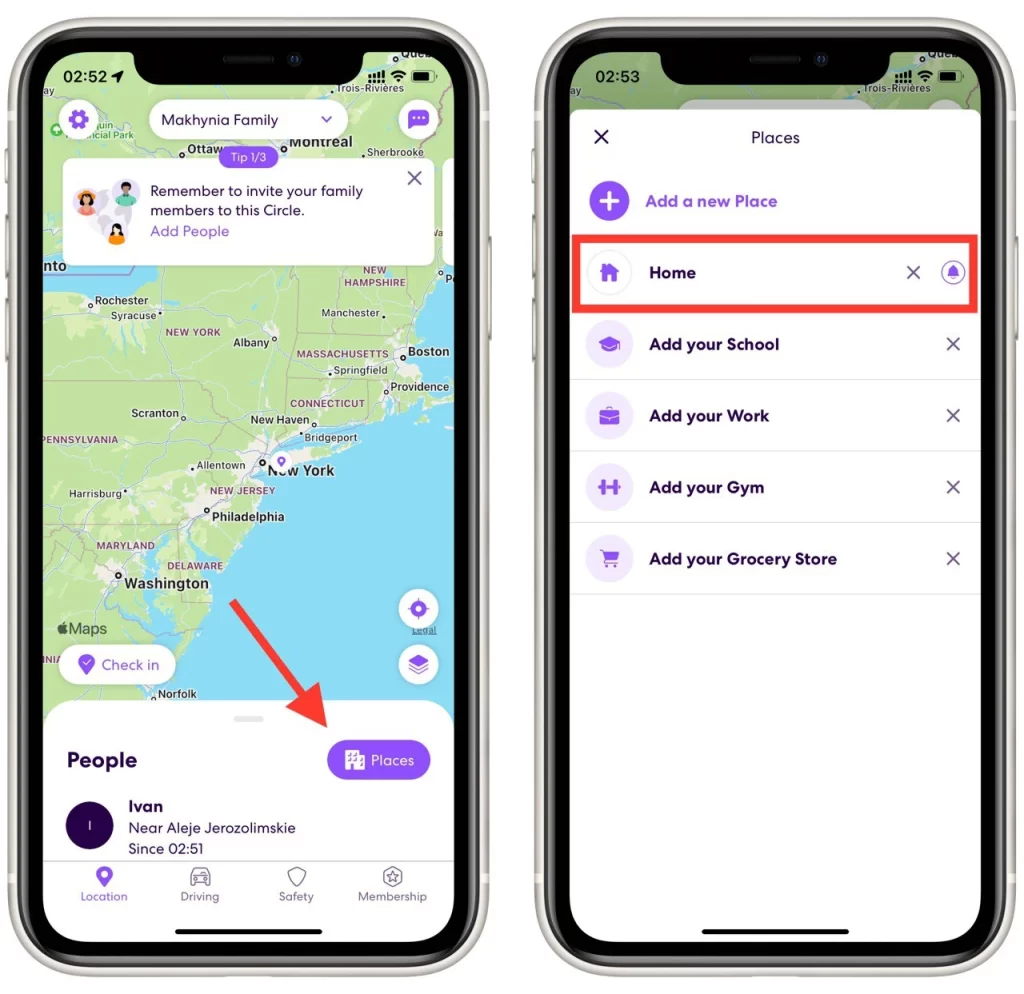
- Your home usually appears at the top of the screen. You need to click on it, which will open the Settings menu. You will then have three options available to you:
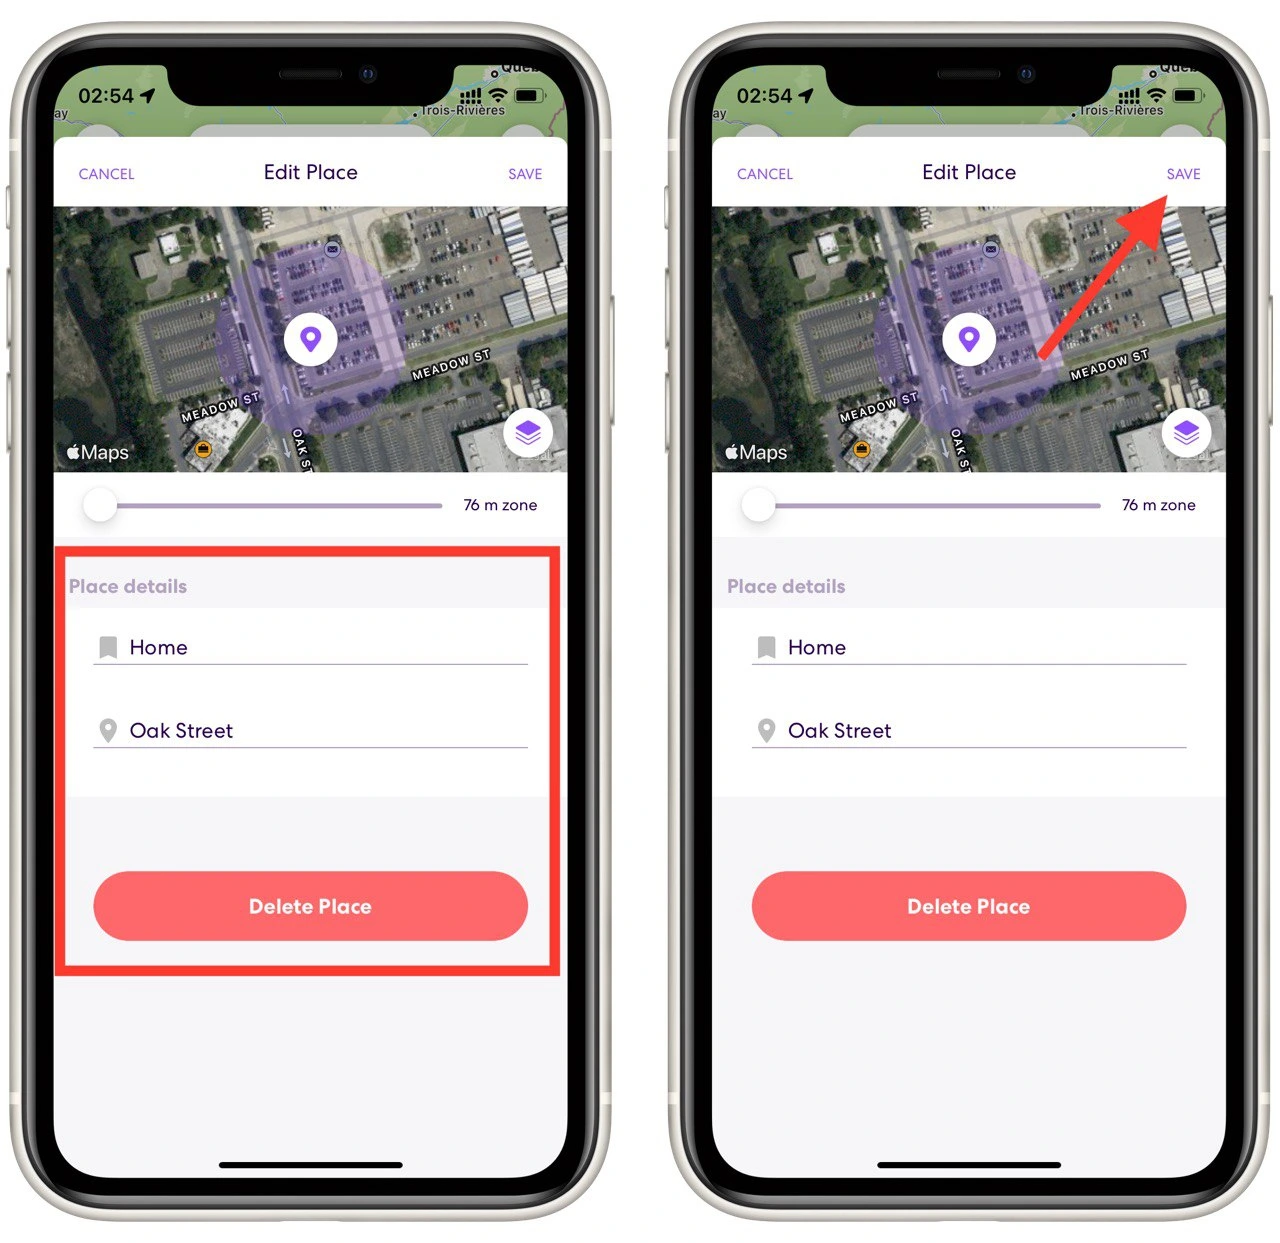
- Delete Place – This will remove the pin completely from the map. You will then need to set up a new home location
- Change the Label – Click “Home” under “Location Details” and rename the location as you wish
- Change Location – Select an address under “Location Info” and enter a new address for your home
- Once you are finished, click Save in the upper right corner of the screen, and your information will be updated.
This way, you can edit any saved locations you have added to Life 360. Note that the app uses Apple Maps to locate locations. So, if you want to add a bookmark to a location not marked on Apple Maps, you will need to enter that location’s address or exact coordinates manually.
How to hide your home location and stop tracing your location
There’s no way to hide your home’s location in the Life360 app. You can only delete that tag. If you don’t want your loved ones to know your new address, don’t change it. Leave your old location and don’t change it when you move.
The app also allows you to stop tracking your location. This is useful when you don’t want anyone to know where you are and what you are doing. You can enable or disable location tracking of your device within the app at any time. To do this, you need to
- Go to Settings using the gear icon in the top left corner of your app.
- Next, you need to find Location Sharing.
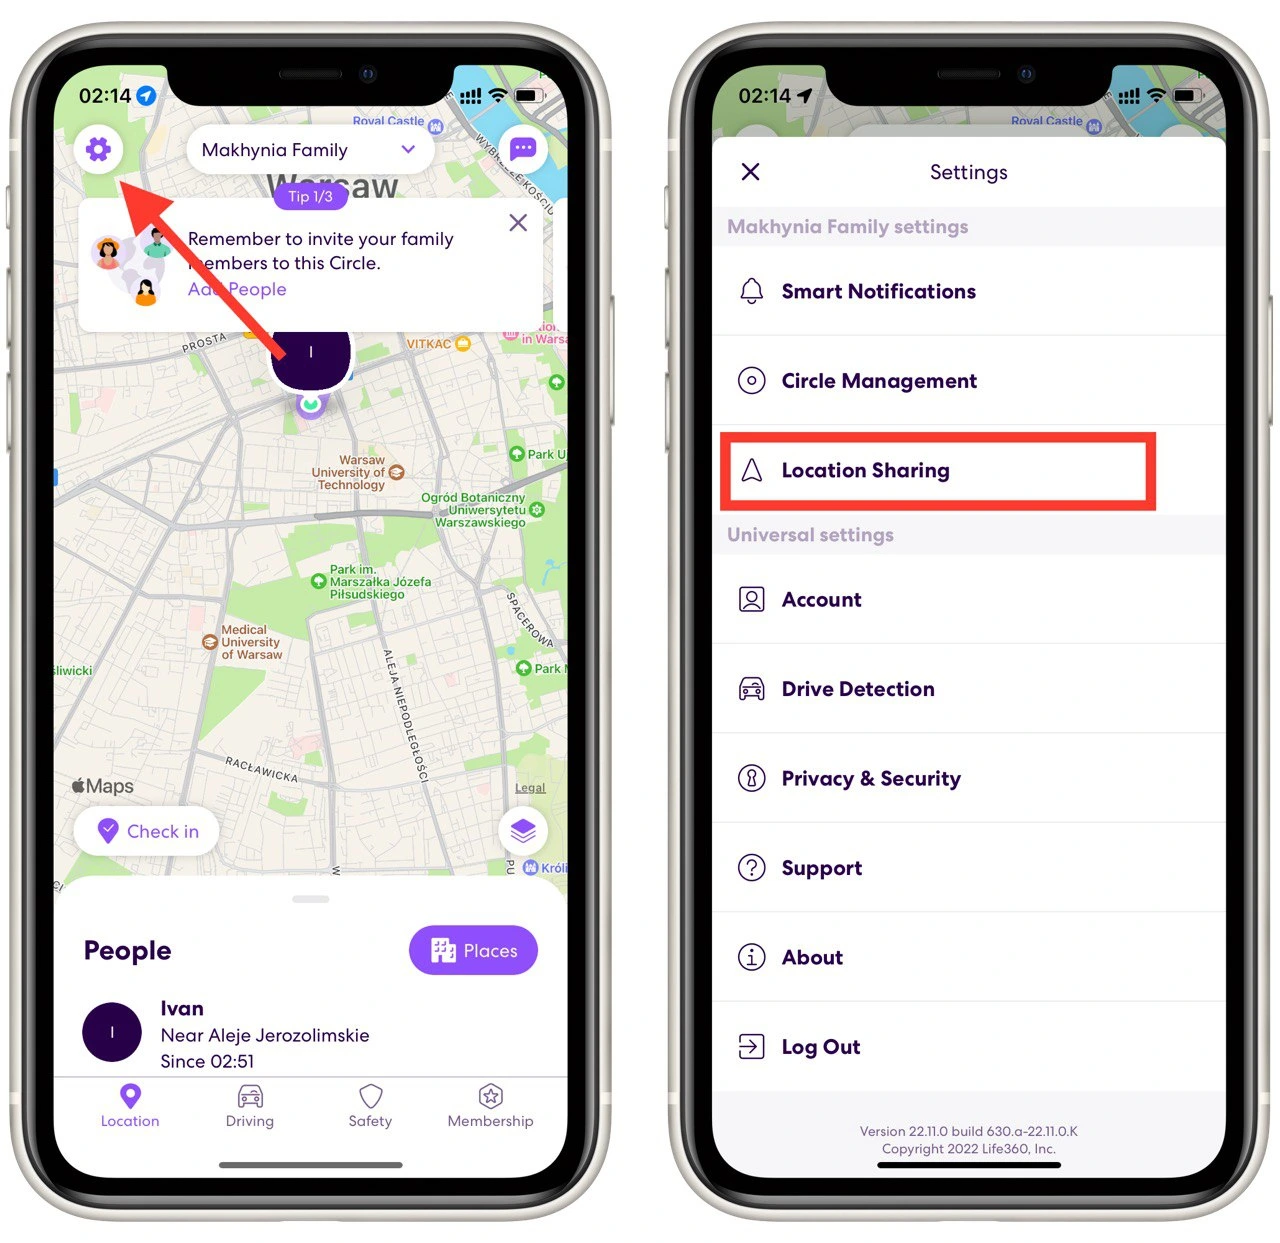
- In the Location Sharing tab, find your device in the list and disable location sharing.

The map will then show your last recorded location, and family members will not be able to see that the tracking has stopped. You can also disable this feature if you turn off the geolocation services on your smartphone. The instructions will vary from device to device, but you can usually do this directly in the Device Settings using the Location tab.
How to add people to your family in Life 360
For other users to share your location and get to know yours, you’ll first need to create your own family in Life 360. After that, you’ll need to add new members. It’s easy to do:
- At the top, click on the button with your family name.
- On the right side, click on the button with the person silhouette and a plus sign.
- You will see a code to add family members. Tell it to the people you want to add so they can join.
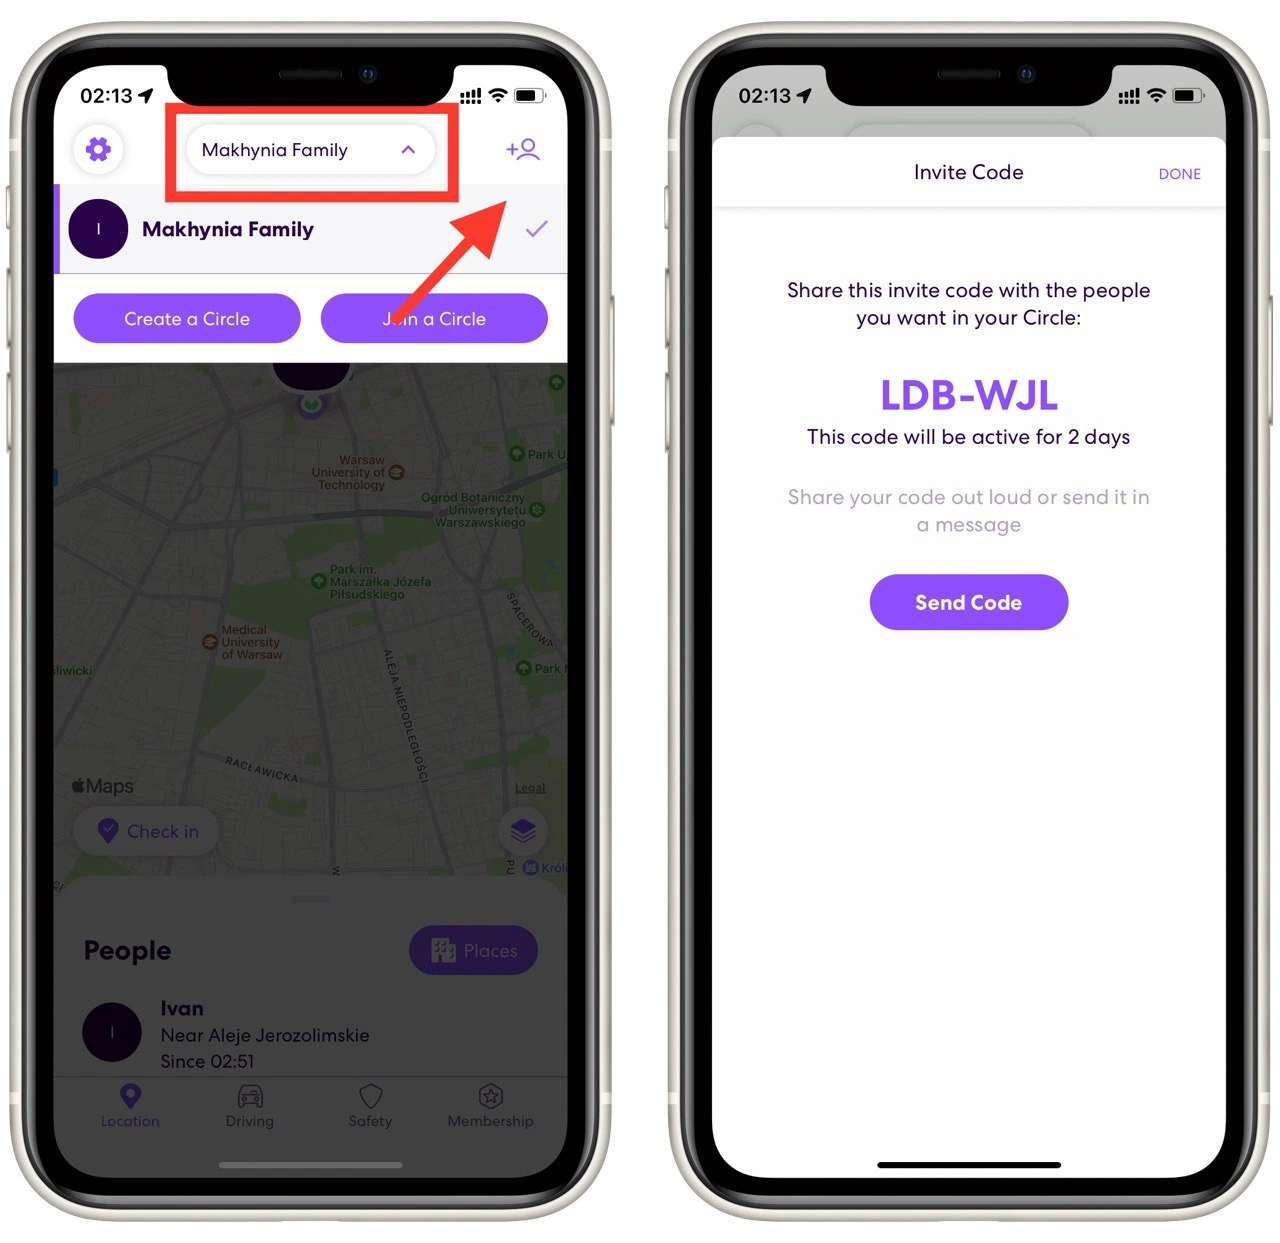
Note that any Life 360 user can join your family with this code. It will be active for two days, then lose its status, and you need to generate a new code. Also, right in this menu is a Send Code button that will help you automatically send the code to the most popular messengers or social networks.
How to change someone’s name on life360
Changing someone’s name in the Life360 app is a straightforward process, but it’s important to note that only the person whose name is being changed can make this update. Here’s how it can be done:
- Open the Life360 App: The person whose name needs to be changed should open the Life360 app on their device.
- Go to Settings: Tap the ‘Settings’ icon, usually represented by a gear icon in the app’s interface.
- Access Profile Settings: Within the settings menu, there should be an option for ‘Profile’ or ‘Account.’ Select this to access the personal profile settings.
- Edit Profile Information: In the profile settings, look for an option to edit the profile. This might be represented by an ‘Edit’ button or a pencil icon.
- Change the Name: Find the field for the name and enter the new desired name. This might be broken into ‘First Name’ and ‘Last Name’ fields.
- Save Changes: After changing the name, save the changes. There should be a ‘Save’ or ‘Done’ button to finalize the update.
- Notify Circle Members: After changing the name, informing other members of the Life360 circles might be a good idea, as the change will also reflect in their view.
How do I rename a place on Life360
Renaming a place in Life360 makes it easier to identify it and helps you personalize and quickly recognize essential places. For example, you’ve created a place called “Park,” but the park is significant, and you may want to refine your meeting location. Or, for example, you’ve arranged to meet at a large mall; of course, it would make sense to localize the meeting place and wait at a convenient location, such as a pizza place. Here’s how you can rename a place:
- Open the Life360 app: First, open the Life360 app on your smartphone.
- Go to the Places feature: Select the Places tab. This will display your saved locations (e.g., home, school, work).
- Select a place to rename: Find the place you want to rename in the list of saved places.
- Edit a place: Click on the specific place you want to rename. The option to edit or change the location’s information will appear.
- Rename Place: In the edit section, you will find a field for the name. Delete the existing name and enter a new name for the place.
- Save Changes: After renaming the place, save the changes. This is usually the “Save” or “Done” button.
- Check the changes: Return to the Places list to ensure the name change was applied correctly.


